RMG Tutorial
View this guide on Google Docs to:
- Save as PDF or any common doc format
Share
About RMG
This tutorial is to help you with RMG for Windows. RMG stands for “Rosalie's Mupen GUI”. RMG is one of the best and most accurate Nintendo 64 emulators. I recommend it as #1. RMG is focused on a simplistic, sleek GUI design and pays homage to the look and feel of Project64. The project aims to close the gap between Project64 and Mupen64Plus regarding user experience. It can play games like Resident Evil 2, Rogue Squadron, Pokemon Snap, and World Driver Championship “out-of-the-box” (without the need to fiddle with settings, plugins, or anything of the sort).
RMG is equipped with lots of neat features. There's a variety of options to enhance the 2D and 3D graphics. Cheats are included; to enable cheats, you simply put a check in the boxes for the cheats you want. Best of all, RMG auto-updates! Auto-updating is a highly convenient and valuable feature.
Should you use RMG?
With all the emulator offerings as of 2026, should you use RMG? Yes, absolutely. Currently, the emulation community considers RMG and m64p (Mupen64Plus) as the two top emulators for N64 emulation. I personally consider RMG to be #1 because I think it's the most user-friendly. It's also more active in development versus m64p.
You may also want to check out RetroArch, a popular multi-system emulator. It includes a core (an emulator) for Mupen64Plus. With RetroArch, it's convenient to emulate all of your favorite systems under the same roof.
You might be thinking, “What happened to Project64?” Project64 was a top emulator from the beginning. It remained the #1 N64 emulator for nearly two decades. It was only recently dethroned in the early 2020s. At the time I'm writing this, Project64 is currently in the middle of a major code rewrite in preparation for a version 4.0 release. Until they finish, Project64 is not considered a top emulator.
Downloading RMG
You can download RMG from the official Github page. Upon arrival, you'll see three download links:
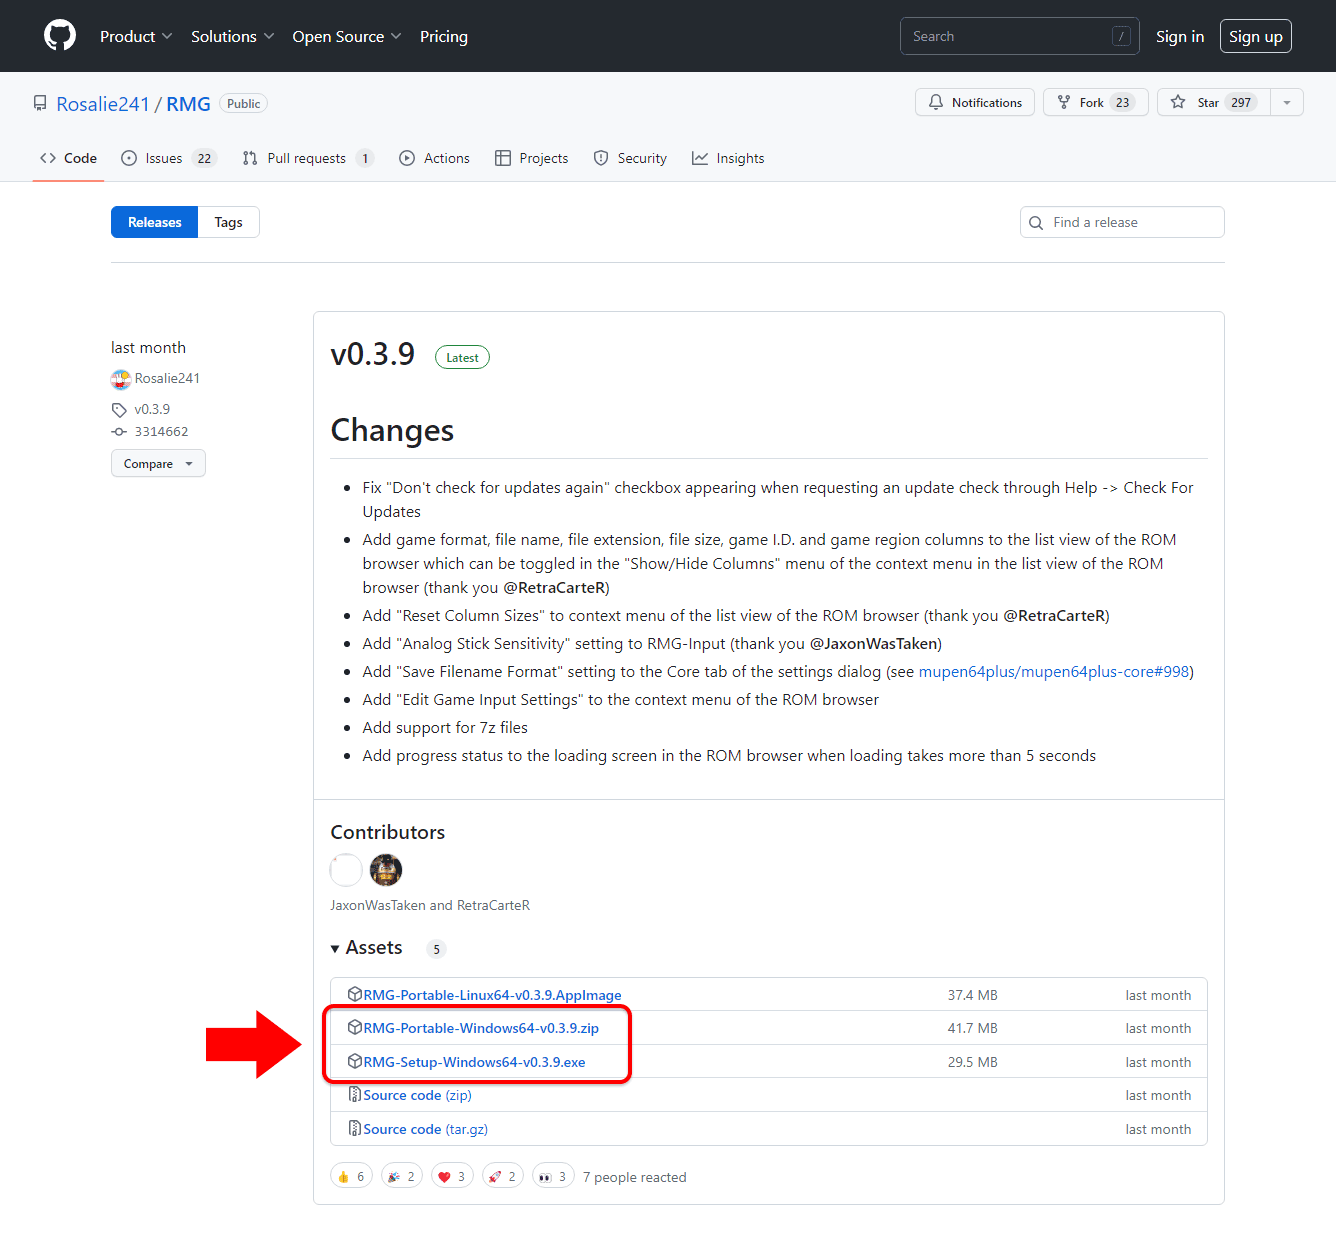 Downloading RMG
 - RMG-Portable-Linux64-v0.X.0.AppImag - Linux version
- RMG-Portable-Windows64-v0.X.0.zip - Portable version for Windows
- RMG-Setup-Windows64-v0.X.0.exe - Install wizard for Windows
As Windows users, what matters to you is the 'portable' version and the 'setup' (installer) version. What's the difference?
- The Installer version - This is an easy install wizard that installs RMG like a normal Windows app. If in the future you want to uninstall RMG, you can do it through Windows.
- The Portable version - A 'portable' program is one that can be placed anywhere on your computer. The program is self contained in the folder and saves everything within that folder. Hence, that is the nature of RMG's portable version. However, although a portable program can be placed anywhere, it's still important to only place it in a common location on your computer such as Documents, Downloads, or create a folder on your desktop. If in the future you want to uninstall RMG, simply delete its folder.
Installation
As pointed out above, you have two versions: 'setup' (installer) and 'portable'.
Installing via the installer
- Double-click on the install EXE for RMG .
- You might get the Windows scare prompt, Windows protected your PC . This prompt is just a precaution Windows gives for any EXE you download from the Internet. There's no cause for alarm here. I assure you, RMG is a trusted emulator. To proceed, click More Info, then Run Anyway.
- On the first screen , the wizard wants you to agree to the license agreement. Just click Next.
- On the next screen , RMG wants to confirm the install location. Unless you're particular about where you want RMG to live, you can leave it at the default path and click Next.
- On the next screen , RMG asks if you want to create a desktop shortcut. It's up to you. Click Next.
- On the last screen , RMG confirms the install location. Click Install when you're ready to begin the installation.
- After installation, click Finish. That's it! RMG is installed and ready to go. Remember, if at any point you want to uninstall RMG, you can do it through Windows.
Installing the portable version
Installation is simple: just extract RMG from its zip file. To make things clearer, check out the video below that shows how to 'install' a portable emulator (it shows Snes9x, but RMG is the same process). It's pretty straight-forward - all that you're doing is extracting a zip file while doing a little bit of folder management. If you want to 'uninstall' a portable emulator, simply delete it!
In the video, I'm recommending “Documents” to house your emulators. But, you could also place emulators in “Downloads”, a folder on your desktop, an external HDD, or a thumb drive. These are common locations with full read/write access.
Setting up the keyboard or gamepad
By default, RMG's inputs are blank. It falls on us to configure the buttons after installing RMG. Here's how:
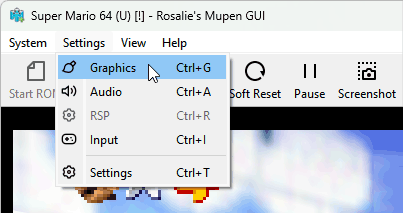
- Go to Settings > Input (or press Ctrl+I), as shown below.
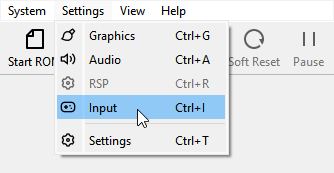
- You'll arrive here , to a big window with an N64 controller and a bunch of locked field boxes that you can't click. RMG first wants you to select the input device. In “Input Device”, select Keyboard if you want to configure your keyboard (as shown below). If you want to configure a gamepad, select the gamepad option. However, the option for a gamepad will only appear if your gamepad is plugged in and detected by Windows.
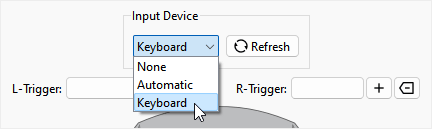
- Once the input device is selected, all the field boxes for the buttons will become active and ready to configure. So now, just click on every blank field one at a time to configure a button to a keyboard key or gamepad button.
Loading a game
Upon opening RMG for the first time, you're going to see this:
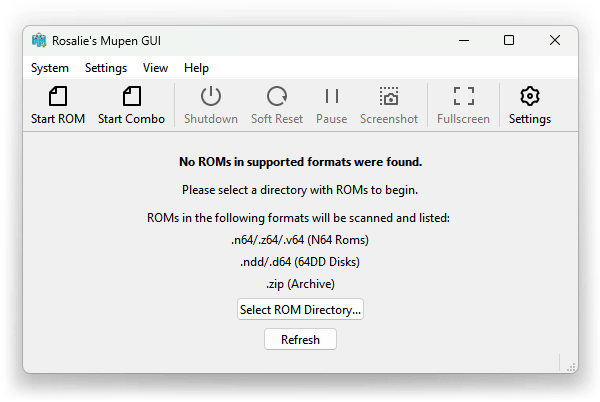
RMG encourages you to select a ROM directory (the folder that contains your N64 ROMs). You don't have to if you don't want to. You could just click the ![]() button and select a ROM. Either way, I'm going to walk you through both these methods.
button and select a ROM. Either way, I'm going to walk you through both these methods.
Before we begin, it's important to note what file formats RMG supports. It's ok if your ROMs are in zip files, but if they're in RAR or 7Z format they must be extracted. You can use 7-Zip (it's free) to extract RAR and 7Z files. RMG supports N64 ROMs that are in .n64, .z64, and .v64 file extensions. If you currently don't see file extensions for any files, you can show them.
Method #1 - Loading a game manually
- Click the large
 button. Or you can go to the System menu, then Start ROM (shown below). Or you can press Ctrl+O.
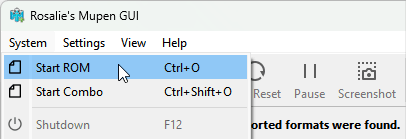
- Navigate your computer to the folder where your N64 ROMs are located. Select the ROM you want to play, then click Open - as shown here .
- That's it! The game should begin immediately. The game will be sharp and pretty , as RMG is already pre-configured for upscaled 3D and optimum settings.
Method #2 - Setting up the ROM directory
- Click the
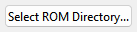 button.
 - Navigate your computer to the folder where your N64 ROMs are located. Note that the folder will appear empty. Once there, click Select Folder - as shown here .
- If you have a lot of N64 ROMs, give RMG a moment to process all of them. It could take a couple of minutes. It'll look like this while it's processing. When finished, all of your N64 ROMs should appear in a nifty list:
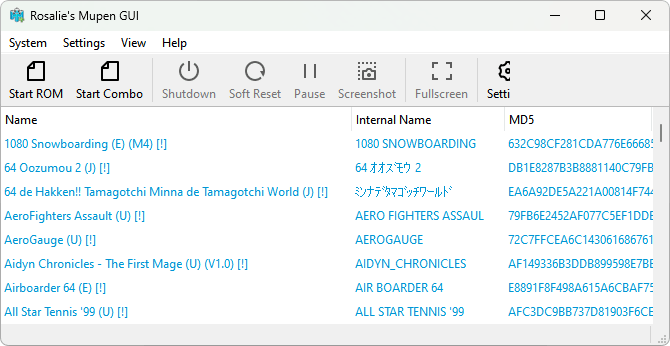
- If you have hundreds of ROMs, navigating this list might be a little daunting. You can speed up searches by selecting a ROM, then press the letter on your keyboard for the ROM you want to play. For example, if you want to play Super Mario 64, tap “S” to jump to the S games. Or you can type “Super” to jump even closer to it. Then, to load the game, simply double-click it.
- That's it! The game should begin immediately. The game will be sharp and pretty , as RMG is already pre-configured for upscaled 3D and optimum settings.
Are your N64 ROMs not showing up? If you tried to set up the ROM directory and RMG doesn't detect any of your N64 ROMs, that could mean one of these reasons: (1) You didn't extract your N64 ROMs from their 7Z or RAR archives, (2) Your N64 ROMs are corrupt, or (3) The ROMs you selected aren't N64 games. If you fall under reason #1, download 7-Zip (it's free) to extract your N64 ROMs. If you fall under reason #2 or #3, try downloading N64 ROMs from a different website.
Upscaling graphics
This is optional. You may want to increase the resolution if you: (1) Want to increase the size of the screen in window mode, or (2) Want to increase the sharpness of the 3D graphics when in fullscreen.
Here's how to upscale the graphics:
- Go to Settings > Graphics (as shown below).
- This is the sexy screen where all the magic happens. The first thing you see is the Video tab . Before you change any settings, you first need to decide if you want these changes to be specific to the game or global. See below.

By default, RMG sets changes to be specific to the game. You may want to move the radio bullet to Settings profile to make the changes global. Clearly, for upscaling graphics, you'd want all games to have that same upscaling. - Now we can change the resolution. Click the “Windowed resolution” drop-down and select a higher resolution.
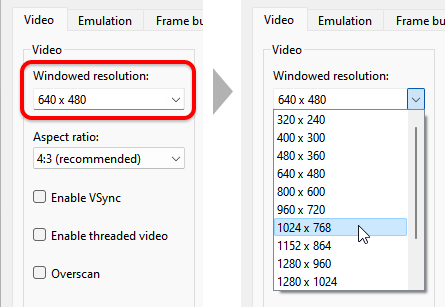
Click Save & Close when you're done. - Lastly, play the game a bit and make sure your computer can handle the increased resolution without lag or drops in frame rate. Press Alt+Enter to bring the game into fullscreen and test it there, too.
Enhancing graphics
This is optional. RMG gives you the option to add anti-aliasing to make the edges of 3D graphics appear a little smoother. RMG also gives you options for smoothing or sharpening textures. I'll walk you through both of these features.
First, go to Settings > Graphics. As mentioned above, you first need to decide if you want the graphics enhanced for only the current game or all games (see below). If you want the enhancements to be applied globally to all games, move the radio bullet to Settings profile.
Adding anti-aliasing
On the Video tab (in Settings > Graphics), look at this box:
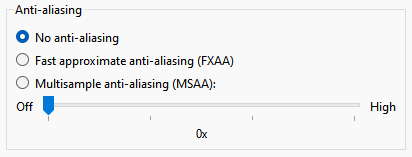
This is where you can change the anti-aliasing to 'Fast' or 'Multisample'.
No anti-aliasing (default)

Fast anti-aliasing
Multisample anti-aliasing
It's not a huge difference, but it does make the 3D graphics a little smoother. Put the radio bullet in the option you want. If you select multisample anti-aliasing, move the notch all the way to High for maximum enhancement. When you're done, click Save & Close.
Texture enhancements
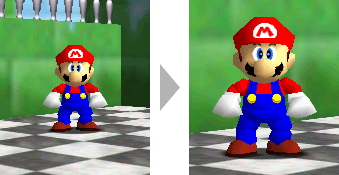
From the Video tab (in Settings > Graphics), click the tab for Texture enhancement. There are two drop-down options of importance here: “Filter” and “Enhancement” (see below).
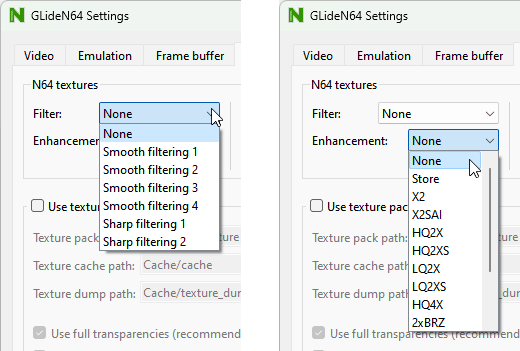
I captured some screenshots so you can see samples of these filters in action.
- Smoothing: Here's “Smooth filtering 1” and “Smooth filtering 4”
- Sharpening: Here's “Sharp filtering 1” and “Sharp filtering 2”


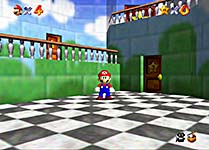
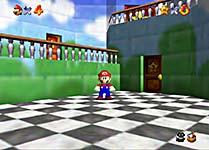
- Enhancement: The first picture shows “4xBrz” and the second shows “Sharp filtering 1” combined with “HQ2X”


Select the option(s) you want. Play around with these; mix & match the filters and enhancements to see which combination most appeals to you. If you haven't already, you may want to upscale the graphics to view these filters better. When you're done, click Save & Close.
Fullscreen
To enter fullscreen, click the  button. Or just press Alt+Enter (a common fullscreen shortcut for emulators).
If you're sick of doing this every time to bring games to fullscreen, you can set RMG to automatically load games to fullscreen. Here's how:
- Click the
 button. You could also go to the Settings menu then Settings.
 - On the first screen of Settings, look for an option that says “Automatically Switch To Fullscreen On Emulation Start” - outlined here . Put a check there, then click OK.
Save states
Save states is a feature that saves the exact spot you are in any game. You can use this feature manually by going into the File menu or by quick keyboard shortcuts.
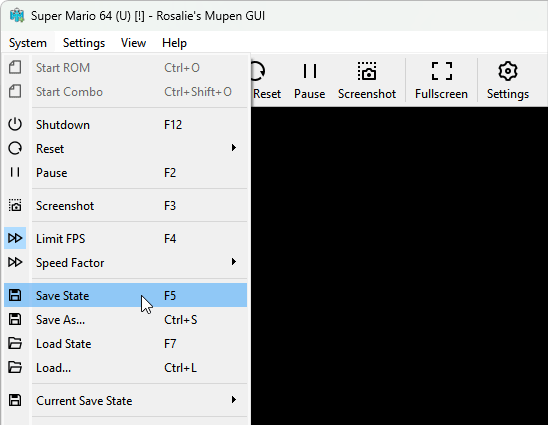
- Capturing a state: To capture a save state, go to System > Save State, or press F5.
- Loading a state: To load a state you previously saved, go to System > Load State, or press F7.
- Ten save slots! RMG lets you save up to 10 different save states. Go to System > Current Save State to change the slot.
- Want to save as a file? RMG lets you save states as a “.state” file. Let's say, for example, you want to save a state at the beginning of every stage and give each save a custom name like “SuperMario64-Stage1.state”, “SuperMario64-Stage2.state”, etc. You can do that by going to System > Save As. Then, to load a saved file, go to System > Load.
New to emulation? If you're new to video game emulation, I don't want to confuse you into thinking that save states are what you're supposed to use as the only means to save your progress with RMG. Save states are an optional feature. You can still save your game at save points as you would on a real N64. Although I do recommend using both save states and in-game saving so that you always have a backup. In-game saves are loaded at the game's title screen (like on a real N64) - they're not loaded via the System menu.
Fast forward
To explain how fast forward works in RMG, look at this screen:
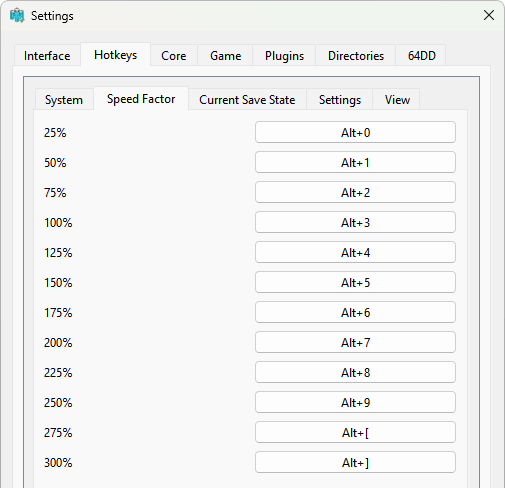
This screen is found by going to Settings > Settings > Hotkeys. RMG offers direct keyboard shortcuts for different fast forward speeds. For example:
- To double the speed, press Alt+7 for 200% fast forward.
- To triple the speed, press Alt+] for 300% fast forward.
- To bring the speed back to normal, press Alt+3 for 100%.
Using cheats
RMG comes included with cheats for all games! This is a pretty awesome feature. Enabling cheats is very easy.
- Load the game you want to apply cheats to.
- Go to System > Cheats.
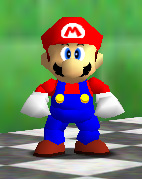
- You should see a list of cheats for the game. For example, here is the full set of pre-loaded cheats for Super Mario 64 . Click the chevrons next to the names of the cheats to reveal checkboxes. Put a check in the checkboxes for the cheats that you want to enable. When you're done, click OK. That's it! Enjoy the cheats.
Capturing screenshots
Screenshots with RMG are a tad complicated. Well, the action of capturing a screenshot is easy. It's finding the screenshots that can get tricky. If you're not very computer savvy, you might be intimidated by the process of finding your AppData folder to locate RMG's folder. Hence, it is my recommendation to change the default folder for screenshots before proceeding to capture screenshots. Here are directions to do so:
- Click the button. You could also go to the Settings menu then Settings.
- Once in Settings, click the Directories tab. Then click the Change button for “Screenshot Directory” - as shown here .
- Next, navigate your computer to locate your preferred location where you want RMG to send captured screenshots. My recommendation is to set it to Windows' “Pictures” folder. You can find the Pictures folder either in the left panel or when you click the notch at the top - as shown here . When you've located your preferred folder, click Select Folder to set it.
- Lastly, close and restart RMG for the directory change to take effect.
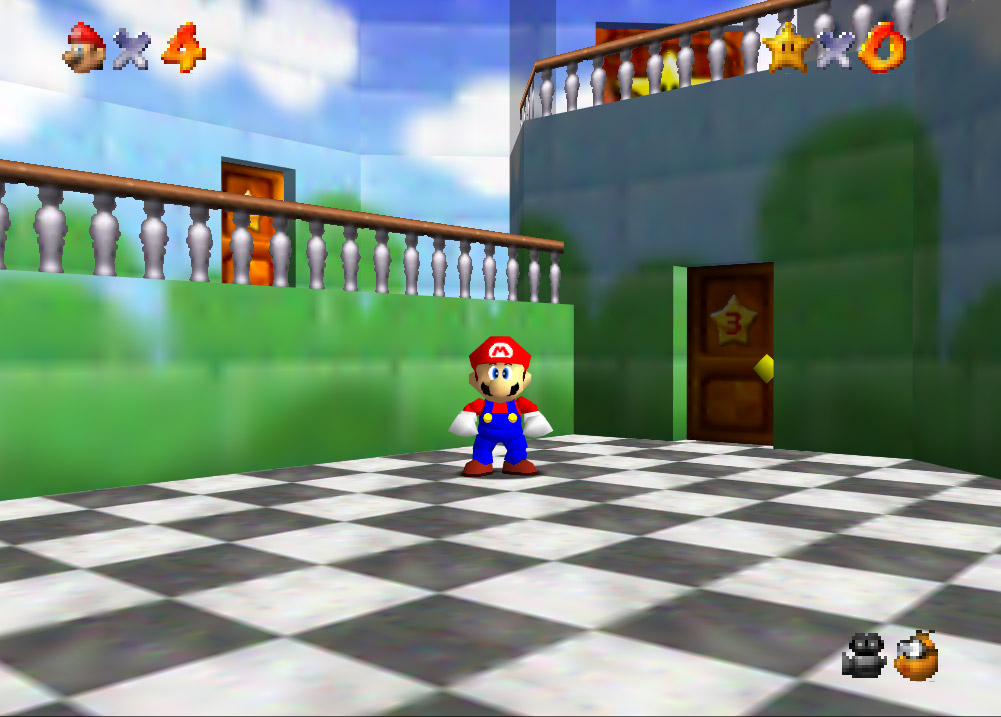
Now we can capture screenshots! While a game is open, click the  button, or tap the F3 key. On the lower-left, you'll see a little message “Captured screenshot”. Your screenshot will appear in your preferred location for screenshots as a PNG file.
Finding ROMs
In my links page, I have some good links to sites where you can download ROMs. Archive.org is a superb site where you can find ROMs. Navigating that site isn't easy. It's easier to search Google with such phrases as “archive.org nintendo 64”. I offer some more help with that in this image .
Another way you can try to find games is through Reddit. The best way to find them is by searching Google with such phrases as “reddit download nintendo 64”.