Gens/GS Tutorial
- About Gens/GS
- Should you use Gens/GS?
- Installation
- Setting up the keyboard or gamepad
- Loading a game
- Full screen mode
- Q: Gens/GS crashes when entering full screen!
- Screen filters
- Save states
- Capturing screen shots
- Using Game Genie
- Fast forward
- Finding ROMs
- Q: Can I transfer my saves to another emulator?
- Q: Gens/GS isn't saving anything!
Sega CD
- Intro to Sega CD emulation
- Sega CD BIOS
- Setting up the BIOS
- Loading Sega CD games
- Perfect Sync
- Formatting Sega CD's memory
- CD Swapping
- Removing Sega CD LEDs
- Q: I get a 'Backup RAM not initialized' error!
- Q: My Sega CD game freezes in the beginning!
- Q: My Sega CD game isn't playing music!
- Q: Game loads blank with audio index error!
Copying
View this guide on Google Docs to:
- Save as PDF or any common doc format
Share
About Gens/GS
This tutorial is to help you with Gens/GS. It's an excellent emulator for Genesis, 32X, and Sega CD. It comes with a bunch of neat features as well.
Gens/GS is a continuation of “Gens”. In the 2000's, Gens was the #1 emulator for Genesis emulation. In time its creator abandoned Gens. As his final gesture he made its source code freely available. People took advantage of the free code and made their own versions of Gens. There are around 10 different versions of Gens that have branched off the original (this page has a list). For the most part these branched emulators are basically the same, so you can still use this tutorial to help you.
I must point out that Gens/GS was last updated in 2009. The original Gens before the forked version was last updated in 2006. That needs to be considered before you decide to use this emulator.
*If you would like to download Gens/GS, I have it on my emulators page.
Should you use Gens/GS?
With all the emulator offerings as of 2026, should you use Gens/GS? Well, it depends. The current #1 Genesis/Mega Drive emulator (regarding accuracy and compatibility) is “Genesis Plus GX”. It also supports Sega CD/Mega CD. However, Genesis Plus GX is not available as a standalone emulator and can only be used in multi-system emulators such as RetroArch and BizHawk. There's also the fact that Gens/GS was last updated in 2009. It may not run well on Windows 10 and 11.
Kega Fusion has always been a strong competitor to Gens (and Gens/GS). Not everyone is fond of using multi-system emulators, so many people are still using Gens/GS or Kega Fusion despite knowing Genesis Plus GX is the superior emulator. When it comes to Gens/GS versus Kega Fusion, people generally prefer Kega Fusion.
Installation
Gens/GS is a standalone program, so it does not have an install wizard. Installation is simple: just extract Gens/GS from its zip file.To make things clearer, check out the video below that shows how to 'install' a portable emulator (it shows Snes9x, but Gens/GS is the same process). It's pretty straight-forward - all that you're doing is extracting a zip file while doing a little bit of folder management. If you want to 'uninstall' a portable emulator, simply delete it!
In the video, I'm recommending “Documents” to house your emulators. But, you could also place emulators in “Downloads”, a folder on your desktop, an external HDD, or a thumb drive. These are common locations with full read/write access.
To open Gens/GS, double-click on ![]()
Setting up the keyboard or gamepad
- Click on Options > Joypads, as shown here . You'll end up here:
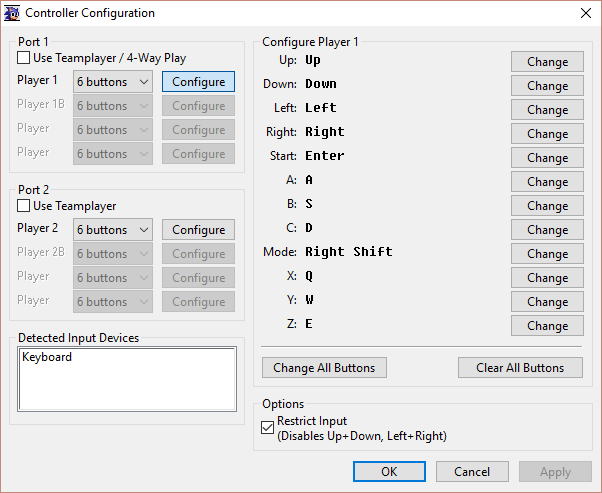
In the “Configure Player 1” panel you see which keyboard keys are associated with which button on the virtual Genesis controller for Player 1 (as Port 1). If you're okay with Gens/GS's default keyboard setup, then you don't need to continue with these directions - unless you want to configure a gamepad. - The first step in configuring the keyboard or a gamepad is to decide on the controller type. The Genesis had two types of controllers: a 3-button and a 6-button controller. They looked like this:
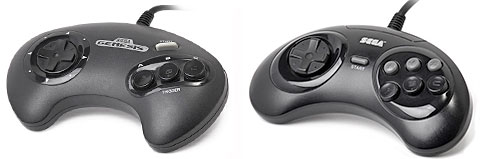
By default, Gens/GS is set to emulate the 6-button controller. You can change it to a 3-button controller by clicking on the drop-down selection next to Port 1, as shown here . - If you want to configure a gamepad, first plug your gamepad into your computer. If Gens/GS is open then close it and re-open it.
- To change a specific button, click on the Change button associated with the button you want to change, as shown below:
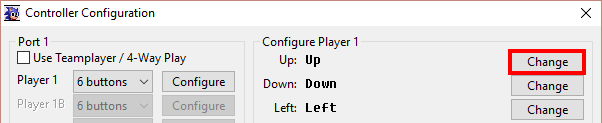
Gens/GS will ask you to press a button. Go ahead and press a keyboard button (if you want to reconfigure the keyboard) or press a gamepad button (if you want to configure your gamepad). - To change all buttons, click on the Change All Buttons towards the bottom, as shown below:
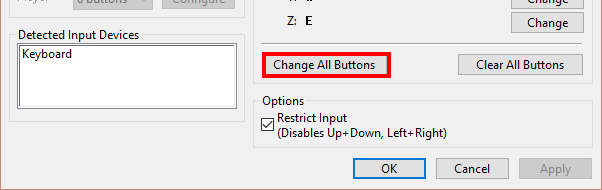
Same as above, press the keyboard key or gamepad button that you want configured for the virtual Genesis controller. Gens/GS will automatically cycle you through all the buttons. - That's it! Click OK when you're done. To configure buttons for Player 2, under Port 2 click on Configure and repeat the same process.
Loading a game
*For loading a Sega CD game, visit the section in this tutorial dedicated to Sega CD.
Video game emulators typically have a dedicated “roms” folder. Gens/GS does not. You can place the Sega ROMs you downloaded anywhere you want. You can place them inside Gens/GS's folder or somewhere else. It doesn't require them in a specific location.
Here's how to load a game:
- Click on the File menu, as so:

- The “Open” window will pop up. From this window navigate to the folder where your Genesis and/or 32X ROMs reside. Click on the game you want to play, then click Open - as shown here .
- The game will begin playing immediately.
Full screen mode
To bring Gens/GS into full screen, go to Graphics > Full Screen. Or press Alt+Enter. While in full screen mode you can access Gens/GS's menu by right-clicking on the screen. And then to exit full screen, press Esc or Alt+Enter.
Q: Gens/GS crashes when entering full screen!
Although Gens/GS is a top emulator, the fact still remains that it hasn't been updated in a long time. When using Windows 8 or Windows 10/11, Gens/GS may behave funny (display weird artifacts at the top) or even crash when you jump into full screen mode. You should be able to fix this by using the Windows Compatibility feature to have Gens/GS emulated under an older version of Windows. Here's how to set it up:
- Right-click gens.exe and left-click Properties.
- Click on the Compatibility tab. You will end up here .
- Here's the tricky part. I can't tell you what to do here because every video card is different.
- You can start by clicking Run compatibility troubleshooter and follow the wizard. Try “Try recommended settings” first. If that doesn't fix it, try “Troubleshoot program”.
- You could also try running Gens/GS in compatibility mode under Windows 8 & older under “Run this program in compatibility mode for”. Probably Windows 7 or (even older) Windows XP is your best bet.
- Lastly, there's a small annoyance that might happen upon setting Gens/GS to emulate under an older version of Windows. From now on, every time you open it you might be prompted by this message: “Do you want to allow the following program from an unknown publisher to make changes to this computer?”. Every time you will have to choose to accept that message.
*If Gens/GS continues to crash after the first full screen crash, that means Gens/GS saved the faulty video setting. To resolve this you need to go into Gens/GS's folder and delete the gens.cfg file.
Screen filters
Screen filters enhance graphics to make them look better than the real thing! You can access the list of screen filters by going to Graphics > Render, as shown below:
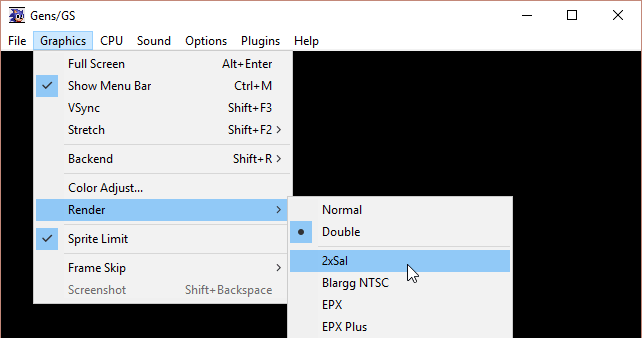
Simply click on a filter. Gens will immediately render the screen with the filter you chose.
The filters
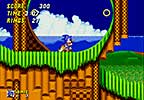
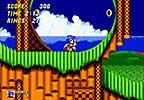
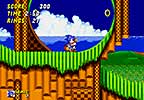
Here's some explanation and samples for these filters:
- 2xSal, SuperSal, 2xSal: smears pixels together with a slight blur. Samples:


- Blargg NTSC: an impressive filter that realistically simulates a TV! Sample:
- EPX, EPX Plus: attempts to round together pixels without any aliasing (blurring). Sample:

- hq2x, hq3x, hq4x: like EPX but does a much better job of pixel-rounding. Sample:

- Scanline, Interpolated Scanline: adds dark horizontal lines to simulate a TV. Samples:


- Scale2x, Scale3x, Scale4x: attempts to round pixels together without any aliasing (blurring). Sample:


Save states
Save states is a feature that saves the exact spot you are in any game. You can use this feature manually by going into the File menu or by quick keyboard shortcuts. Note that this feature is intended for Genesis and 32X games. Save states don't work well with Sega CD games.
There's one detail about save states with Gens/GS that can be confusing. There are two types of them. You have quick saves and regular save states.
Quick saves
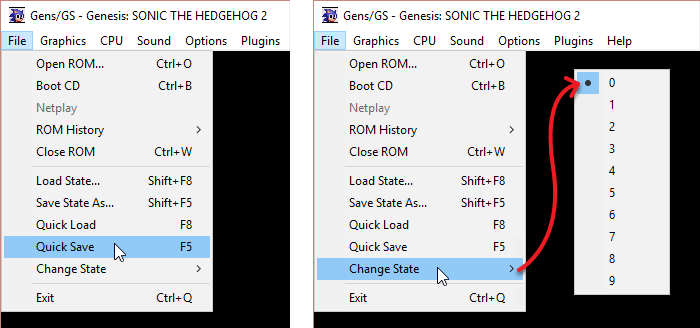
- Capturing a quick save: To capture a quick save go to File > Quick Save. The keyboard shortcut for saving a quick save is F5.
- Loading a quick save: To load a quick save that you previously saved, go to File > Quick Load. The keyboard shortcut for loading a quick save is F8.
- Ten save slots! Gens/GS allows you to save up to 10 different quick saves. By default, it is set to slot “0”, the first slot. You can change the slot by going to File > Change State. Or press F6 (backward) & F7 (forward) to change slots.
Regular save states
The less convenient regular save state feature has a few purposes.
- By going to File > Save State As you can enter a custom filename for your save. For example, if you're playing Sonic the Hedgehog you can capture a save state at the beginning of every stage and call each save “Stage 1”, “Stage 2”, etc. One annoying detail is that Gens/GS doesn't automatically put a file extension. You can enter “.gs0” as the file extension. Otherwise, your saves won't appear when you try to load them, unless you enable the option to show all files.
- By going to File > Load State, it doesn't just load your save states. You can load save states from Kega Fusion. Through here you can also load save states from another version of Gens/GS on another computer.
*All the RPG shrines in my FantasyAnime.com offer complete collections of periodical game saves. With them, you can continue at any significant point in the game. I offer a Game Saves Tutorial where you can learn more about how to use somebody else's saves. You can also learn about how to transfer saves between other emulators.
Capturing screen shots
To save a screen shot just go to Graphics > Screenshot. You could also press Shift+Backspace. It'll be saved as a PNG image and tossed into Gens/GS's folder.
Using Game Genie
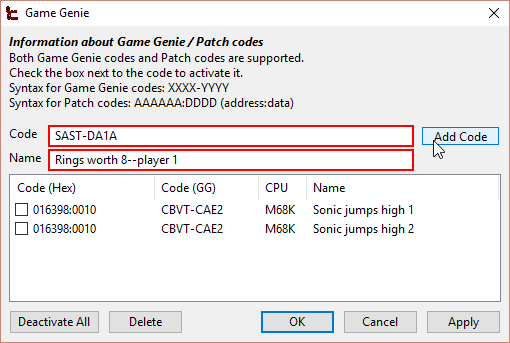
- First, load the game. Click on Plugins > Game Genie.
- In the “Code” field type the code. You could also Ctrl+V to paste it from a website. There cannot be any spaces in the code!
- In the “Description” field type a short description for the code.
- Click on the Add Code button to add the code.
- Repeat the process to enter more codes. Know that Gens/GS does support cheats with multiple lines. You need to enter such codes one line at a time, and in order. Click OK when you're done.
- Reset or reload the game. If the cheat doesn't work then you either typed it wrong or it's a bad code.
Finding cheats: Use Google. The best search keywords to use is to type the name of the game then “game genie”. For example: “sonic the hedgehog game genie”.
Fast forward
Fast forward is the feature that speeds up the game. Typically, emulators have a single fast forward button with a set speed. Gens/GS does things a little differently by letting you customize the speed increase. You enable fast forward by pressing F4 to increase the frame skip. You can keep pressing it to increase the speed, up to a digit of “9.” F3 decreases the frame skip. F2 sets it back to normal speed.
Finding ROMs
In my links page, I have some good links to sites where you can download ROMs. If you want to try to find more sites than what's in my collection of links, just Google around. For example, if you want to download Sonic the Hedgehog just Google “download sonic the hedgehog genesis”.
Q: Can I transfer my saves to another emulator?
The only thing you can do is transfer Gens/GS save states to Kega Fusion. Other than that, I have not been successful transferring save states or SAV files (internal saved RAM) from Gens/GS to other Genesis emulators. With SNES emulators, SRM files (internal saved RAM) can be transferred to any other SNES emulator. Genesis emulators, however, have not stuck to a similar standard.
At least, Gens/GS isn't stingy with its saves as long as you keep using Gens/GS. You can easily share your saves with other people who are using Gens/GS. Or you can copy your saves for use on a Gens/GS on another computer.
Q: Gens/GS isn't saving anything!
If you're using Gens/GS for the first time and you're finding that you have all these problems:
- Save states aren't working. You save a state, then when you try to reload it nothing happens.
- In an RPG when you save your game at a save point and close/re-open Gens/GS, you find that the save is lost.
- Emulator configurations that you changed aren't saved. When you close/re-open Gens/GS, you have to make those configuration changes again.
Then your problem is that you currently have Gens/GS in a read-only location on your computer. You must move Gens/GS to a more common location such as Documents, Downloads, or a folder on your desktop.
Intro to Sega CD emulation
There are some important details you should know about Sega CD emulation.
When downloading Sega CD ISOs
Sega CD games existed on audio CDs. The first track is the data, and the rest of the tracks are the game's soundtrack. When people rip Sega CD games to be placed in a ROM website for the world to download, the game is prepared in a similar data+audio track structure as the real thing. There are a few different types of formats that people have prepared ripped Sega CD games as. They consist of one or more BIN files (the game's data), audio tracks, and a CUE sheet. The CUE sheet is a simple text file with a programmatic list of the audio tracks.
The following are the four types of Sega CD ISOs. When you download a Sega CD game from a ROM website, it'll be in one of these formats.
- A CHD
As of the early 2020s, this is the new popular format being distributed from sites. Unlike all the formats listed below, a CHD is a single file. A CHD game would simply be something like “Lunar - Eternal Blue (USA).chd”.- Important note: This new format is NOT compatible with Gens/GS. You need to use RetroArch (on Windows or Android) to run these games.
- A binary BIN/CUE: As of the early 2020s, this is another new format being distributed from sites. It looks like this when you open it. All files are BIN files. When you look at the CUE sheet , the BIN files are organized as the audio tracks.
- Important note: This new format is NOT compatible with Gens/GS. It'll load, but the audio tracks will be out of sync. You need to use RetroArch (on Windows or Android) to run these games.
- A standard BIN/CUE: This is how video game ISOs (for any CD-based system) are normally ripped as. It looks like this when you open it. When you look at the CUE sheet , the audio tracks are listed even though there are no actual audio files present.
- An ISO/MP3: This used to be the most popular format for most of the 2000s and 2010s when the Internet was slower. Converting the audio tracks to MP3 significantly reduced the file size of Sega CD games. It looks like this when you open it. ISO/MP3 is supported by Gens/GS and Kega Fusion. However, other Genesis emulators don't support ISO/MP3.
- An ISO/WAV: This is an ISO/MP3 with the audio tracks converted to WAV. This format renders the game compatible with any Genesis emulator (that supports Sega CD).
In casual conversation on the Internet, all the above formats are referred to as a “Sega CD ISO.”
Internal saving is handled differently
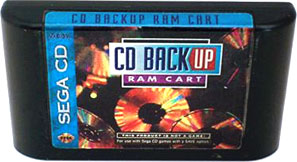 The Sega CD Backup RAM cart
Gens/GS treats Sega CD differently than the way things work with the real Sega CD system. The real Sega CD system has internal memory (which doesn't hold much) and external RAM carts. However, Gens/GS gives each game its own internal memory and its own external RAM cart. Cool, huh? That allows for a lot more space than the real thing.
There is one string attached, though. With the real Sega CD system, internal memory and each new RAM cart has to be formatted. And since Gens/GS gives each game its own internal memory and RAM cart, you need to be formatting it each time you play a new game. That is, games that require saving such as RPGs. Some games won't even allow you to play them until the memory is formatted. But don't worry! Formatting is quick and easy to do. I explain the formatting process here.
Copies work on the real thing!
Yes, any Sega CD game that you download can be burned to a CD-R and played on the real thing with no problem. The Sega CD system does not have any kind of copy protection. In this tutorial, I have a section about burning Sega CD ISOs to CD-R.
Sega CD BIOS
You need to download the Sega CD BIOS to boot Sega CD games. There's a different one for each region. You can download them here:
- US Sega CD BIOS (91.1 KB) - required for booting US games.
- Euro Sega CD BIOS (87.2 KB) - required for booting European games.
- Jap Sega CD BIOS (84.9 KB) - required for booting Japanese games.
Setting up the BIOS
- Once downloaded, extract the bios from its zip file and place it in the same folder that Gens/GS is in.
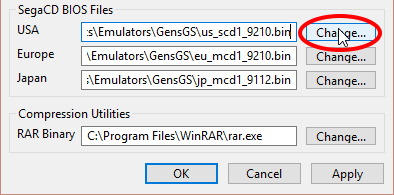
- Click on the Options > BIOS/Misc Files.
- Look under “SegaCD BIOS Files“ for the BIOS fields. Click on the Change button (circled in the picture above) for the Sega CD BIOS that you want to set. Navigate to the BIOS file, select it and click on Save. Click OK when you're done.
Loading Sega CD games
If you've been reading this tutorial since Intro to Sega CD emulation, then by this point:
- You have an understanding of Sega CD ISO formats.
- You understand how Sega CD handles saving differently than the real thing.
- You've downloaded & configured the Sega CD BIOS.
Now you can begin to load Sega CD games.
Loading a Sega CD ISO
- I'm assuming you downloaded a Sega CD game from a ROM site. Most emulation websites distribute their Sega CD downloads in a RAR or 7Z file. You would need to install 7-Zip (it's free) to extract the game from its RAR or 7Z file. Download & install 7-Zip. Once installed, you extract the game by right-clicking on it and going to 7-Zip > Extract Here, as shown here .
- If you downloaded an ISO/MP3 or BIN/CUE archive, it's important that it includes a CUE sheet. Sometimes they're not included. The game won't work without it. This is the CUE sheet . If it's missing, no worries. You can use this helpful utility, Sega CUE Maker (87 KB), to generate a CUE sheet.
- Open the CUE file in Notepad. And take a look at this screen shot . You are checking for the following:
- Make sure the name of the ISO matches the name of the actual ISO. It's okay if it's not case sensitive.
- Make sure all the audio tracks match the name of the actual audio tracks.
- Make sure all the audio tracks have the same audio format. If you have MP3 audio files, then the CUE sheet must show MP3 file types. If you encounter a CUE sheet that has WAV file types when the actual files are MP3, then within Notepad do a Find/Replace action to change them all to MP3.
- Okay! Now you can load the Sega CD ISO. Go to the File > Open ROM, as shown here .
- If the game is an ISO/MP3 archive, then you click on the CUE sheet to load the game.
- If the game is a BIN/CUE file, then you click on the BIN file to load the game.
- If the game is just a single ISO file, then you click on the ISO file to load the game.
- The first screen you see is the Sega CD BIOS screen (shown to the right). Just press Start and the game will begin.
 The Sega CD BIOS screen
*If upon pressing Start you see the CD player screen instead of the game, that's a problem. That means your Sega CD ISO is not valid. Review the steps above to ensure everything is correct. If all else fails try downloading that game from another ROM site.
Loading a real Sega CD or CD-R copy
First, I want to try to discourage you from trying to play a Sega CD game via your CD-ROM drive. The process is prone to have problems and you will experience slow loading times. Rather, what I do recommend is ripping your Sega CD game to a BIN/CUE. There is plenty of space on your hard drive for it. Plus it's good to have a digital backup of your game, just in case your physical copy gets lost or broken.
Here's how to load a real Sega CD game or CD-R copy:
- Insert the game into your CD-ROM. Wait a brief moment for Windows to load it. Close the “What do you want to do with this CD?” window if it pops up.
- Go to File > Boot CD. Wait a brief moment for the game to load.
*If you are using an old version of Windows (Windows XP, Windows 98, Windows ME) and Gens/GS does nothing when you try to boot your Sega CD game, try installing ForceASPI. - The first screen you see is the Sega CD BIOS screen (shown to the right). Just press Start and the game will begin.The Sega CD BIOS screen
*If upon pressing Start you see the CD player screen instead of the game, that's a problem. That means your Sega CD game is not valid. If it's a CD-R copy, then it is bad burn. If all else fails try downloading the game.
Now that you have your Sega CD game running, it's very important that you read the next two sections about Perfect Sync and formatting the memory.
Perfect Sync
You must know about Perfect Sync!! It's a feature that tells Gens/GS to give fewer commands with the emulation of a Sega CD game. Some Sega CD games require this feature to be enabled or else they will lock up at certain points in the beginning.
For example, “Popful Mail” won't boot past the Sega logo unless Perfect Sync is enabled. There are more games like that. You might be asking “Well, how come Gens/GS doesn't automatically enable Perfect Sync for the games that need it?“ I do not know. This is something we all have to live with.
To enable Perfect Sync:
- Click on CPU > SegaCD Perfect Sync (SLOW).
- Now load your Sega CD game. If you currently have a Sega CD game running, you need to restart it.
*Don't forget to remove the check from Perfect Sync when you're done playing that game. Having it enabled with games that don't need it may cause problems.
Formatting Sega CD's memory
This process is necessary for RPGs, and maybe some non-RPGs. It's essential to do this if the game gives you a “Backup RAM not initialized” error.
- At the Sega CD BIOS screen , press the button you set for B.
-
You will arrive at the CD Player screen (shown to the right). Move the hand to OPTION and access it.
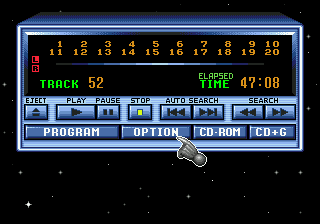 The CD Player screen on Sega CD
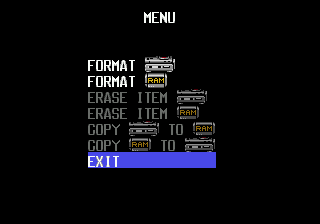 The Sega CD memory management screen
- You will arrive at a screen with some memory info, just continue.
- You will arrive at the screen where you can manage your memory (shown to the right). First format internal memory by going to
 .
. - Choose Yes to format.
- Next, format the RAM cart by going to
 .
. - Choose Yes to format.
- Now choose Exit.
- At the CD Player screen, choose CD-ROM to boot the CD.
CD Swapping
Some Sega CD games are two CDs such as Ground Zero Texas & Night Trap. When it comes time to change discs, you should see a flashing CD tray icon in the bottom left of the display. This means the emulated CD tray is OPEN. You can safely load a second Sega CD ISO (or swap a CD) at this point. That's it! It's very easy.
Removing Sega CD LEDs
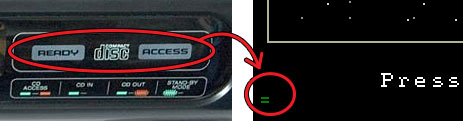
The Sega CD system has two lights that blink with when it's processing: a green 'READY' light and a red 'ACCESS' light. To make the Sega CD emulation experience a bit more authentic, these lights are indicated on the lower left of the screen. Personally, I find them to be distracting. Here's how to remove them:
- Go to Options > General Options.
- Remove the check from Show SegaCD LEDs.
Q: I get a 'Backup RAM not initialized' error!
You need to format the memory.
Q: My Sega CD game freezes in the beginning!
You need to enable Perfect Sync.
Q: My Sega CD game isn't playing music!
Read through the section about loading Sega CD games. Pay attention to the parts about verifying the CUE sheet.
Q: Game loads blank with audio index error!
Upon loading a Sega CD game, Gens might just give you a black screen with a weird audio index message at the top:
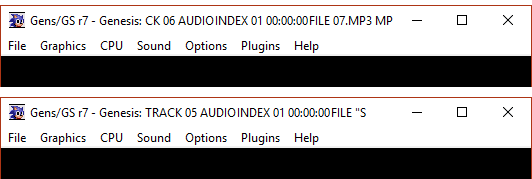
I'm not sure what causes this issue. This happens sometimes when you load a CUE sheet. The fix is to load the BIN or ISO instead.
Dumping your Sega CD games to ISO
Perhaps you prefer using your own Sega CD games instead of downloading them from the Internet? Or maybe you just want to keep backup copies of your Sega CD games? Whatever the case, here's how you can dump your games:
- Download & install RetroArch for Windows. It's the #1 multi-system emulator. I have a tutorial for RetroArch for Windows as well.
- Put your game CD in your computer's CD-ROM drive. Open RetroArch and select Dump Disc - as shown here
- On the next screen, select your CD-ROM drive (the first option, most likely).
- You're going to see this progress bar appear on the lower-left of the screen:

Depending on the speed of your CD-ROM drive, this will probably take 5-20 minutes to finish. - When RetroArch finishes dumping your game CD, the progress bar will disappear. It doesn't prompt you with an alert sound or anything. If your CD-ROM was humming during the dumping, you'll know RetroArch finished when your CD-ROM's humming sound stops.
- RetroArch dumps the ISO of your game CD in its Downloads folder. So the next step is locating the Downloads folder. If you didn't set a custom location for RetroArch during its installation, then it's in its default location in Windows (C:) > RetroArch-Win64 - as shown here .
- In RetroArch's Downloads folder, you should see a BIN file and a CUE file with a weird filename like “cdrom-200000-1000000”, as shown here . Double-click on the CUE file and choose to open it in Notepad. You'll see the text that's shown in my picture.
- Next, rename the CUE file and BIN file to the name of your game. Open the CUE file in Notepad to rename the ISO as well. You can name these files to any name you want. The only requirement is that both files & the name in the CUE file must be the same exact name. Look here - these three instances need to be changed to the same name.
- That's it! You've successfully dumped your Sega CD game. You can use it with any Sega CD emulator or any multi-system emulator that supports Sega CD.
Burning Sega CD games from ISO
These directions are for burning either a BIN/CUE archive or ISO/MP3 archive to a CD-R. As mentioned previously, the real Sega CD system does not have copy protection. You can play CD-R copies on it with no problem.
Must have a CUE sheet!
It is essential for the Sega CD game you are going to burn to have a CUE sheet . You cannot proceed without it. If it's missing, no worries. You can use this helpful utility, Sega CUE Maker (87 KB), to generate a CUE sheet.
1. Convert MP3s to WAV
If your Sega CD game is a BIN/CUE, jump to “3. Burning to CD-R”. If your Sega CD game is an ISO/MP3, then the MP3 tracks must be converted to WAV. You can do so quickly with an awesome free program known as WinLAME. You can download WinLAME here (1.5 MB). Here's how to convert MP3s to WAV with WinLAME:
- Open WinLAME. Click on the
 button, look for the folder where the MP3s are, select them all, then click on Open. You should see the MP3s you selected listed in the white box. Click Next to go to the next screen.
 - You'll arrive at the “Output Settings” screen. Under “Output Module”, choose Wave Output, as shown here . Click Next to go to the next screen.
- You'll arrive at the “Presets” screen. The default is fine. Click Next to go to the next screen.
- You'll arrive at the “Encoding” screen. Click
 to begin the conversion.
2. Edit the CUE sheet
- We need to open the CUE file and change all instances of MP3 to WAV. The CUE sheet is this file . Go ahead and double-click it.
- You've probably never opened a CUE sheet on your computer. Windows will prompt you with an “Open With” window. Choose Notepad from the list, like this: on Windows 10/11 , on Windows XP . If Notepad isn't showing, click Other Programs and it should be there on the list.
- So you'll have a Notepad window like this . Click on the Edit menu then Replace. In “Find what” type “.mp3” and in “Replace with” type “.wav” - as shown here . Take note that this is case-sensitive! If your wav files have “.WAV” instead of “.wav”, then you must type it in caps here as “.WAV”. Click Replace All when you're ready.
- I don't think this part is necessary, but I like to do it anyway just so things are consistent. Do another Replace to change instances of “MP3” to “WAVE”. Your finished CUE sheet should look like this .
3. Burning to CD-R
Now we can burn to a CD-R. You can use a CD-RW disc, but CD-R discs have a higher success rate.
- Download & install ImgBurn (it's free). You can download ImgBurn from the ImgBurn homepage.
*If you have an anti-virus such as AVG, it may flag ImgBurn for containing adware . Don't panic - it does not contain adware! This warning is false. All that ImgBurn does is show you ads during the install wizard (which is why AVG falsely flags it). ImgBurn is 100% safe. - Upon opening ImgBurn, click Write image file to disc, as shown here .
- Under “Source” click the folder icon, as shown here . Navigate your computer to where your Sega CD ISO resides. Select the CUE sheet and click Open, as shown here
- Take a look at this picture . Insert the CD-R disc. Upon insertion, you'll see information appear (where indicated in the picture at “1”). Next, make sure your CD drive is selected (it should do it automatically).
- Click the icon to burn. Depending on the speed of your CD drive, your game could take maybe 2-10 minutes to finish burning. That's it! Enjoy your fresh copy of a Sega CD game.
*If your burned Sega CD game is not playing music, then you messed up. Go through my directions again and pay attention to every detail.