Android Video Game Emulators
The best emulators
- Which emulators to use?
- Single-system vs. multi-system emulators
- Multi-system: RetroArch vs. Lemuroid
- PlayStation 1: ePSXe vs. DuckStation
Important notes
- Sega CD & PCE-CD: Important notes
- Teasing PlayStation 2, GameCube, etc.
- Extracting ISOs in 7Z or RAR
- Transferring saves from Windows emulators
- Downloading large games... disappear?
- Cheating
Gamepads & other devices
- Setting up a Bluetooth gamepad
- Notes about a gamepad on Chromebooks
- Emulation with Android set-top boxes
More info
View this guide on Google Docs to:
- Save as PDF or any common doc format
Share
About emulation on Android
Nearly every video game emulator for Android is very easy to use. The UI and user flows are standard with all of them. It’s not necessary for me to put together tutorials for each one. If you’re accustomed to using emulators on Windows, then you will feel right at home on Android.
However, things do get a little tricky when you want to do more than just play your favorite games. In this tutorial, I will walk you through important points pertaining to video game emulation on Android.
Which emulators to use?
In the Google Play Store, there are many video game emulators. Searching for, say, a Super Nintendo emulator brings up at least ten of them. Most of the emulators have ads or require you to pay. I want to save you the trouble of navigating this mess by presenting you with the list below of the best emulators.
| Category | System | Emulator Name | Cost? | Notes |
|---|---|---|---|---|
| Nintendo | GameCube/Wii | Dolphin | Free! | See compatibility list. |
| Nintendo 64 | M64Plus FZ | Free with ads | When you load a game, you need to look at an ad for 10 seconds. If ads bother you, use RetroArch. | |
| M64Plus FZ Pro | $3.99 US | |||
| Super Nintendo | Snes9x EX+ | Free! | The most popular SNES emulator! | |
| NES | NES.emu | $3.99 US | If you refuse to pay for NES.emu, try the alternative below or RetroArch. | |
| Nostalgia.NES | Free with ads | |||
| Nintendo DS | melonDS | Free! | ||
| Game Boy Advance | GBA.emu | $4.99 US | If you refuse to pay for GBA.emu, try the alternative below or RetroArch. | |
| Nostalgia.GBA | Free with ads | |||
| Game Boy Color | GBC.emu | $2.99 US | If you refuse to pay for GBC.emu, try the alternative below or RetroArch. | |
| Nostalgia.GBC | Free with ads | |||
| Sega | Genesis/Sega CD | MD.emu | $4.99 US | Doesn't support 32X, and Sega CD games require some setup. If you refuse to pay for MD.emu, try the alternative below or RetroArch. |
| Lemuroid | Free! | Doesn't support 32X, and Sega CD games require some setup. | ||
| Saturn | Yaba Sanshiro | Free with ads | Requires Saturn BIOS. | |
| Game Gear/SMS | RetroArch Plus | Free! | Use the “Genesis Plus GX” core. | |
| Sony | PlayStation 1 | DuckStation | Free! | Requires PS1 BIOS. See section on ePSXe vs. DuckStation. |
| ePSXe | $4 US | Requires PS1 BIOS and some setup. See section on ePSXe vs. DuckStation. | ||
| PlayStation 2 | Play! | Free! | Only supports 35% of game library - see compatibility list. Requires PS2 BIOS. | |
| PSP | PPSSPP | Free! | If you need help boosting performance, see performance guide. | |
| Arcade | MAME | MAME4droid | Free! | I have a dedicated MAME4droid tutorial. |
| RetroArch Plus | Free! | I explain arcade emulation with RetroArch in the Windows Retroarch tutorial. | ||
| NEC | TurboGrafx16/ PC Engine |
PCE.emu | $3.99 US | PC Engine CD games require some setup and require the BIOS. If you refuse to pay for PCE.emu, try the alternative below or RetroArch. |
| Lemuroid | Free! | PC Engine CD games require some setup and require the BIOS. | ||
| Bandai | WonderSwan/ WonderSwan Color |
RetroArch Plus | Free! | Use the “Beetle Cygne” core. |
| Multi-system | Multi-system | RetroArch Plus | Free! | Supports over 40 systems! This 'Plus' version is for newer devices (Android 8.0 or higher). If you need help, see my Android RetroArch tutorial. CD-based systems require the BIOS. |
| RetroArch | Free! | Supports over 40 systems! This version is for older Android devices (Android 7.0 or lower). | ||
| Lemuroid | Free! | Supports 20+ systems (the most popular ones). |
GameCube/Wii
| Dolphin | Free! | See compatibility list. |
Nintendo 64
| M64Plus FZ | Free with ads | The top emulator. This free version makes you look at an ad for 10 seconds every time you load a game. It's a minor inconvenience for using this great emulator for free. But if the ads bother you and you refuse to pay for the pro version, then use RetroArch (which is 100% free). |
| M64Plus FZ Pro | $3.99 US | The top emulator. This 'pro' version removes the ads. |
Super Nintendo
| Snes9x EX+ | Free! | The most popular SNES emulator! |
NES
| NES.emu | $3.99 US | If you refuse to pay for NES.emu, try the alternative below or RetroArch. |
| Nostalgia.NES | Free with ads |
Nintendo DS
| melonDS | Free! |
Game Boy Advance
| GBA.emu | $4.99 US | If you refuse to pay for GBA.emu, try the alternative below or RetroArch. |
| Nostalgia.GBA | Free with ads |
Game Boy Color
| GBC.emu | $2.99 US | If you refuse to pay for GBC.emu, try the alternative below or RetroArch. |
| Nostalgia.GBC | Free with ads |
Genesis/Sega CD
| MD.emu | $4.99 US | Doesn't support 32X, and Sega CD games require some setup. If you refuse to pay for MD.emu, try the alternative below or RetroArch. |
| Lemuroid | Free! | Doesn't support 32X, and Sega CD games require some setup. |
Saturn
| Yaba Sanshiro | Free with ads | Requires Saturn BIOS. |
Game Gear/SMS
| RetroArch Plus | Free! | Use the “Genesis Plus GX” core. |
PlayStation 1
| DuckStation | Free! | Requires PS1 BIOS. See section on ePSXe vs. DuckStation. |
| ePSXe | $4 US | Requires PS1 BIOS and some setup. See section on ePSXe vs. DuckStation. |
PlayStation 2
| AetherSX2 | Free with ads | Based on PCSX2 - see compatibility list. Settings need to be tweeked for better performance. Requires PS2 BIOS. |
| Play! | Free! | Only supports 35% of game library - see compatibility list. Requires PS2 BIOS. |
PSP
| PPSSPP | Free! | If you need help boosting performance, see performance guide. |
Arcade
| MAME4droid | Free! | I have a dedicated MAME4droid tutorial. |
| RetroArch Plus | Free! | I explain arcade emulation with RetroArch in the Windows Retroarch tutorial. |
TurboGrafx16/PC Engine
| PCE.emu | $3.99 US | PC Engine CD games require some setup and require the BIOS. If you refuse to pay for PCE.emu, try the alternative below or RetroArch. |
| Lemuroid | Free! | PC Engine CD games require some setup and require the BIOS. |
WonderSwan/WonderSwan Color
| RetroArch Plus | Free! | Use the “Beetle Cygne” core. |
Multi-system
| RetroArch Plus | Free! | Supports over 40 systems! This 'Plus' version is for newer devices (Android 8.0 or higher). If you need help, see my Android RetroArch tutorial. CD-based systems require the BIOS. |
| RetroArch | Free! | Supports over 40 systems! This version is for older Android devices (Android 7.0 or lower). |
| Lemuroid | Free! | Supports 20+ systems (the most popular ones). |
As you see above, the majority of the top emulators are free. ePSXe (PS1) is worth paying for if you don't like DuckStation (a free PS1 emulator). ePSXe goes for around $4 US. If you like standalone emulators and you don't like RetroArch, the “.emu” series of emulators are an excellent, high quality option (they go for $3-5 US). The .emu emulators are intuitive, feature-rich, and small in size.
Single-system vs. multi-system emulators
Android offers many emulators dedicated to a single video game system, but it also has a few emulators that support multiple video game systems. Which one should you use? Well, I recommend using both. Specifically, the multi-system emulator I recommend is RetroArch.
For example, if the SNES emulator isn't performing to your liking, RetroArch gives you the option of multiple cores (multiple emulators) to choose from for each system. But RetroArch is not very user-friendly, so the single-system emulators are better in that regard. Try both and see which one you like the best.
One area where RetroArch beats single-system emulators is with tablets and Play Store supported Chromebooks. Single-system emulators are designed for smartphones; they don't fare well on a large screen. RetroArch is designed for everything, so that'll be your go-to emulator on those devices.
Multi-system: RetroArch vs. Lemuroid
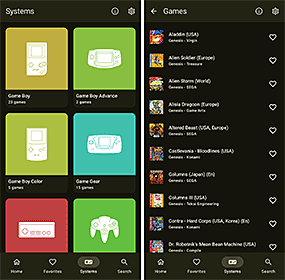
Lemuroid is a rising competitor to RetroArch. It's a much simpler multi-system emulator with a clean, visual design. It comes with support for PlayStation 1, N64, NDS, 3DS, SNES, NES, Game Boy, Game Boy Advance, NeoGeo Pocket Color, Genesis/Mega Drive, Sega CD, 32X, Sega Master System, Game Gear, PC Engine/TurboGrafx16, Wonderswan Color, Atari Lynx, and FinalBurn Neo.
Lemuroid is a 100% free emulator that doesn't have ads. It offers the usual assortment of features: save states, fast forward, gamepad support. However, it lacks options and customization. It doesn't offer cheats. It only offers one screen filter (TV effect). You can't change the 'core' for a system. So if, for example, you're finding bugs with PlayStation 1, you don't have the option to try a different PlayStation 1 core. For arcade emulation in particular, offering more than one arcade core is critical.
RetroArch is still my top recommendation. But yet, if you find RetroArch intimidating, Lemuroid would be a better alternative for you with its friendlier, more visually appealing design. Lemuroid is especially ideal if you want something simple that just works.
PlayStation 1: ePSXe vs. DuckStation
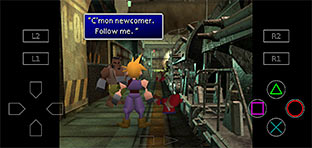
DuckStation is a relatively new and promising PlayStation 1 emulator. In this guide I keep recommending ePSXe, but what about DuckStation? Firstly, DuckStation is 100% free (ePSXe costs around $4 US). Its emulation quality is excellent - it's possibly better than ePSXe. Swapping CDs (ISOs) is just as easy as with ePSXe. I recommend enabling the PGXP corrections to correct texturing and jittery animation . One drawback with DuckStation is that it's not Chromebook-friendly. At the time I'm writing this, they even removed DuckStation from being available for Chromebooks altogether, for some reason.
But yet, ePSXe still has a better interface; it's easier and friendlier to use. It's Chromebook-friendly. ePSXe does require some setup . ePSXe and DuckStation are both good emulators with their pros and cons. It's up to you to decide which emulator would be better for your needs.
Sega CD & PCE-CD: Important notes
There are a few different types of formats that people have prepared ripped Sega CD/Mega CD and TurboGrafx-CD/PC Engine CD games as. They consist of one or more BIN files (the game's data), audio tracks, and a CUE sheet. The CUE sheet is a simple text file with a programmatic list of the audio tracks. ROM websites deliver games in one of four formats:
- A CHD (Recommended): As of the early 2020s, this is the new popular format being distributed from sites. Unlike all the formats listed below, a CHD is a single file. A CHD game would simply be something like “Lunar - Eternal Blue (USA).chd”.
- A binary BIN/CUE (Recommended): As of the early 2020s, this is another new format being distributed from sites. It looks like this when you open it. All files are BIN files. When you look at the CUE sheet , the BIN files are organized as the audio tracks.
- A standard BIN/CUE: This is how video game ISOs (for any CD-based system) are normally ripped as. It looks like this when you open it. When you look at the CUE sheet , the audio tracks are listed even though there are no actual audio files present.
- An ISO/MP3: This used to be the most popular format for most of the 2000s and 2010s when the Internet was slower. Converting the audio tracks to MP3 significantly reduced the file size of Sega CD/TurboGrafx-CD games. It looks like this when you open it.
- An ISO/WAV: This is an ISO/MP3 with the audio tracks converted to WAV .
I need to point out that not all of the above formats are compatible with emulators on Android. ISO/MP3 is not supported at all. ISO/WAV will load, but the CD audio may run fast as if in fast forward. BIN/CUE ('binary' or 'standard') are the formats that are 100% supported.
With a properly prepared ISO, the next steps are easy. All you do is copy over the proper BIOS and configure it with the emulator you're using. Every emulator does it a little differently. It might require you to place the BIOS in the emulator's root folder. Or it might require you to configure the BIOS in the settings. When the BIOS is properly configured, all you do to play your game is load its CUE sheet as if it were a ROM.
No Perfect Sync on Android
Sega CD/Mega CD games have an annoying little string attached. Some Sega CD games require something called Perfect Sync , or else they freeze at the Sega logo. In particular, I know Shining Force CD and Popful Mail require Perfect Sync in order to work. Genesis emulators on Windows allow you to enable/disable Perfect Sync to work around this problem. Android's Genesis emulators (the ones that support Sega CD) do not offer Perfect Sync. Hence, there are quite a few games that will not work. However, I know that RetroArch must have some kind of auto Perfect Sync feature because every Sega CD game I've tried on it works.
Teasing PlayStation 2, GameCube, etc.
Browsing through my recommended Android emulators, you're going to see Dolphin which supports GameCube and Wii. You'll see emulators for PlayStation 2, Sega Saturn, and Dreamcast. If you poke around the Play Store, you'll even find emulators for PlayStation 3. Don't get excited - they probably won't work! The Play Store is teasing us.
The modern smartphone is fast, but it's not that fast. These emulators are intended for high-end Android devices. For the rest of us, the highest our average Android devices will support is PlayStation 1 and N64; maybe even PSP if we're lucky.
Extracting ISOs in 7Z or RAR
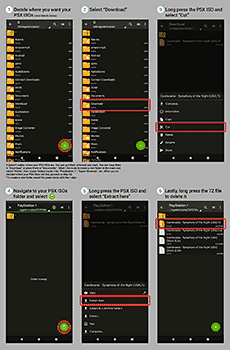
ROM websites like to distribute their large CD-based games in 7Z or RAR. They must be extracted to use them with emulators. Here are on directions on how to do so:
- First, you're going need an app that can extract 7Z files. I recommend ZArchiver (it's free).
- Side note: ISOs are less commonly delivered in ZIP and RAR. Either way, ZArchiver supports extracting them.
- Open ZArchiver. You need to decide where you're going to house your ISOs. It doesn't matter where you put them. Some people keep them in the Downloads folder. What I like to do is create a folder called “ROMs” and inside that folder create folders for “PlayStation 1”, “Super Nintendo”, etc. In ZArchiver, to create a new folder tap the
 then
then  . Proceed to the next step when you're ready.
 - Return to your device's main root directory (the default screen when you open ZArchiver). Select Download. Once inside, long press your ISO and select Cut.
- Navigate to the folder where you want your ISOs to be. Select the clipboard icon
 to paste the ISO there. Tap on the file (not a long press) and select Extract here. Depending on the size of the file, it may take 10-20 seconds or two minutes to finish extracting.
 - Depending on how the ROM site setup the 7Z archive, it will either: (1) extract the ISO files here, or (2) extract the ISO files into a new folder with the name of the game. Either way should be fine and not impact how the emulator you're going to use loads ISOs.
- Lastly, we don't need the 7Z file anymore so you can delete it. Long press it and select Delete. Also, if you don't foresee yourself extracting more 7Z files in the future, you can go ahead and uninstall ZArchiver (long press its app icon and select Uninstall).
Transferring saves from Windows emulators
This is a popular topic. Many of us are already long-time users of emulators. So, naturally, we want to continue our gameplay from Windows emulators to our Android device(s). My FantasyAnime.com also offers periodical game saves for many popular classic RPGs.
Can saves be transferred? Yes! Sort of. Not every video game system is covered.
- PlayStation 1 saves: If you plan on using Android's ePSXe (which I hope you are), transferring your memory card from ePSXe on Windows is a simple copy & paste. Go into ePSXe's “memcards” folder and drag over “epsxe000.mcr”.
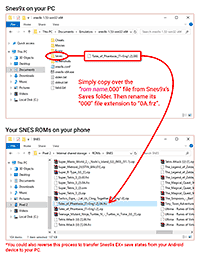
- Super Nintendo saves: Android's Snes9x EX+ accepts both save states & internal save RAM files from Snes9x on Windows! Let's say your save state is “finalfantasy6.000”. Rename it to “finalfantasy6.0A.frz” for it to work on Snes9x EX+. The internal saved RAM files (i.e. “finalfantasy6.srm”) don't need to be renamed - simply copy & paste them over.
- Game Boy/Game Boy Color/Game Boy Advance saves: Internal saved RAM files (i.e. “finalfantasy6.sav”) from Visual Boy Advance on Windows will work on RetroArch. Simply copy & paste them over to the “saves” sub folder in RetroArch's root folder.
- Genesis, Sega CD, 32X, Game Gear, Nintendo 64 saves: These cannot be transferred :(
Downloading large games... disappear?
Android can be wonky when you try to download a large ROM or ISO. ‘Large’ meaning around 1 GB in size and higher. It may take a couple tries because sometimes the file disappears as soon as you're prompted that it finished downloading. Or maybe Android will hiccup and suddenly halt the download. These issues are especially prone to happen if you’re nearing your max capacity of space on your device.
Instead of wireless downloading, I recommend a wired transfer by connecting your Android device to a computer. You won't encounter problems transferring large ROMs and ISOs that way.
Cheating
Every video game emulator supports cheats. Snes9x EX+ supports Game Genie cheats. ePSXe, DraStic DS, and RetroArch even auto-download cheat files!
Setting up a Bluetooth gamepad
Setting up a Bluetooth gamepad is quick and easy. First of all, make sure the gamepad's specifications specifically state that it's supported by Android. If you're looking for a Bluetooth gamepad, I have several good ones pointed out in my Gamepads article.
Pairing your gamepad
- First, make sure your Bluetooth gamepad is fully charged and has LED lights indicating it's on.
- Put your gamepad in 'pairing mode'. Sometimes it's as simple as pressing the Start button and you'll see lights blinking on your gamepad. Gamepads that are compatible with multiple OSs might require a specific button to be pressed for pairing with Android. Read the documentation that came with your gamepad. Or go to the manufacturer's website and look for directions there.
- On your Android device, enter the Bluetooth screen. I can't tell you exactly how because every Android device has a different GUI. Typically, you access it by swiping down on the top and press the Bluetooth icon - as shown here .
- In the Bluetooth screen, press Pair new device - as shown here .
- In the next screen, you should see the name of your Bluetooth gamepad - like this . Press it. It should turn gray with “Pairing” - like this .
- There are a few problems that could surface in this step. Your Bluebooth gamepad might have a weird name such as “50:4B:24:2F:DC:E9”. Try to pair it anyway.
- The “Pairing” notice might hang for a few minutes and then stop. Make sure your Bluetooth gamepad is fully charged and indicating that it's turned on, and try again. Read your gamepad's instructions to ensure its LED lights are indicating that it's on and ready to be paired.
- Upon a successful pairing, you should see your gamepad listed on the Bluetooth screen with “Connected” - as shown here .
Emulator setup
Next, your Bluetooth gamepad needs to be configured with every video game emulator you intend to use it with. Each emulator does it differently.
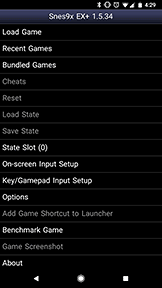
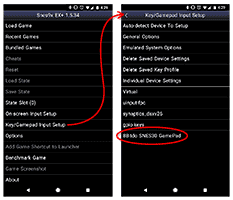
- With Snes9X EX+: Go to Key/Gamepad Input Setup and you should see the name of your Bluetooth gamepad towards the bottom, as shown to the right.
- With ePSXe: Go to Preferences, look under “Input Preferences”, and press Player 1.
- With Mupen64Plus: You don't need to do anything. Your gamepad is auto-detected and pre-configured.
- With RetroArch: You shouldn't have to do anything. When you load a game and press a button on your gamepad, you should see a message appear on the bottom left telling you that your gamepad is now active with the game.
Notes about a gamepad on Chromebooks
Chromebooks (what's a Chromebook?) have limited support for gamepads with video game emulators from the Play Store. I can only tell you what I know of this subject from my own experience. I don't have a pile of gamepads to test with all the popular Android video game emulators.
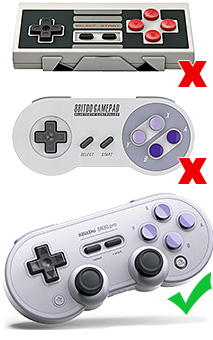 Old 8Bitdo's don't work, but newer models do
I've been using the 8Bitdo gamepads, which is the most popular brand for retro style Bluetooth gamepads. My first generation 8Bitdo gamepads (I have the NES and SNES controller) haven't worked on any of my Chromebooks. However, all later generations worked on my Chromebooks. I tested them with Snes9X, the .emu emulators, ePSXe, Mupen64Plus, and RetroArch. In 2021, they released the newest model of their best controller: the 8Bitdo Pro 3.
So maybe only gamepads from 2017 and newer will work on Chromebooks? Or maybe only certain gamepads will work where the developer specifically programmed support for Chromebook Android apps? I can't say for sure.
The gamepad API
There's a detail I need to point out to avoid confusion. If you Google the subject of gamepads on Chromebooks, every result will tell you that all gamepads work on any Chromebook with no problem. PlayStation 3 controllers work on Chromebooks, too. However, this is misleading because what everyone is talking about is gamepad support for Chrome based games via the gamepad API. All this wonderful support for gamepads, unfortunately, does not apply to video game emulators from the Play Store.
Emulation with Android set-top boxes
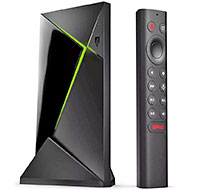 Nvidia Shield TV
The most convenient option for emulation is to use an Android set-top box. The best model is the Nvidia Shield TV Pro. Like with using a Chromebook, you're blessed with full access to Android's video game emulators.
The Nvidia Shield TV Pro goes for $200 US. The official gamepad is sold separately, but you don't need to get it because any other Bluetooth Android gamepad is supported (8BitDo's are the best).
Setting everything up on a Shield TV is the same way you'd set up emulators on an Android phone or tablet. Simply go into the Shield TV's app store and download the video game emulators you want. All of the popular video game emulators in the Play Store are present in the Shield TV's app store. All of the menus and emulators can be navigated with your Bluetooth gamepad. The “X-plore” app is recommended for moving roms around; it can extract zip files too.
The Shield TV Pro is a beast with its Tegra X1 processor. Not only can it handle up to PlayStation 1, N64, and PSP, but it can handle them with high-resolution 3D. Thanks to the Yaba Sanshiro emulator, Shield TV can even handle Sega Saturn emulation (Saturn emulation has a reputation for being CPU-heavy). And don't forget about RetroArch - install that and you'll have over 40 video game systems under one roof.
The drawback is with capacity. There's only 16 GB of space, which doesn't hold a lot of ROMs. You can, however, connect an external harddrive for extra storage. Even just a small $20 128 GB flash drive is enough to hold hundreds, possibly thousands of ROMs.
There's a cheaper Shield TV dongle (the pill) that goes for around $150 US. While it's not as good as the Pro, it's still a worthwhile option if you need something cheaper. But, it's 32-bit, while the Pro is 64-bit (further down, I will explain how this impacts emulation).
 Google TV Streamer 4K
Need something cheaper? There's two I recommend. The Google TV Streamer 4K is half the price as the Shield TV. And the Onn 4K goes for even cheaper. Granted, they're not as fast as the Shield TV, but they get the job done. Like the Shield TV, they support any Bluetooth Android gamepad. In the app store you'd need RetroArch, “Downloader” (to download roms), and “X-plore” (to move them). Expanding memory on the Google TV Streamer is possible if you get a USB‑C hub with power passthrough.
Here's a rundown on these Android TV devices:
| Name | Cost | CPU | RAM | Bit | Capacity |
| Nvidia Shield TV Pro | $200 US | NVIDIA Tegra X1+ (quad-core ARM CPU) | 3 GB | 64-bit | 16 GB. Storage can be expanded via USB-C. |
| Nvidia Shield TV (the pill) | $150 US | NVIDIA Tegra X1+ (quad-core ARM CPU) | 2 GB | 32-bit | 8 GB. Storage can be expanded via microSD. |
| Google TV Streamer 4K | $99 US |
MediaTek MT8696 — quad‑core ARM processor with Cortex‑A55 cores (up to ~1.8–2.0 GHz) | 4 GB | 32-bit | 32 GB. Can be expanded but it's tricky. |
| Onn 4K | $33 US |
Amlogic S905Y2 Quad-core Cortex-A53 (up to 1.8 GHz) | 2 GB | 32-bit | 8 GB. Can be expanded via USB. |
Whichever device you might select, it's extremely beneficial to wrap your head around RetroArch. Once you get comfortable with that emulator and know how to set everything up, you'd be able to emulate any video game system with ease.
The non-Pro Shield TV (the pill) and the Google TV/Onn are 32-bit. That means you're limited to using 32-bit RetroArch, not 64-bit RetroArch (called “RetroArch Plus”). This gives you less options for cores (a 'core' is an emulator within a multi-system emulator). That doesn't mean 32-bit RetroArch is a poor emulator. It still supports 40+ video game systems. For example, if 64-bit RetroArch offers 15 cores for Super Nintendo, 32-bit RetroArch only offers a few. Those few SNES cores still emulate SNES perfectly. Unless you're an emulation purist, you're not missing out on anything important.
The Dig front-end
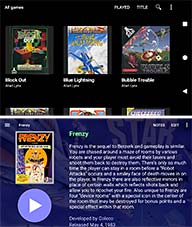
The Dig emulator front-end is a really handy app! Let's say you already set up all of your emulators and ROMs on your Android device. It might be a bit tedious having to fuss through a collection of emulators and look for the ROM you want to play every single time. Dig optimizes your emulation experience by consolidating all of your games and emulators into a single, fun graphical interface!
Upon opening Dig for the first time, what it does is scan your Android device to collect the emulators you currently have installed and builds a database with all of your ROMs. Then Dig presents you with a graphical interface showing the box art for each one of your ROMs. Selecting a game takes you to a helpful profile with information about it. Pressing 'Play' immediately loads the game in your installed emulator. It's awesome!
Dig is especially helpful with RetroArch since it lacks an intuitive interface. Dig is also valuable for Chromebooks since RetroArch's interface isn't Chromebook friendly.
Using ROM hacks
I have a detailed tutorial on patching ROMs. In my patching tutorial, I explain how you can auto patch or manually patch games with a ROM hack's patch. I recommend reading my patching tutorial before you continue reading here. The language here might be confusing if you don't.
As far as I know, no Android emulator supports auto-patching. These are your options for using ROM hacks:
- I think the fastest & easiest way to use a ROM hack is to look for a pre-patched ROM. That saves you loads of trouble.
- If you can't find a pre-patched ROM, then try patching the ROM on your computer. Upon a successful patching, transfer it over to your Android device. I recommend using Dropbox or Google Drive for the transfer.
- If you can’t find a pre-patched ROM and patching on your computer isn’t an option, then you can try patching the ROM directly on your Android device. I have directions in my patching tutorial.
Don't forget--the #1 website for ROM hacks and English translations is RomHacking.net!
Finding games
In my links page, I have some good links to sites where you can download ROMs and ISOs for classic video game systems.
Finding games for PS2/PS3/PSP/GameCube/Wii and beyond is trickier due to how large games are. These games are typically not available in ROM sites readily found on Google. However, Archive.org is a superb site where you can find these games for download. Navigating that site isn't easy. It's easier to search Google with such phrases as “archive.org playstation 2”. I offer some more help with that in this image .
Another way you can try to find large/newer games is through Reddit. The best way to find them is by searching Google with such phrases as “reddit download playstation 2”.
Emulator tutorials
While this site primarily covers Windows emulators, I have created several (detailed) tutorials for Android emulators.
- RetroArch - This is the most popular multi-system emulator. While it may not be as user-friendly as competing emulators, it's 100% free and supports emulating ALL classic gaming systems.
- DuckStation - This is a top emulator for PlayStation 1. ePSXe for Android is a close competitor, but DuckStation is 100% free.
- MAME4droid - This is a top emulator for arcade emulation. Arcade emulation can be confusing. This tutorial takes the time to explain everything for beginners.
