RetroArch Tutorial
Setting things up
- First-time setup (important!)
- Understanding the cores
- Deleting a core
- Required BIOS files
- Finding the BIOS folder
- Setting up the keyboard
- Using gamepads
Playing games
- Loading a game
- Disabling the on-screen button overlay
- Entering full screen
- The quick menu
- Disc swapping for multiple-CD games
System-specific info
- Loading Genesis/Mega Drive games
- Loading Sega CD & TurboGrafx-CD games
- Loading Sega Saturn games
- Loading PlayStation 1 games
- Q: My PAL PS1 game won't load!
- Loading Nintendo 64 games
- Loading Arcade games: Getting started
- Loading Arcade games
- Systems to avoid with RetroArch
Features
- Shaders (screen filters)
- Fast forward
- Rewind
- Save states
- Capturing screenshots
- Using cheats
- Adding your own cheats
- Dumping your CD-based games to ISO
Other info
View this guide on Google Docs to:
- Save as PDF or any common doc format
Share
About RetroArch for Windows
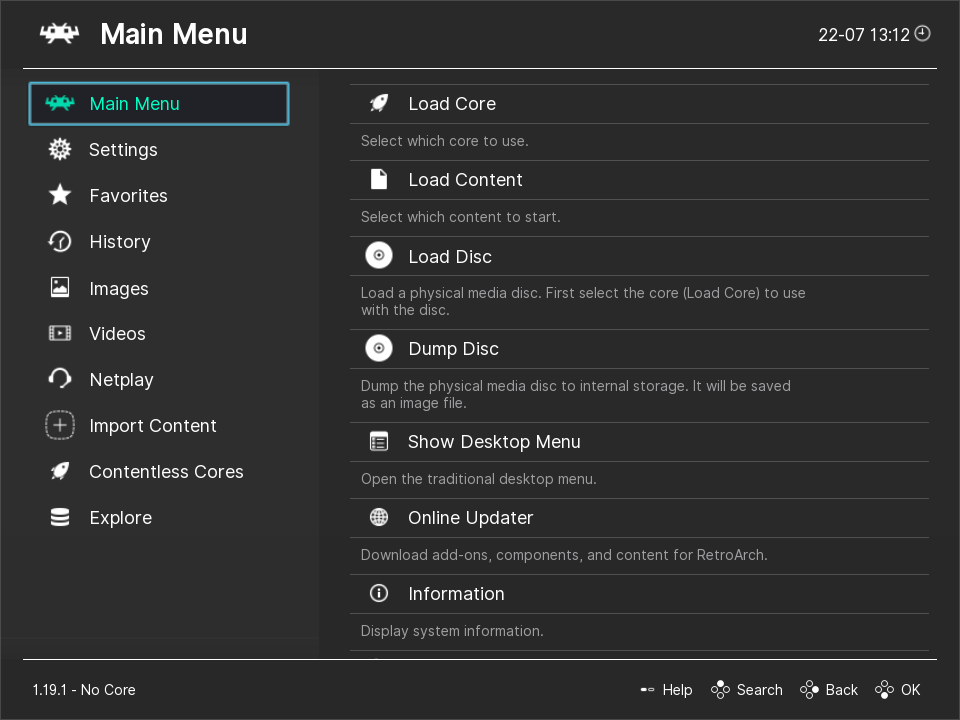 RetroArch's start screen
RetroArch is a multi-system emulator that supports pretty much every video game system. Atari Lynx, Neo Geo Pocket Color, WonderSwan, Game Boy Color, Game Boy Advance, NES, SNES, Virtual Boy, PC Engine/TurboGrafx-CD, PC-FX, Game Gear, Genesis/Mega Drive, Sega CD/Mega CD, Sega Master System, PlayStation 1, PlayStation 2, Saturn, PSP, and more! It's an open source emulator available for every operating system.
The drawback with RetroArch is that it wants to do everything and cook your dinner! It's loaded with an overwhelming amount of features and customization. It can make RetroArch more intimidating than helpful for beginners. However, that's exactly the reason why I created this tutorial. Hopefully, I can make RetroArch easy for everyone :)
RetroArch can be downloaded from its homepage: RetroArch.com
Downloading RetroArch
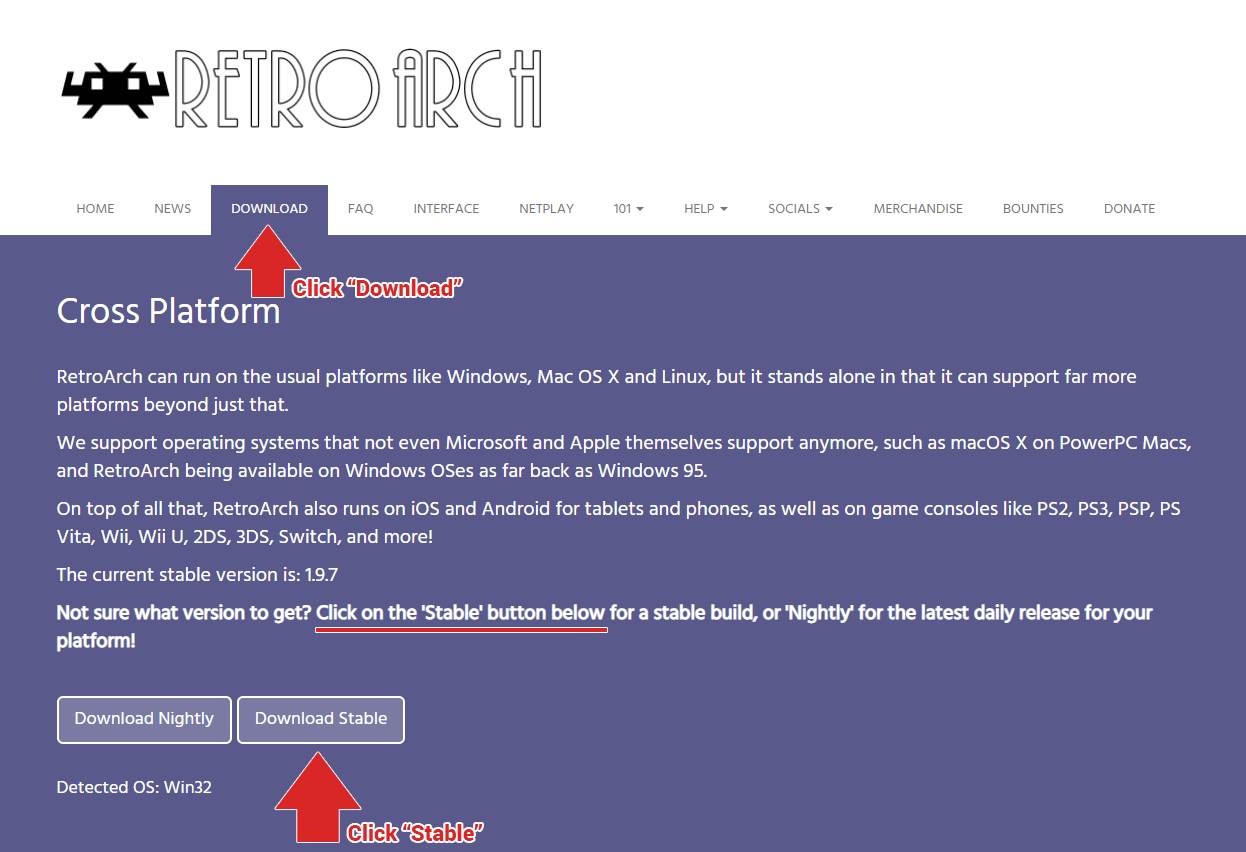 Downloading RetroArch
When you go to download RetroArch from RetroArch.com, the website should detect your OS and present you with an easy download button (as shown to the right).
If it doesn't detect your OS or doesn't properly detect your device (maybe you're using a private browser?), scroll down on the Downloads page and look for the Windows category where you'll see four versions :
- Installer (64bit)
- Installer (32bit)
- Download (64bit)
- Download (32bit)
So what are these and which version do you download? First, I'll start with 64-bit vs 32-bit. I won't drown you with technical jargon. In short: these are types of Windows systems. 64-bit is newer and faster, and 32-bit is older and slower. If you have 64-bit Windows, you need to download the 64-bit version of RetroArch. And vice versa with 32-bit. They stopped making 32-bit computers around 2017, so chances are you're most likely using a 64-bit computer.
As for “Installer” vs “Download”, that's if you want the install wizard or the portable version. I recommend the Installer; I cover the Installer in the installation directions further down. The Download (the portable version) doesn't have an install wizard. The portable version is 'installed' as soon as you unzip it from its zip file.
Installation
If you elected to download the Installer, here are directions for it. This Installer is easier than the portable version (the 'Download', as indicated on their site). Also, this Installer allows RetroArch to be uninstalled through Windows if you decide you don't want it anymore.
Here's how to use the Installer:
- Download RetroArch from RetroArch.com, if you haven't already. Double-click on
 to begin the installation.
 - If you get the Windows scare prompt, Windows protected your PC , that means you downloaded a non-stable build of RetroArch (a nightly build or beta version). This scare prompt is overly dramatic. If you install a non-stable build of RetroArch, the only risk you're taking is possibly RetroArch crashing due to untested code. If you're intent on avoiding the Windows scare prompt, download the Stable version.
- On the Welcome screen , click Next.
- On the License Agreement screen , put the check to agree and click Next.
-
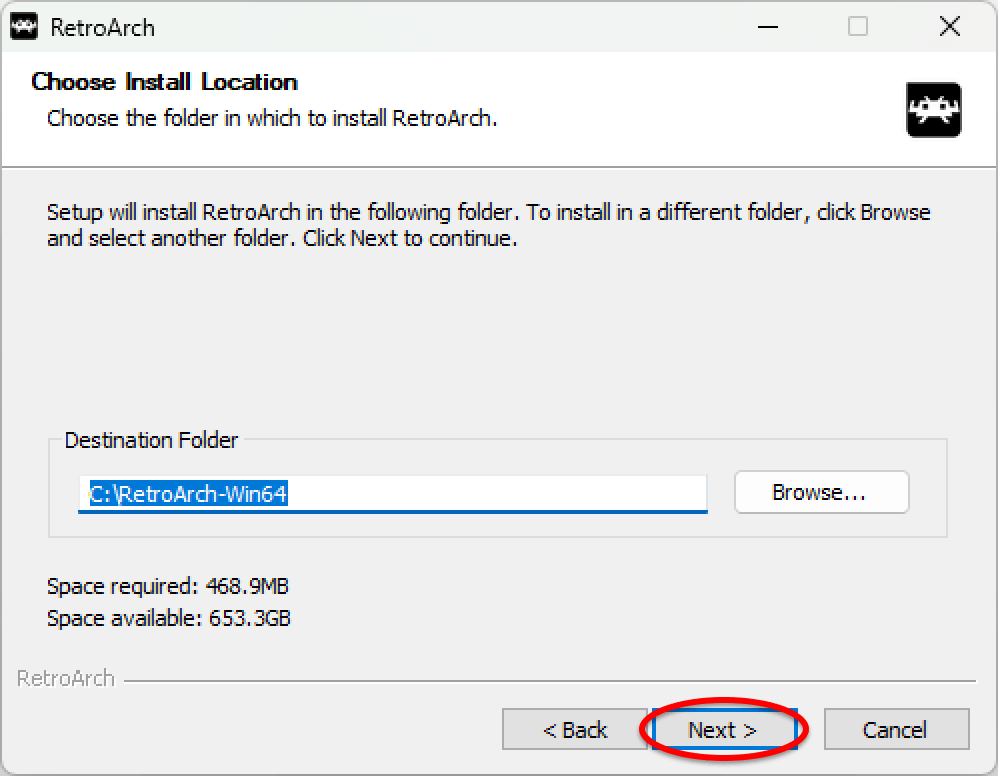
The Install Location screen is important. RetroArch defaults to the root of your C drive. It's convenient, but unusual. If you're not very computer-savvy, you may want to have RetroArch installed to an easier location to reach such as in your Documents folder. It makes things easier for you when you need to copy over the BIOS files and find your screenshots. Otherwise, you can just click Next to continue.
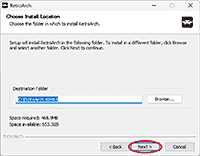 Install Location
-
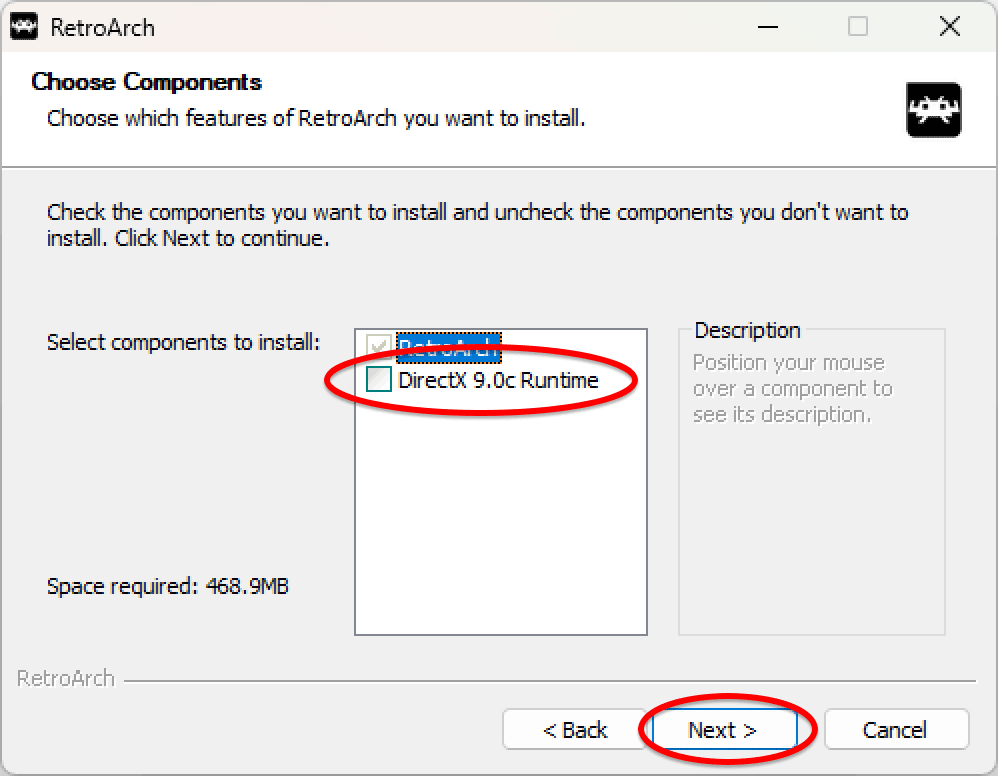
On the optional Components screen, this step is only important if you have an older computer. By 'older' I mean, probably from mid-2010's and older. Installing DirectX helps prevent video related issues. Even if you have a new computer, installing it doesn't hurt. Anyway, if you think your computer might need it then put a check in “DirectX 9.0c Runtime”. Click Next.
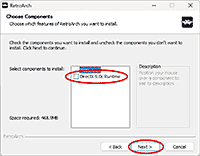 Components (optional)
- If you opted to install DirectX, the next step will begin the DirectX installation in a new install wizard. Just click Next, Next, Next for every screen. BUT, make sure at the last screen you remove the check that installs the Bing search bar. Pay attention for that small detail.
- On the Start Menu Folder screen , click Install.
 Wait patiently for RetroArch to install. And that's it! On the final screen click Finish. RetroArch is now a new program in your Windows Start Menu and a shortcut icon on your desktop.
Going back in the UI

The main screen UI is straight-forward to navigate. You have the section buttons in the left panel and the content in the center panel. However, the UI doesn't make it obvious how you can go back a screen. You can do that in two ways: click the retro alien logo or press the Backspace key.
First-time setup (important!)
RetroArch doesn't come packaged with its 'cores' (its video game emulators). The authors of RetroArch are mindful of your computer's space. So upon installing RetroArch, it didn't bloat your hard drive with all 100+ emulators it offers! You get to choose which 'cores' you want to be installed.
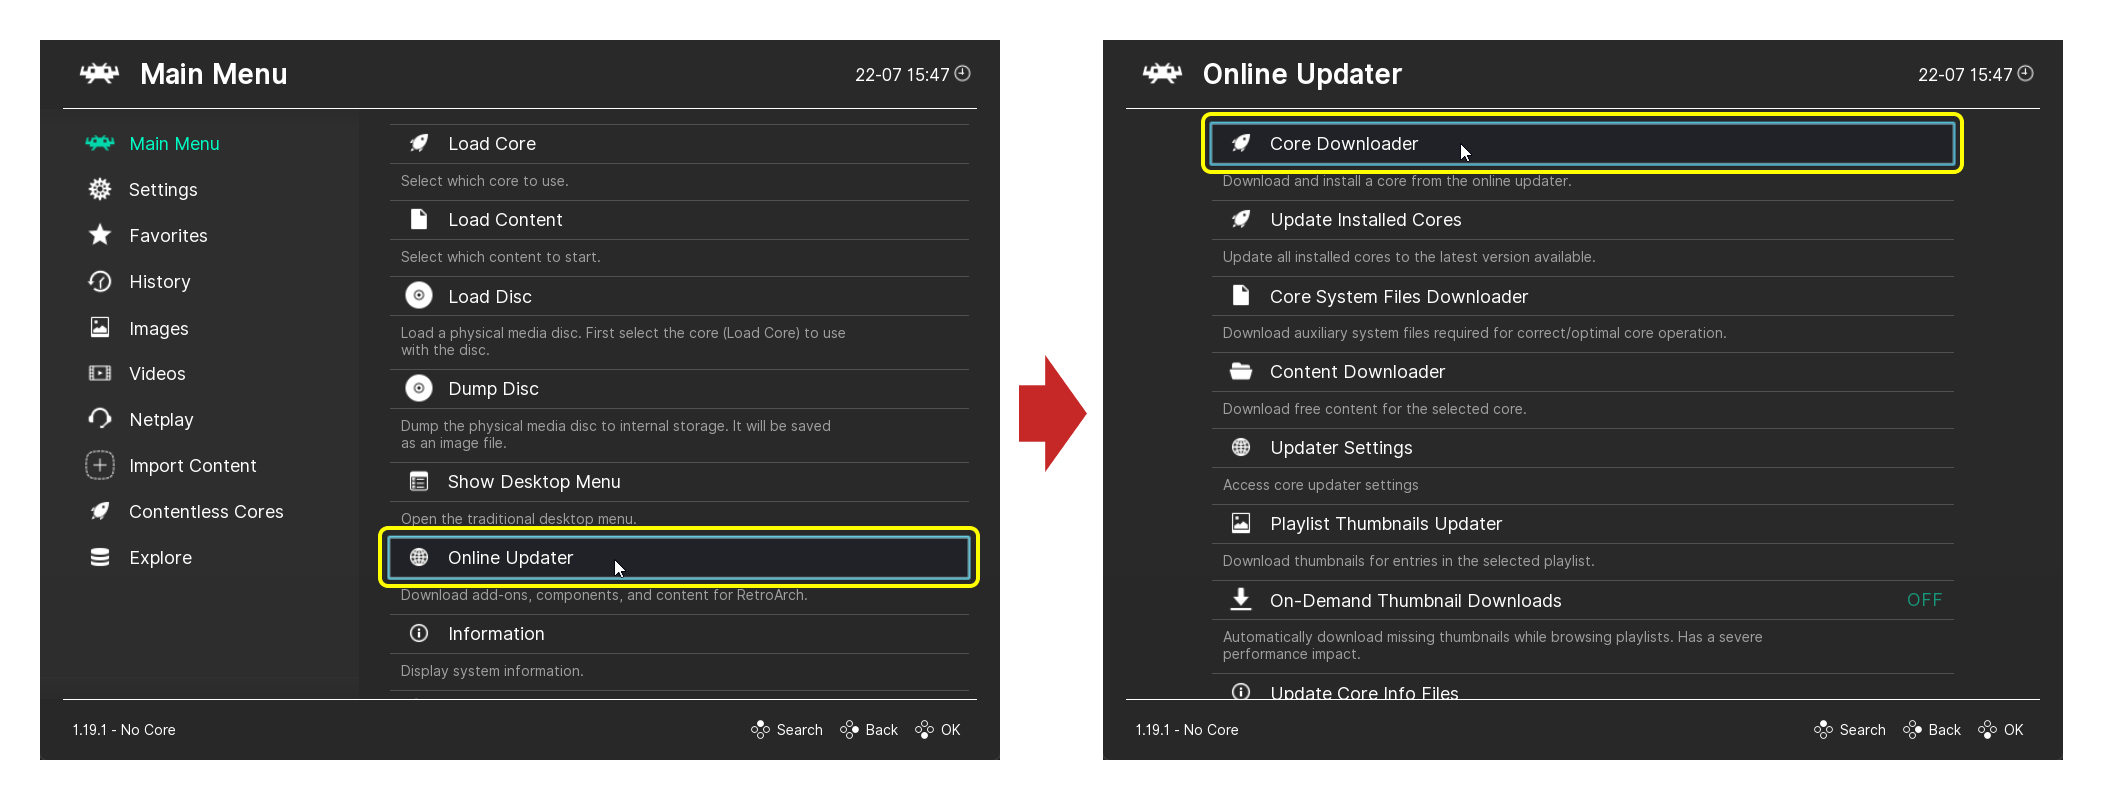
You access the core updater screen by going to Online Updater > Core Updater, as shown above. Then select the systems you want.
That's all there is to it! Once you download a core it becomes available immediately. So if you download an SNES core then you can immediately proceed to play your SNES ROMs.
If you're finding the list of cores confusing, continue reading below.
Understanding the cores
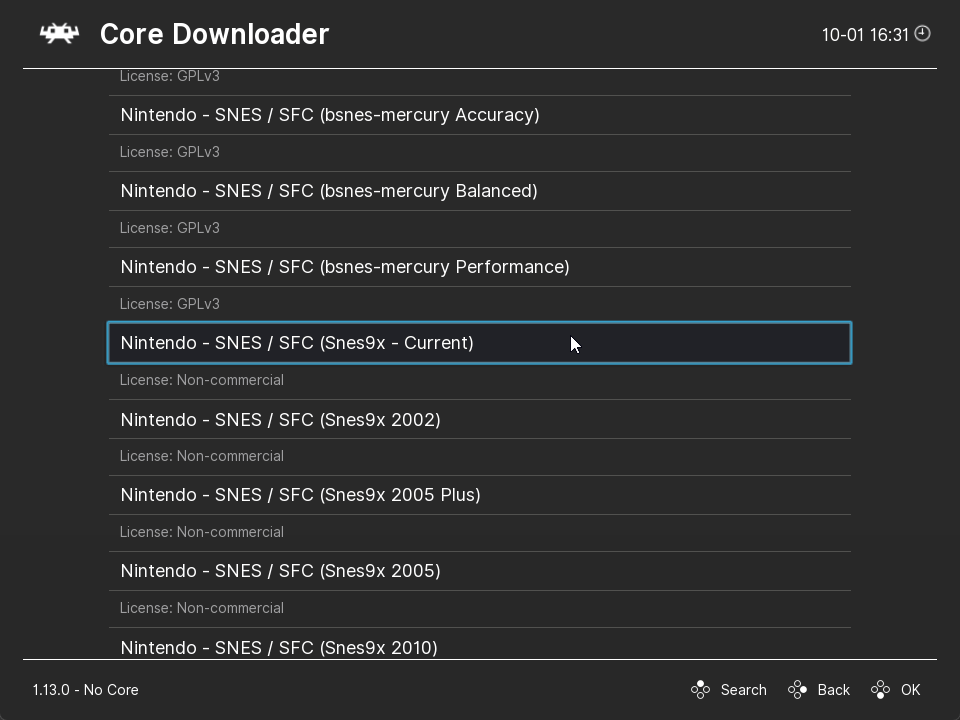 RetroArch has around 15 Super Nintendo cores
Browsing through RetroArch's massive cores list, you're going to see cores listed like this:
- Game Boy Advance (gpSP)
- Game Boy Advance (mGBA)
- Game Boy Advance (VBA Next)
- Game Boy Advance (VBA-M)
So what does all that mean? I don't know how involved you are with video game emulation, but enthusiasts take emulation very seriously. RetroArch wants to satisfy everyone's OCD for perfection by offering a variety of cores for specific emulators. As a beginner, you may or may not recognize those emulators.
To familiarize yourself with the best emulators (which RetroArch has cores for), you could review my list of top emulators. Or just pick a core at random; unless you're an emulation purist, you probably won't notice any difference between cores.
Deleting a core
RetroArch's interface makes it easy to accidentally download an unwanted core. The following directions are how you can delete a core.
- On the main screen, go to Load Core and select the core you want to delete - as shown here .
- At the lower-left, you should see the core you chose . Next, click Information.
- On the Information screen, select Core Information - as shown here .
- On the Core Information screen, scroll all the way down and you'll find an option for Delete Core. Select it to delete the core .
Required BIOS files
The following video game systems require these BIOS files in order for games to work. You don't need every single region. For example, if you only intend to play US games, you only need the US region BIOS.
- PlayStation 1
- scph5500.bin - required for Japan-region games.
- scph5501.bin - required for North America/US-region games.
- scph5502.bin & scph5552.bin - required for Europe-region games.
- Sega CD/Mega CD
- bios_CD_J.bin - required for Japan-region games.
- bios_CD_U.bin - required for North America/US-region games.
- bios_CD_E.bin - required for Europe-region games.
- PC Engine CD/TurboGrafx-CD
- syscard3.pce - general BIOS required for all regions.
- Sega Saturn
- mpr-17933.bin - required for North America/US-region and Europe-region games.
- sega_101.bin - required for Japan-region games.
- Arcade (MAME)
- neogeo.zip - required for NeoGeo games (don't extract it!).
These BIOS files are CASE SENSITIVE. Depending on which website you downloaded them from, they may be named differently. Make sure every BIOS is named exactly as you see it above. Speaking of where to download BIOS files, you can grab all of them below.
- RetroArch BIOS Bundle (3.45 MB). Contains all the BIOS files listed above. Download this file by right-clicking the download link and go to Save Link As. When saving, rename the “_ip” file extension to “zip”. If you don't see the file extension, try showing them.
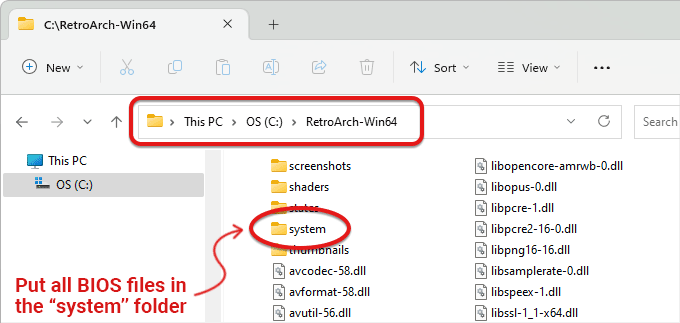
Extract the BIOS file(s) from their ZIP file (except for 'neogeo.zip'). Place all of the BIOS files in RetroArch's “system” folder. Finding the “system” folder is where things can get a little bit tricky depending on how computer-savvy you are.
Finding the BIOS folder
So you've downloaded the BIOS files and extracted them from their ZIP file. Now you need to locate RetroArch's “system” folder to move them into. There are three possible scenarios for this process.
#1 - You changed the location during installation
When you installed RetroArch, did you select a different install location? (I recommended your Documents folder.) If so, then finding the “system” folder is easy. Simply navigate to the location you chose, look for RetroArch's folder, and inside you'll find the “system” folder. Move all of the BIOS files into there.
#2 - RetroArch's default location
By default, RetroArch is located in the root of the C drive under “RetroArch-Win64”. So, open File Explorer, click OS (C:), then double-click RetroArch-Win64. See below for the visual. The “system” folder is located inside this RetroArch folder. Move all of the BIOS files into this “system” folder.
#3 - You can change the default folder for BIOS files
If navigating to the C drive is not convenient for you, know that the default folder for BIOS files can be changed to an easier location.
- From the main screen click Settings, scroll down, and click Directory - as shown here .
- At the Directory screen , the option to change the default BIOS folder is right there at the top. That's it! Now you can move all of your BIOS files to this new directory location.
Setting up the keyboard
These are the general keys:
 Up/Down/Left/Right = Up/Down/Left/Right keys
 B Button (Down) = Z
- Y Button (Left) = A
- X Button (Top) = S
- A Button (Right) = X
- Left Shoulder = Q
- Right Shoulder = W
- Start = Enter
- Select = Shift
If you wish to reconfigure these keys or find the full list of keys:
- From the main screen click Settings then Input - as shown here .
- At the Input screen , scroll down a bit and select Port 1 Binds for player 1. Or Port 2 Binds for player 2, and so on.
- At the Port Binds screen , you can either select Bind Default All to automatically reconfigure all buttons or select the specific button(s) to change.
Custom keys per game
RetroArch allows you to configure custom keys on a per-game basis. This is done through the Quick Menu. During gameplay, press the F1 key for the Quick Menu then scroll down and click Controls > Port 1 Controls. The changes you make here are exclusive to the game that is currently running and will not globally change your keys.
Using gamepads
The beautiful thing about setting up a gamepad with RetroArch is that you don't have to do anything! RetroArch promises to automatically map the buttons for any gamepad you plug in. I don't know exactly how robust this feature is; if even older gamepads are mapped properly.
To use your gamepad with RetroArch, plug it in then open RetroArch. If you plugged it in while RetroArch is already open, you need to close and re-open RetroArch. During gameplay when you press any gamepad button for the first time, RetroArch will prompt you that it successfully detected your gamepad.
If you want to reconfigure the buttons on your gamepad, it's the same process I explained above for reconfiguring keyboard keys. And if you want gamepad recommendations, I have those in the gamepads page.
Loading a game
 Use the File menu to load games
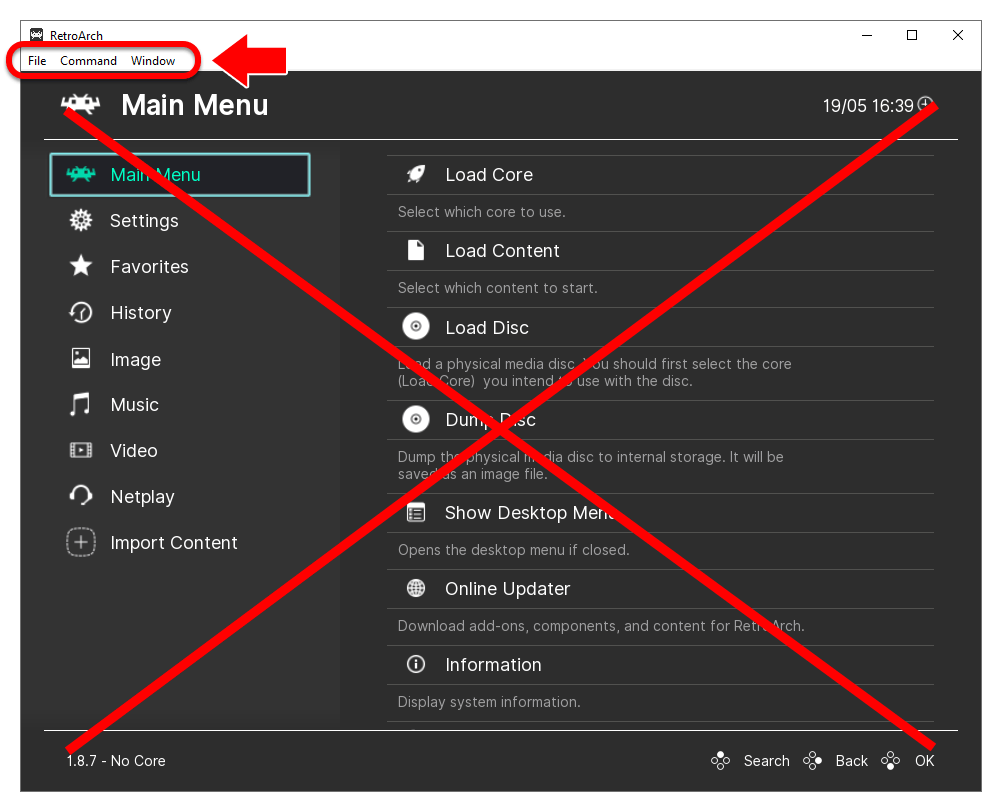
RetroArch's interface is misleading. It pushes you to load a game through its main window UI. However, you can also load games via the File menu and it's 1000% easier & faster. Here's how:
- Don't forget that first you need to download the cores for every video game system you want RetroArch to support.
- RetroArch can load games from their zip files. However, if your game is in a RAR or 7Z file then it needs to be extracted. ROM sites tend to use those formats to compress CD based games and other large games. You can use 7-Zip (it’s free) to extract them. If you need step-by-step help with this, there are YouTube videos.
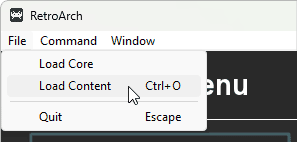
- When you're ready to load a game, click the File menu then Load Content.
- Navigate to the folder where your ROMs are located. Click on the game you want to play then click Open - as shown here .
- If you downloaded a single core for a video game system then the game will immediately begin to load. However, if you downloaded multiple cores for a video game system then RetroArch will ask you which core you want to load with your game:
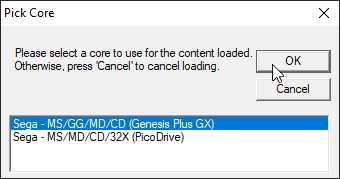
Click on the core you want to use then click OK. - To close a game, press the F1 key for the Quick Menu then click Close Content. Or to close RetroArch altogether, press the Esc key twice.
Note: The File menu lacks a “Recently played games” list. However, that's found in the main window UI under History .
Disabling the on-screen button overlay
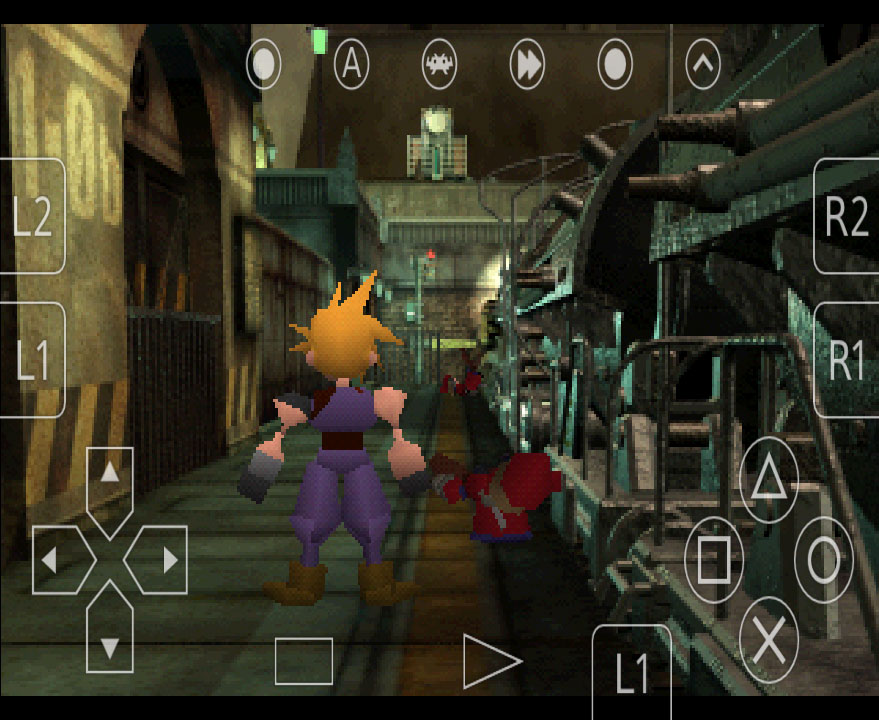
Sometimes certain cores load games with the on-screen button overlay from the mobile version of RetroArch. This is a minor bug, but it's easy to disable.
- During gameplay, press the F1 key for the Quick Menu. Scroll down and click On-Screen Overlay - as shown here .
- Click Display Overlay to toggle it off.
Entering full screen
By default, RetroArch will load games in a window. You can enter & exit full screen mode by pressing the “F” key on your keyboard. You can also access full screen via the “Window” menu at the top; click Window > Toggle Exclusive Full Screen.
The Quick Menu
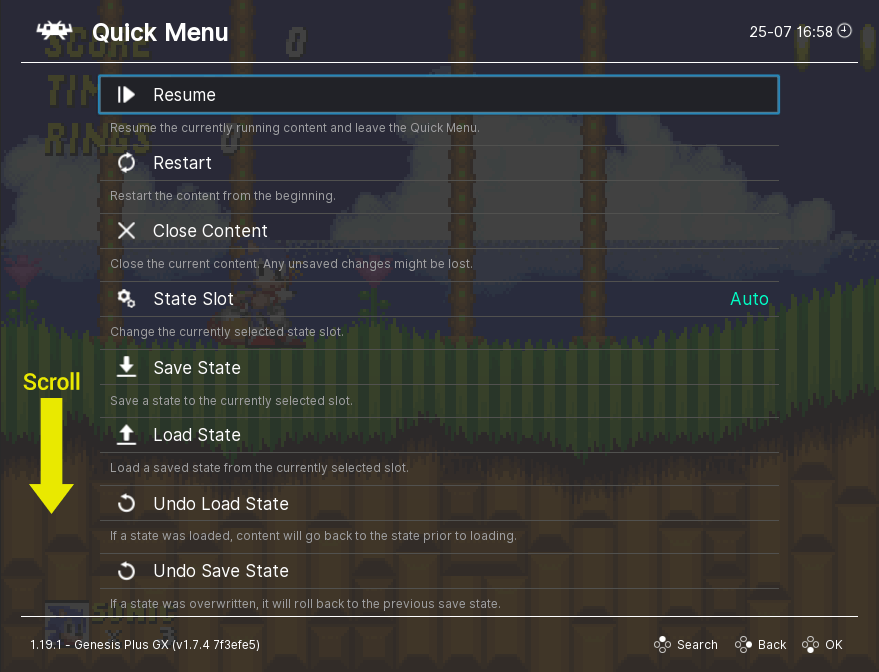 The Quick Menu
The Quick Menu is a handy menu that gives you all the game-specific options for the game you're currently running. Options such as save states, recording, controls, cheats, and more. Access it by pressing the F1 key during gameplay.
The Quick Menu is an essential part of the Android version of RetroArch. On the Windows version it's an optional menu that you don't have to use.
Disc swapping for multiple-CD games
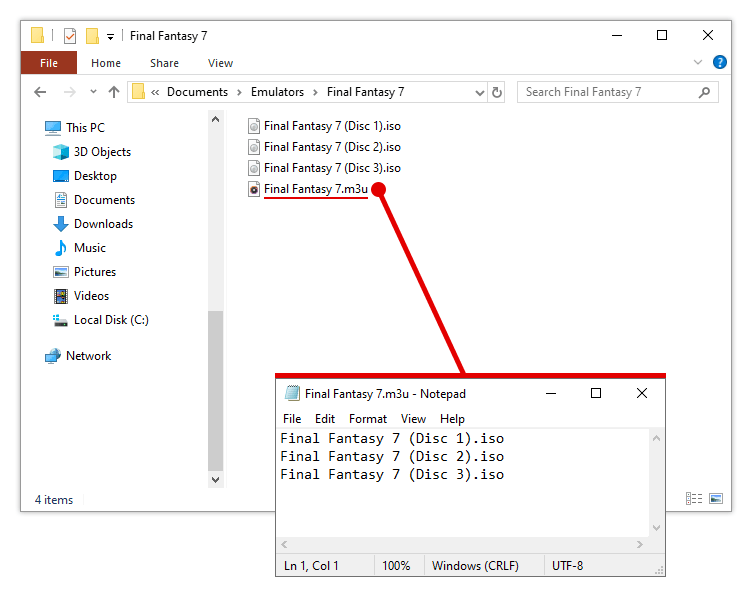
This can either be easy or difficult depending on how computer-savvy you are. I'm going to go as slow as I can and hold your hand through this. First, I'm going to start by showing you the finished result of how everything needs to be prepared for games with multiple discs to work with RetroArch. If this picture below makes sense to you, then you can skip the following directions and simply mimic my picture.
 Final Fantasy VII in CHD format
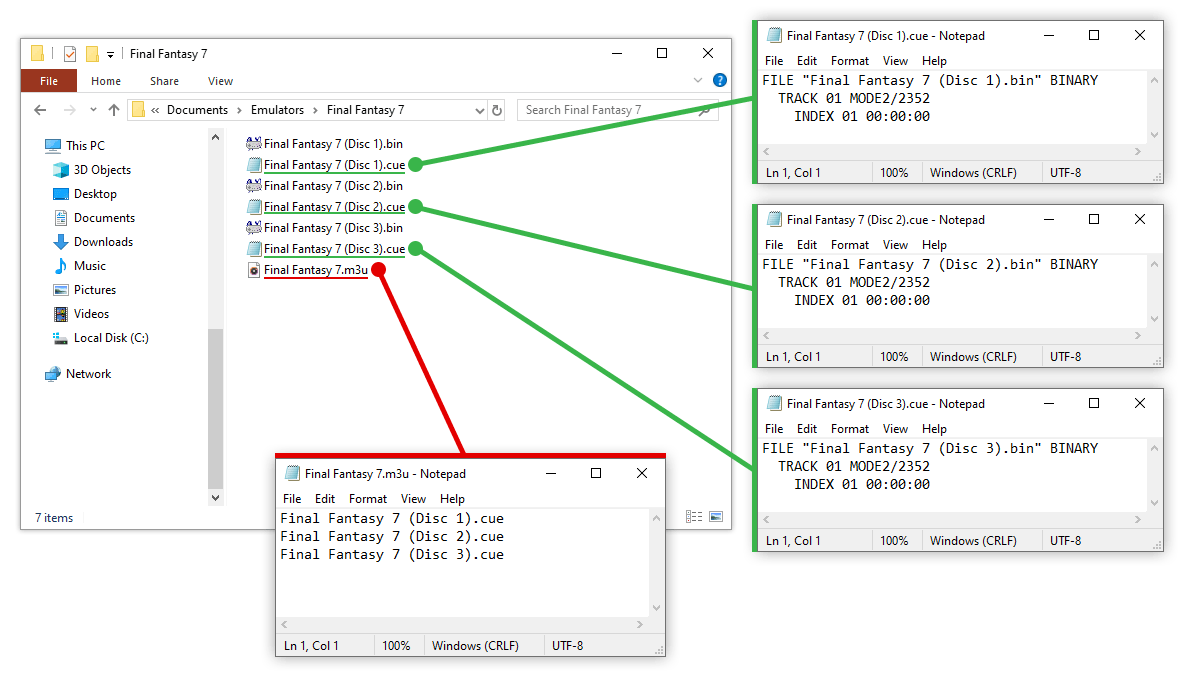 Final Fantasy VII in BIN/CUE format
What we're doing is creating a text file (an “M3U” file) that lists the names of the CUE or ISO files.
Creating an M3U file
- To make this process easier for you, I recommend enabling Windows to show all file extensions. You don't have to, but it makes things far less confusing. Here are some YouTube videos showing you how to do this.
- In the example picture above I'm highlighting the three CUE files as a 'just in case' step. I'm sure the ROM website you downloaded the game from setup these CUE files properly. But yet, just in case I recommend opening these CUE files in “Notepad” and double-checking to make sure the filename shown inside them match the actual filename of the BIN file.
- If this is the first time you're opening up a CUE file, Windows will ask you which program to open it up with. Click on More apps and put a check in “Always use this app to open .cue files” - as shown here . Then click OK.
- Now for the fun part. Open up Notepad. In the lower-left in “Type here to search”, type “notepad”. You'll see Notepad appear in the search .
- In Notepad, type the filenames of each disc for your game. In my example using Final Fantasy 7, you would type this:
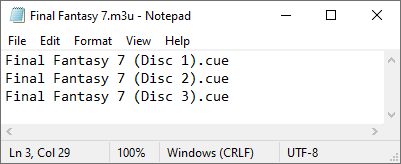
- Next, save the file. Go to the File menu then Save As. Type the exact name of your game as the files have it (well, it doesn't have to be exact, but it's best to keep everything consistent) with a “.m3u” file extension at the end. In my example with Final Fantasy 7, since the game files are called “Final Fantasy 7 (Disc x).cue”, I'm calling the M3U file “Final Fantasy 7.m3u”. Just like this
Important notes
You now have an M3U file for disc swapping. From this point, you no longer load the game by selecting the CUE or ISO files. From now on, you load the game by selecting this M3U file you just made. You know you're successful when you load the M3U and RetroArch immediately presents you with this prompt:

Be careful! If you've already been playing the first disc without creating an M3U file, loading the M3U file will overwrite your memory card file and delete your save(s)! Because loading the new M3U file for the first time creates a new memory card file (one that's shared between all discs).
Swapping to the next disc
I'm going to show you how to swap discs with the Quick Menu. You could swap discs via the Command menu at the top, but I recommend doing this within the Quick Menu because the Command menu doesn't give you visual cues that you swapped discs correctly.
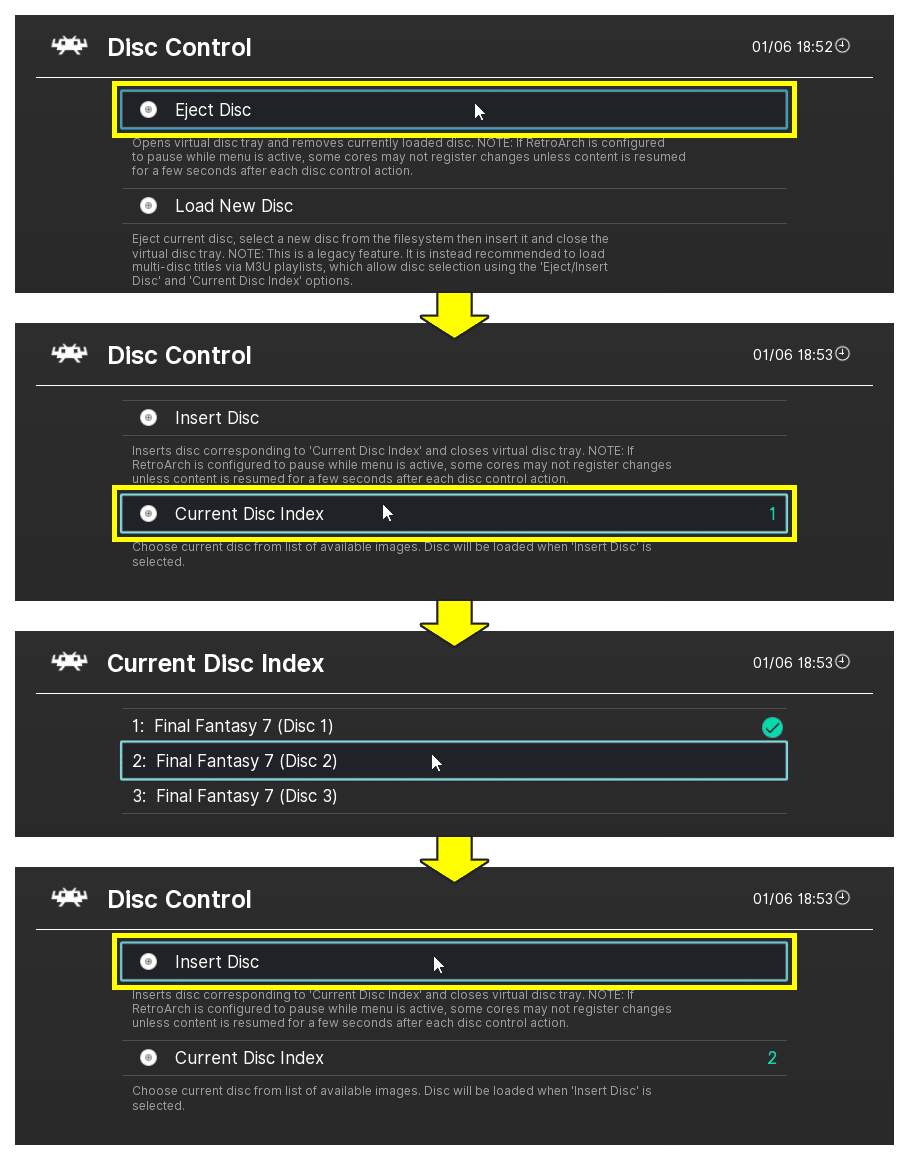
- When the game tells you to swap to the next disc, press the F1 key to access the Quick Menu. Scroll down and click Disc Control - as shown here .
- Follow the sequence in the picture to the right. Click Eject Disc > Current Disc Index.
- Select the next disc you want to swap to.
- Click Insert Disc. You'll return to the game. Press the Start button or whatever the game says to do when you've inserted the next disc.
Loading Genesis/Mega Drive games
On the subject of Genesis/Mega Drive emulation, everyone talks about Kega Fusion and Gens. Those two are very popular Genesis/Mega Drive emulators that have been around since the early 2000s. However, Kega Fusion was last updated in 2010 and Gens/GS was last updated in 2009.
Currently, the best and latest Genesis/Mega Drive emulators are not available as individual standalone programs. They're only available as 'cores' for multi-system emulators, such as RetroArch. Hence, I want to highlight these RetroArch cores for you:
- Genesis Plus GX - Currently, this core is the #1 emulator for Genesis/Mega Drive.
- Genesis Plus GX Wide - An experimental variant of the core that expands the width of the screen by 40%. View this video for a demo!
- PicoDrive - Genesis Plus GX doesn't support 32X games, but PicoDrive does. Also, if you're finding that Genesis Plus GX runs slow or choppy, PicoDrive is a friendlier option for older/slower machines.
Loading Sega CD & TurboGrafx-CD games
First, you need to extract your Sega CD/Mega CD or TurboGrafx-CD/PC Engine CD game from its 7Z, RAR, or ZIP archive. If you have a RAR or 7Z file, you can use 7-Zip (it's free) to extract it.
Now I'm going to explain the different types of formats that people have prepared these games as. They consist of one or more BIN files (the game's data), audio tracks, and a CUE sheet. The CUE sheet is a simple text file with a programmatic list of the audio tracks. ROM websites deliver games in one of four formats:
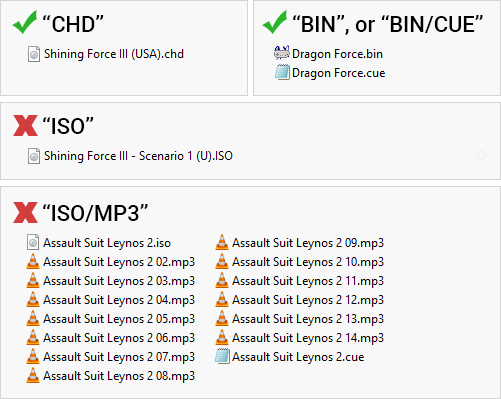
- A CHD (Recommended)
As of the early 2020s, this is the new popular format being distributed from sites. Unlike all the formats listed below, a CHD is a single file. A CHD game would simply be something like “Lunar - Eternal Blue (USA).chd”. - A binary BIN/CUE (Recommended)
As of the early 2020s, this is another new format being distributed from sites. It looks like this when you open it. All files are BIN files. When you look at the CUE sheet , the BIN files are organized as the audio tracks. - A standard BIN/CUE (Not recommended)
This is how video game ISOs (for any CD-based system) are normally ripped as. It looks like this when you open it. When you look at the CUE sheet , the audio tracks are listed even though there are no actual audio files present. - An ISO/MP3 (Doesn't work)
This used to be the most popular format for most of the 2000s and 2010s when the Internet was slower. Converting the audio tracks to MP3 significantly reduced the file size of Sega CD/TurboGrafx-CD games. It looks like this when you open it. - An ISO/WAV (Not recommended)
This is an ISO/MP3 with the audio tracks converted to WAV .
I need to point out that not all of the above formats are compatible with RetroArch. ISO/MP3 is not supported at all. ISO/WAV will load, but the CD audio will run fast as if in fast forward. Only BIN/CUE ('binary' or 'standard') will successfully run on RetroArch. If you do have games in ISO/MP3 or ISO/WAV, you need to look for other ROM websites to find them in BIN/CUE.
As for which core to use, “Genesis Plus GX” is the top recommendation for Sega CD/Mega CD emulation. If you find that it's running slow or choppy on your device, “PicoDrive” is the next best choice.
Anyway, with a CHD or BIN/CUE in hand, the next steps are easy:
- Copy over the proper BIOS to RetroArch's “system” folder.
- Games must be extracted from their 7Z/RAR/ZIP archives. 7-Zip (it's free) can extract RAR and 7Z files. If you need step-by-step help with this, there are YouTube videos. If your game is a CHD, ROM sites don't compress them into archives, so you don't need to worry about extracting them.
- Next, load your game. Click the File menu then Load Content. Navigate to the location on your computer where your game is.
- Select the CUE sheet then click Open - as shown here
Loading Sega Saturn games
Mednafen is regarded as the best emulator for Sega Saturn. However, Mednafen's usability is horrible and I don't recommend it to you guys. Fortunately, we can have the same high-quality Saturn emulation experience on RetroArch thanks to the “Saturn (Beetle Saturn)” core - which is Mednafen's Saturn emulator.
Here's how to get yourself up and running with Saturn emulation:
- The Saturn BIOS needs to be in RetroArch's “system” folder.
- Games must be extracted from their ZIP/RAR/7Z archives. 7-Zip (it's free) can extract RAR and 7Z files. If you need step-by-step help with this, there are YouTube videos.
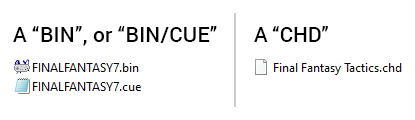
- It matters what type of format your Saturn ISOs are in. View the picture below for the different types. “CHD” & “BIN/CUE” are supported by the Beetle core. Although CHD is highly recommended over BIN/CUE. RetroArch often has trouble loading Saturn games in BIN/CUE format.
- Download the Beetle Saturn core. On the main screen, go to Online Updater > Core Updater. Scroll down the long list and click on Sega - Saturn (Beetle Saturn) - as shown here .
- Next, load your Saturn game. Click the File menu then Load Content. Navigate to the location on your computer where your Saturn ISO is, then select the ISO file (or CHD file). That's it!
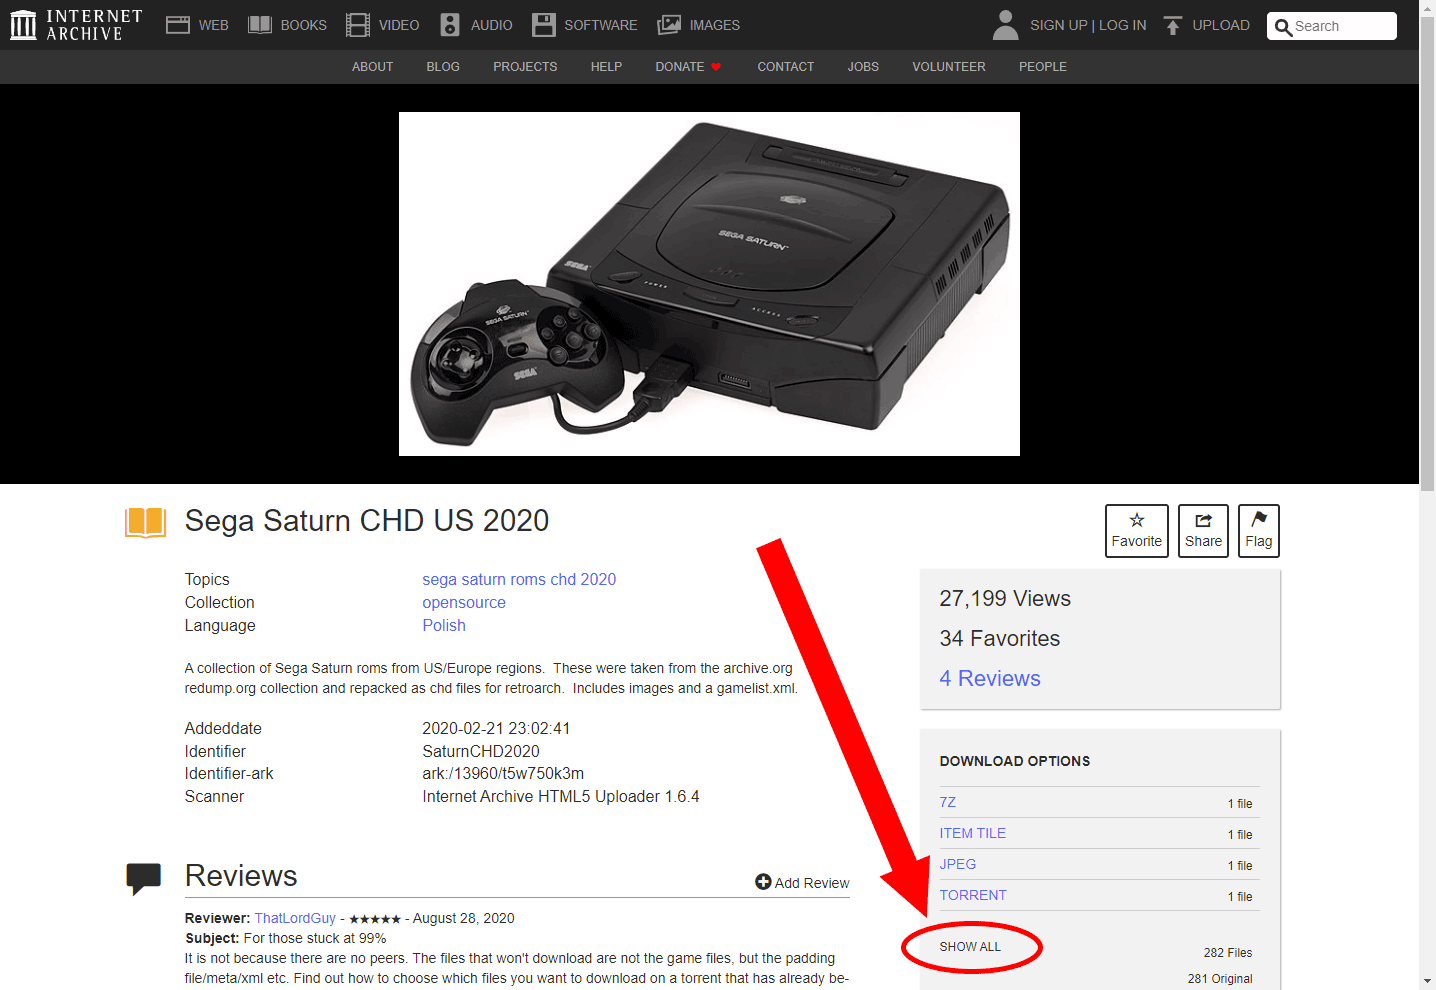
If you followed these directions and RetroArch boots to just a black screen or the Saturn's CD player, then I need to tell you about the infamous problem with Saturn emulation. Saturn emulators are notorious for having poor compatibility with ISOs (not to be confused with game compatibility). Meaning, maybe 50% of the time, your ISOs will fail to boot. The good news is that there's a 'fix' for this: only use “CHD” format ISOs. They're a relatively new ISO format that has a high success rate with working. To find Saturn CHD games, I recommend searching Google with “archive.org saturn chd”. Click the first search result, then click SHOW ALL, as shown here . Then download all the games you want :)
Loading PlayStation 1 games
RetroArch's PlayStation 1 emulation is pretty awesome. It has all the latest 'PGXP corrections', and more. However, RetroArch is a hassle when it comes to disc-swapping with multiple-CD games. DuckStation is a great alternative. It's as good as RetroArch, and without the disc-swapping hassle.
Here's how to get yourself up and running with PlayStation 1 emulation:
- The PlayStation 1 BIOS needs to be in RetroArch's “system” folder.
- Games must be extracted from their ZIP/RAR/7Z archives. 7-Zip (it's free) can extract RAR and 7Z files. If you need step-by-step help with this, there are YouTube videos. Sometimes ROM sites deliver PlayStation 1 ISOs in ECM format. To extract an ECM file watch this video.
- RetroArch only accepts PlayStation 1 ISOs that are in “BIN/CUE”, “CHD”, “CCD”, “TOC”, and “PBP”. Like below:
If the PlayStation 1 ISO you downloaded came in a weird format such as NRG, IMG, UIF, DAA, CDI, XBX, B51, BWI, etc. - they are not supported. - Download the PlayStation 1 core. On the main screen, go to Online Updater > Core Updater - as shown here . Scroll down the long list and click on Sony - PlayStation (Beetle PSX HW).
- What's the difference between “Beetle PSX HW” and “Beetle PSX”? HW provides a GL and Vulkan renderer. It also offers more rendering options such as “PGXP Perspective Correct Texturing” (this is explained below). The regular Beetle PSX core uses software rendering.
- Next, load your PlayStation 1 game. Click the File menu then Load Content. Navigate to the location on your computer where your PlayStation 1 ISO is, then select the BIN or ISO file.
- If the game loads with the on-screen button overlay , you can disable it.
-
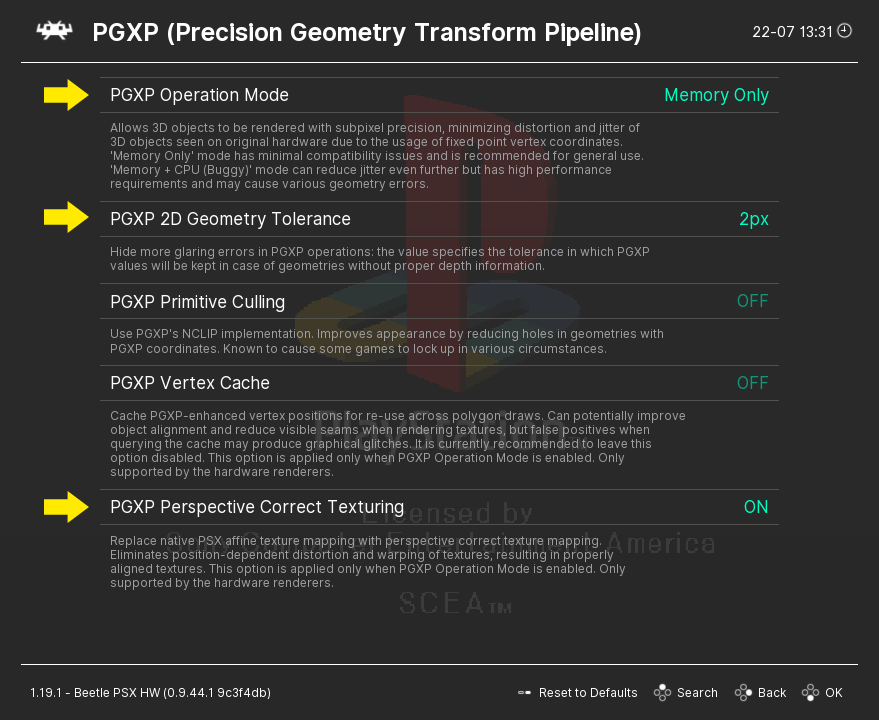
By default, this core doesn't have enhanced 3D graphics enabled. After loading a PlayStation 1 game, press the F1 key for the Quick Menu. Scroll down and click Core Options then PGXP. You'll arrive at the picture shown to the right.
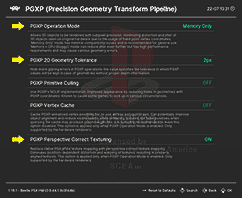 Beetle PSX's options
-
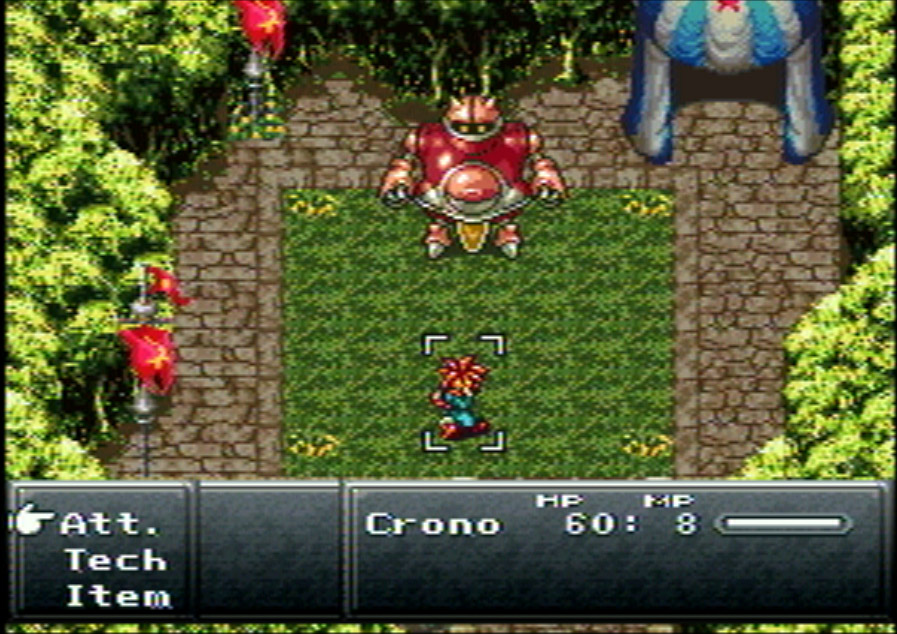
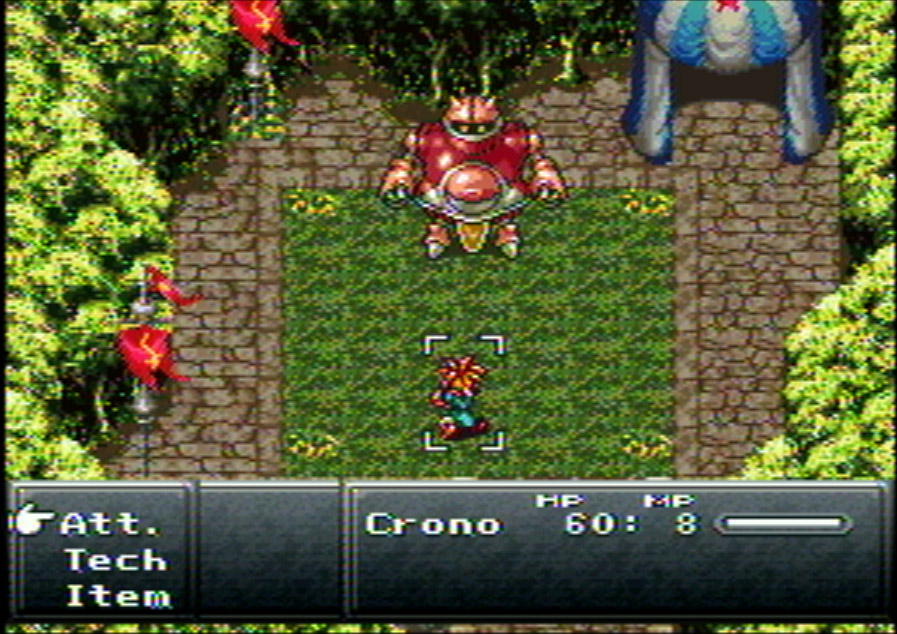
✅ PGXP Operation Mode - 3D games suffer from jittery animation. Setting PGXP to “Memory Only” will attempt to correct it. This is best described with the animated GIF to the right. Notice the face of the lady.
It's not 100% perfect, but the difference is dramatic.
 (Left) Normal, (Right) PGXP Mode
- ✅ PGXP Geometry Tolerance - This upscales the 3D graphics, making them gorgeous and sharp. Change this to 2x or 4x, or even 8x if your computer can handle it. See the difference this makes.
- ⛔ PGXP Primitive Culling & PGXP Vertex Cache - These two attempt to fix small defects in the high-resolution rendering of 3D graphics. Primitive Culling may crash games, and Vertex Cache may cause graphic glitches. It's best to leave these turned off.
- ✅ PGXP Perspective Correct Texturing - PlayStation 1 games weren't designed to be in high resolution. As a result, you'll notice that surface textures are skewed and not quite straight. Enabling this 'correct texturing' feature fixes that! See the difference this makes. This texture correctioning is more obvious in full 3D games; these videos show clearer examples.
-
✅ PGXP Operation Mode - 3D games suffer from jittery animation. Setting PGXP to “Memory Only” will attempt to correct it. This is best described with the animated GIF to the right. Notice the face of the lady.
Note: Beetle PSX (including Beetle PSX HW) isn't very friendly with games that are hacks or fan translations. Tales of Phantasia in particular is a popular fan translation that doesn't work on it. However, the other PSX core “PCSX ReARMed” works well with hacks.
Q: My PAL PS1 game won't load!
Upon loading a PAL version of a PlayStation 1 game, you may receive this error:
ERROR: System failed to boot.
Error loading content
Some PAL PS1 games (mostly by Infogrames and EA) use LibCrypt anti-piracy protection. For these games, you must have the SBI file in order to emulate them properly.
Depending on where you downloaded the game, an SBI file might already be included in it. If that's the case, simply make sure the SBI file and your PS1 ISO have the same name. If the SBI file isn't there with your PAL ISO, you can download a collection of all SBI files below.
- All PAL PS1 SBI files (109 KB)
If you need more help, check out this page on CDRomance.
Loading Nintendo 64 games
Nintendo 64 emulation is great on RetroArch, too. The best part is that the 3D is enhanced and upscaled by default (unlike PS1 emulation where you need to enable everything). There are a few details I need to point out.
- The best core for Nintendo 64 emulation is Nintendo - Nintendo 64 (Mupen64Plus-Next) .
-
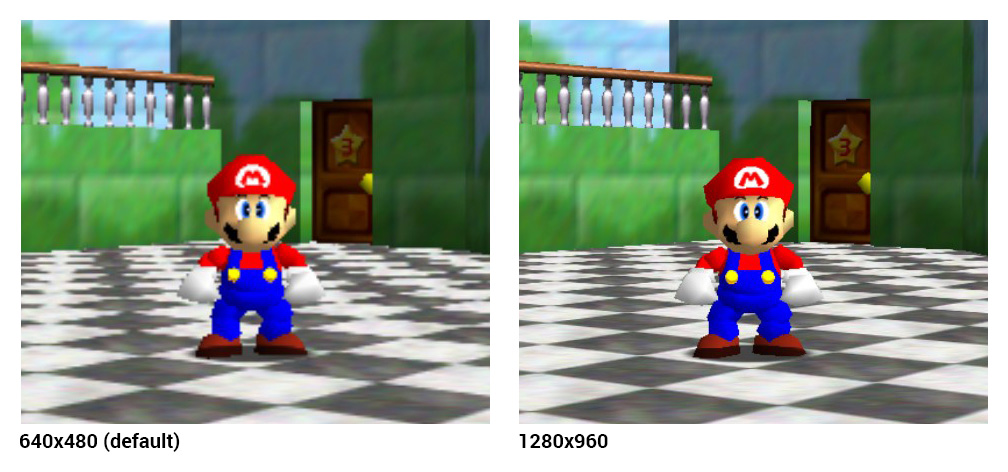
After installing ParaLLEI N64, you may want to tweak the resolution to upscale the 3D even further. During gameplay, press the F1 key for the Quick Menu and click Options. Look for Resolution (restart) select a higher resolution. After selecting another resolution, you need to close the game and restart it to see the change.
 Comparison of default vs 1280x960
- Not all the keys are configured by default. If you play Mario 64, you'll find that you can't move Mario. Go to the keyboard configuration in Settings > Input > Port 1 Binds. These empty buttons need to be configured. Particularly, setting up the left analog is important.
Loading Arcade games: Getting started
Arcade emulation in general can be tricky (with any emulator). The arcade roms readily available in rom sites don't run with the latest arcade emulators. They run with old emulators.
The cores to download
In RetroArch's Core Updater, I recommend downloading the following cores:
- Arcade (MAME - Current) - This is the latest build of MAME. It most effectively runs arcade games newer than 2003.
- Arcade (MAME 2003) - This is a build of MAME from 2003. It most effectively runs classic arcade games from 2003 and older.
- Arcade (MAME 2003-Plus) - This is the same core as above, but modified to run better on older/slower devices.
Download all versions of a game
Arcade roms use a parent/child system to help reduce the memory size of games. I explain this more in the MAME tutorial: Understanding MAME's rom structure. The biggest challenge with arcade emulators is dealing with the notorious errors that state you're missing files.
So because of the parent/child system and the missing-files errors, it's best to download every version of a game. That means downloading the versions for US, Japan, Europe, etc. If you're looking for a good place to download arcade roms, try searching Google with: reddit download arcade roms.
Don't extract or rename arcade roms!
Arcade roms are specifically designed to work with arcade emulators as zip files and in the exact filenames they're given. If you rename these zip files or extract them, arcade emulators won't detect them.
NeoGeo games require the BIOS
If you want to load NeoGeo games, you need the NeoGeo BIOS. You can download it from the BIOS section. Within my BIOS zip file, you'll see two BIOS zip files for NeoGeo:
- neogeo.zip - Required in order to boot NeoGeo games. Do not rename or extract this zip file! This should work with MAME 2010 and newer.
- neogeo(old).zip - You may need this for MAME 2003 or older. Rename it to “neogeo.zip” if you want to use it.
Place the NeoGeo BIOS in the same folder where your NeoGeo roms are.
Loading Arcade games
- It's best to load the core first. In the GUI, select Load Core . Assuming you already downloaded the arcade cores I recommended above, you'll see them listed here.
- If you're trying to play a game that was released after 2003, select Arcade (MAME - Current).
- If you're trying to play a classic game from 2003 and older, select Arcade (MAME 2003). Of course, you could certainly try playing a game older than 2003 with MAME Current. Although I think it has a better chance of working with MAME 2003.
- Next, load the arcade rom through the File menu (don't use the GUI). Go to File > Load Content
As for which version to load, select whichever version you want in the series of files for an arcade game . You can select the parent at the top of the list, or be patriotic and select the US version. - If the game runs with MAME Current: That's great! You're all set :)
If you get errors with MAME Current: The errors would say...
“Required files are missing, the game cannot be run” (looks like this )
“Failed to load content”
“Fatal error: Required files are missing, the machine cannot run.”
That means you're missing files or your arcade roms are older than what the core supports. Go back to step #1 and select the “Arcade (MAME 2003)” core.
If MAME 2003 runs slow: If you selected MAME 2003 and your game loads but runs slow, go back to step #1 and select the “Arcade (MAME 2003-Plus)” core. - If the game runs with MAME 2003: That's great! You're all set :)
If you get errors with MAME 2003: There's something wrong with your roms and it's not the fault of the arcade cores. Make sure to download ALL versions of a game (all roms for it). You could also try downloading arcade roms from different places. And don't forget not to rename or extract the zip files for arcade roms.
To play arcade games, the general keys are the same as with MAME: press “5” a few times to insert coins for Player 1, then press “1” for Player 1 Start. The keys 1-4 are the Start keys for Players 1-4. The keys 5-8 are the “insert coin” keys for Players 1-4.
Systems to avoid with RetroArch
While RetroArch is an awesome emulator that can run pretty much everything, that doesn't mean it's good at everything. The following systems aren't recommended for use.
- GameCube/Wii emulation - The Dolphin core, “Nintendo - GameCube / Wii (Dolphin)”, runs slow and its options are confusing. The standalone emulator for Dolphin is better.
- Nintendo DS emulation - The cores for melonDS and DeSmuME both run slow. They're under “Nintendo - DS (DeSmuME)” and “Nintendo - DS (melonDS)”. The standalone emulators for melonDS and DeSmuME are best.
- Sony PSP emulation - The PPSSPP core, “Sony - PlayStation Portable (PPSSPP)”, runs slow and its options are confusing. The standalone emulator for PPSSPP is better.
- Sony PlayStation 2 emulation - RetroArch offers “Sony - PlayStation 2 (LRPS2)” for PS2 emulation. At the time I'm writing this, this core is still under development, so it's not the best option. Using the standalone emulator for PCSX2 is the best option for PS2 emulation.
Shaders (screen filters)
Screen shaders (called 'screen filters' in other emulators) render your screen in a variety of ways to make it look sharper and beautiful. Here's how to enable it:
- You don't have to have a game running, but I recommend that you do so that you can quickly see the changes for the different filters that you enable.
- On the main screen, click Settings > Video - as shown here .
-
At the Video options, scroll down and look for Video Filter. Click this for the list of screen filters. Select a filter, then return to your game to see how it looks.
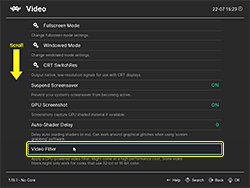 The Video options

Not sure which shader to pick? Keep reading.
The Shaders
RetroArch comes with an overwhelming amount of shaders! There are well over 50. I'm going to show you the ones I recommend. Once you click a thumbnail below, you can press the left & right arrow keys on your keyboard to quickly transition between all of these previews.
- Blargg's NTSC filters: these fun filters simulate a retro TV. They flicker and everything! They consist of Composite, RF, RGB, and S-Video.
- EPX & Scale2x: My favorite! These attempt to round pixels together without blurring. They look the same.
- Phosphor2x & Scanlines: classic filters that add scanlines. Phosphor2x adds plaid-like scanlines.


Fast forward
Press the Spacebar key to enable fast forward. Press it again to disable it.
Is fast forward not fast enough or not slow enough for you? You can adjust the speed of fast forward in Settings. It's found by clicking on Settings > Frame Throttle > Fast Foward Rate.
Rewind
The Rewind feature is disabled by default because enabling it might slow performance. To enable it, while a game is running press the F1 key for the Quick Menu then scroll down and click Rewind > Rewind > ON. Henceforth, simply press the R key to rewind.
Save states
Save states is a feature that saves the exact spot you are in any game. You can recall your save state at any time. You can collect multiple save states through 'slots'.
What are Save Slots? Let's say the Save Slot is set to slot 0. You save a state at the beginning of level 5 in Super Mario Bros. Then you change the save slot to slot 1. Then you save a state at the beginning of level 7. Your save at level 5 is still preserved in slot 0, and you can access it when you change the save slot back to slot 0.
There are three different ways to access save states.
Keyboard shortcuts
- Save state = F2
- Load state = F4
- Decrease current save slot = F6
- Increase current save slot = F7
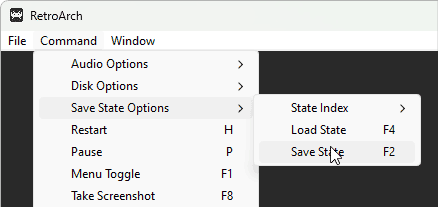
Via the Command menu
In Command > Save State Options you can save state, load state, and select between 10 different save slots.
Note: With the keyboard shortcuts and via the Quick Menu you can switch between an infinite amount of save slots instead of being capped at 10 when using the Command menu.
Via the Quick Menu
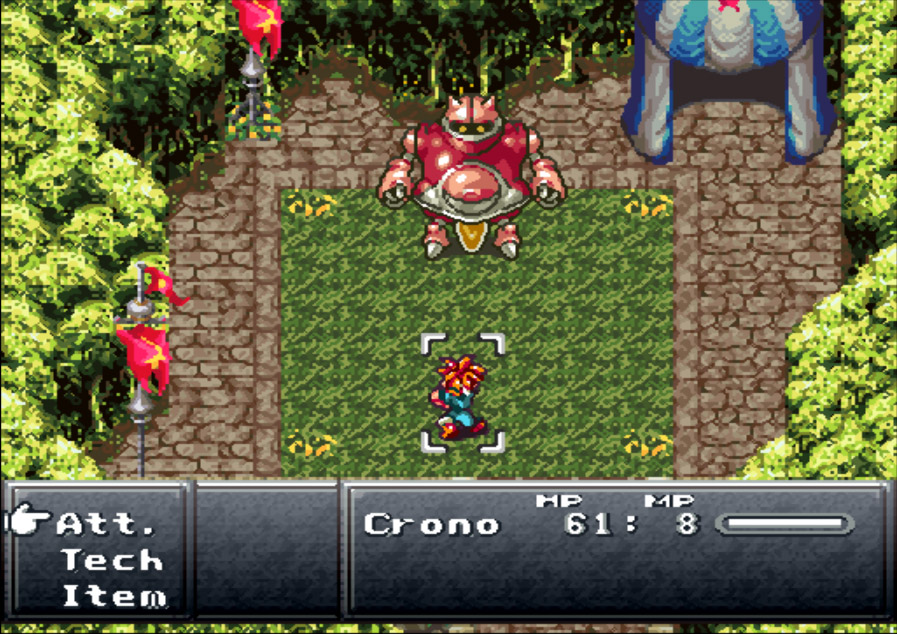
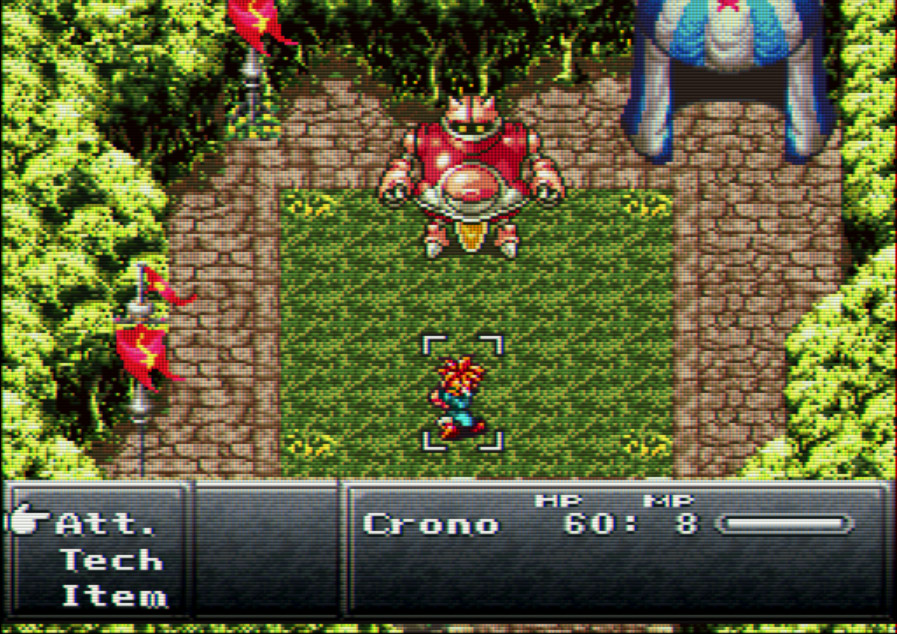
During gameplay, press the F1 key to access the Quick Menu. From there all the save options are immediately in view : Save State, Load State, and Save Slots.
Capturing screenshots
Press the F8 key to capture a screenshot, or in the top menu go to Command > Take Screenshot. RetroArch will save it as a PNG image and toss it into the “screenshots” folder. RetroArch captures screenshots with the current shader/filter you're using.
Where's the screenshots folder? Follow the directions in finding the BIOS folder to locate RetroArch's root folder. There you'll find the screenshots folder.
Using cheats
RetroArch has a massive collection of cheats available! Here's how to use them.
- Make sure you have the cheat files downloaded. Go to the Online Updater and select Update Cheats - as shown here .
- During gameplay, press F1 for the Quick Menu then select Cheats > Load Cheat File (Replace) - as shown here .
- You'll arrive at the cheats list. Select the video game system for your game and select your game.
-
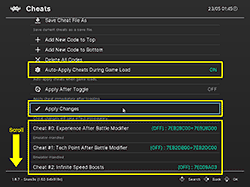
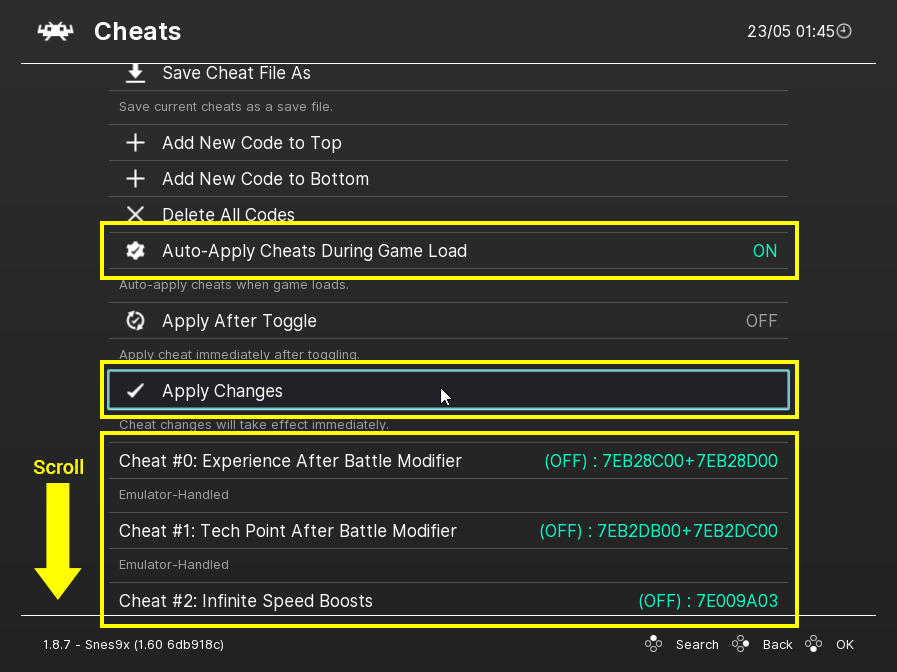
RetroArch will take you back to the Cheats main screen. When you scroll down, the cheats for your game are now populated on this screen (shown in the picture to the right). Before you scroll all the way down, I recommend enabling Auto-Apply Cheats. That'll keep your cheats active after you close RetroArch and re-open the game at a later time.
 Cheat options & enabling cheats
- When you select a cheat you want to use, you need to click Enabled to turn it on .
- When you're done enabling all the cheats you want to use, click Apply Changes . Resume your game and enjoy the cheats :)
There's one caveat with using RetroArch's pre-downloaded cheats. They're hit or miss and may not work. These cheats are largely untested. You may have to add your own cheats. Read below to learn how.
Adding your own cheats
Adding your own cheats is a slightly involved process. You can't do it through RetroArch's UI. You need to create a text file and add the cheats using RetroArch's format.
- In RetroArch's root folder, go to the cheats folder . Locate the CHT file for the game you want to add cheats to. Double-click on it to open it in WordPad.
- The file will look something like this:
The format should be self-explanatory. At the top you put the number of cheats. Each cheat needs to be numbered in order, starting at 0. Most of RetroArch's codes are ProAction Replay. For the sake of these directions, I'm going to add some Game Genie codes. After editing the CHT file in WordPad, my finished CHT file looks like this:cheats = 2
cheat0_desc = "Unlimited Energy"
cheat0_code = "FF00F7:0003"
cheat0_enable = false
cheat1_desc = "Unlimited Lives"
cheat1_code = "FF00F8:0003"
cheat1_enable = false
Save the file.cheats = 3
cheat0_desc = "Infinite lives"
cheat0_code = "AX3A-AA2N"
cheat0_enable = false
cheat1_desc = "Invincible line 1"
cheat1_code = "98FA-298D"
cheat1_enable = false
cheat2_desc = "Invincible line 2"
cheat2_code = "AF75-7BC1"
cheat2_enable = false - Following the directions in using cheats, use RetroArch to select your CHT file and turn on your cheats. And don't forget to apply them.
Dumping your CD-based games to ISO
Perhaps you prefer using your own CD-based games instead of downloading them from the Internet? Or maybe you just want to keep backup copies of your games? Whatever the case, here's how you can dump your games. I haven't tested every system, but I had no issues ripping games from Sega CD, TurboGrafx16-CD, PlayStation 1, and Saturn.
- Put your game CD in your computer's CD-ROM drive. Open RetroArch and select Dump Disc, as shown here
- On the next screen, select your CD-ROM drive (the first option, most likely).
- You're going to see this progress bar appear on the lower-left of the screen:

Depending on the speed of your CD-ROM drive, this will probably take 5-20 minutes to finish. - When RetroArch finishes dumping your game CD, the progress bar will disappear. It doesn't prompt you with an alert sound or anything. If your CD-ROM was humming during the dumping, you'll know RetroArch finished when your CD-ROM's humming sound stops.
- RetroArch dumps the ISO of your game CD in its Downloads folder. So the next step is locating the Downloads folder. If you didn't set a custom location for RetroArch during its installation, then it's in its default location in Windows (C:) > RetroArch-Win64 - as shown here .
- In RetroArch's Downloads folder, you should see a BIN file and a CUE file with a weird filename like “cdrom-200000-1000000”, as shown here . Double-click on the CUE file and choose to open it in Notepad. You'll see the text that's shown in my picture.
- Next, rename the CUE file and BIN file to the name of your game. Open the CUE file in Notepad to rename the ISO as well. You can name these files to any name you want. The only requirement is that both files & the name in the CUE file must be the same exact name. Look here - these three instances need to be changed to the same name.
- That's it! You've successfully dumped your PlayStation 1 game. You can use it with any PlayStation 1 emulator or any multi-system emulator that supports PlayStation 1.
Using saves from other emulators
This is a tricky topic. And I have this topic thoroughly covered in my Game Saves Tutorial. It's possible for certain in-game save files to be transferred over to RetroArch. Save states cannot be transferred. In-game saves & save states are different formats - don't get them confused.
- Super Nintendo emulators: Through in-game saved RAM (*.SRM files), saves from emulators such as Snes9x, ZSNES, and BSNES can be transferred over to RetroArch. SNES SRM is the friendliest and most compatible save format; they work with any SNES emulator on any OS.
- PlayStation 1 emulators: Through MCR memory card files (*.MCR), saves from emulators such as ePSXe can be transferred over to RetroArch. Just keep note that by default RetroArch doesn't collect saves into a single memory card as ePSXe does. Rather, it gives each game its own memory card.
- Genesis emulators: These saves cannot be transferred.
- All other systems/emulators: Transferring saves is hit or miss. Most emulators save their in-game saves as *.SAV files. Unlike SNES SRM and PS1 MCR, emulator authors didn't get together and settle on a global format for *.SAV, so that's why transferring them doesn't always work.
By now you probably have this question in your head: “'Transferring' saves? What does that even mean? How do you 'transfer' a save??” Good question! Here's how:
- The first thing you need to do is to locate RetroArch's 'saves' folder . Using the directions in the finding the BIOS folder section, you'll find the saves folder in RetroArch's root folder.
- Copy over the save files you want to be transferred to this saves folder. Make sure the save files have the exact same filename as the ROM. For example, if your game is called “Chrono Trigger (U).zip”, make sure the SRM is called “Chrono Trigger (U).srm”.
- Close & restart RetroArch. Load the game, go to the game's title screen, and select whatever option it has to continue a saved game.
Finding ROMs
In my links page, I have some good links to sites where you can download ROMs and ISOs for classic video game systems.
Finding games for PS2/PS3/PSP/GameCube/Wii and beyond is trickier due to how large games are. These games are typically not available in ROM sites readily found on Google. However, Archive.org is a superb site where you can find these games for download. Navigating that site isn't easy. It's easier to search Google with such phrases as “archive.org playstation 2”. I offer some more help with that in this image .
Another way you can try to find large/newer games is through Reddit. The best way to find them is by searching Google with such phrases as “reddit download playstation 2”.
div>