MagicEngine Tutorial
⚠️ This tutorial is archived and no longer included in the main navigation. This emulator is too old and I do not recommend it for modern devices.
- About MagicEngine
- Should you use MagicEngine?
- Installation
- MagicEngine setup
- Setting up the keyboard
- Setting up a gamepad
- Loading a game
- Booting a CD game
- Loading a CD game from ISO
- Burning CD games from ISO
- Fullscreen/window mode
- Q: Fullscreen's screen is small!
- Screen filters
- Save states
- Capturing screen shots
- Finding ROMs
- Q: MagicEngine isn't saving anything!
View this guide on Google Docs to:
- Save as PDF or any common doc format
Share
About MagicEngine
This tutorial is to help you with MagicEngine for Windows. MagicEngine is, hands down, the best TurboGrafx16 emulator out there. Its interface is easy to use. It runs every type of game perfectly: regular carts, arcade carts, Super CD, Super CD2, Arcade CD. However, MagicEngine needs to be purchased. It costs $30 US. Its free trial lets you play games for 5 minutes.
There's another thing that might turn you off about MagicEngine (and Ootake). CD games can only be played via your CD-ROM drive. It does not support booting CD games from ISO. That really sucks because we don't really use CD-ROM drives anymore. RetroArch, a multi-system emulator, does allow you to boot CD games from ISO.
MagicEngine can be downloaded from its homepage: magicengine.com.
Should you use MagicEngine?
With all the emulator offerings as of 2026, should you use MagicEngine? Hmmmmm, well... no. MagicEngine hasn't been updated since 2008 and they're still charging money for it. I made this tutorial because MagicEngine was a top emulator for a long time. RetroArch is the top choice now for TurboGrafx16/PC Engine emulation. Ootake is a good option as well since it's still in active development.
MagicEngine, though, still has the nostalgic factor. It's an important piece of emulation history. It was the first and best PC Engine emulator. Its GUI isn't outdated either - using MagicEngine is still a pleasant experience.
Installation
MagicEngine is a standalone program, so it does not have an install wizard. Installation is simple: just extract MagicEngine from its zip file. Not sure how to extract zip files? Here's a video tutorial showing you how: how to unzip files on Windows.
IMPORTANT! MagicEngine must be placed in a common folder on your computer. I recommend Documents, Downloads, or create a folder on your desktop. If you place MagicEngine somewhere else on your main C drive, then you may be restricting it to read-only access. Doing so prevents MagicEngine from saving anything.
To open MagicEngine, double-click on ![]()
MagicEngine setup
Upon opening MagicEngine for the first time, you're presented with this window:
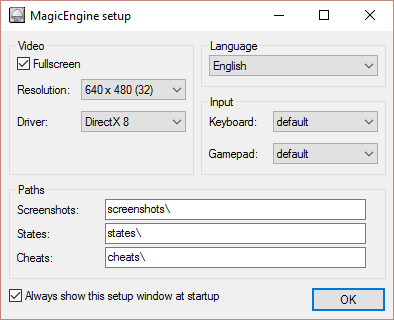
There's not much of a point to this window. You can remove the check from Always show this setup window at startup, then click OK. It doesn't matter if you set MagicEngine to fullscreen or not here, because you can always press Alt+Enter to switch between fullscreen mode and window mode.
Setting up the keyboard
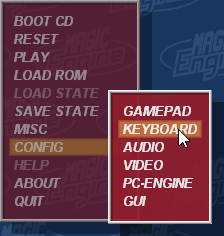
- Using the mouse or keyboard arrows, go to Config > Keyboard, as shown below:
- You'll arrive at the keyboard configuration screen:
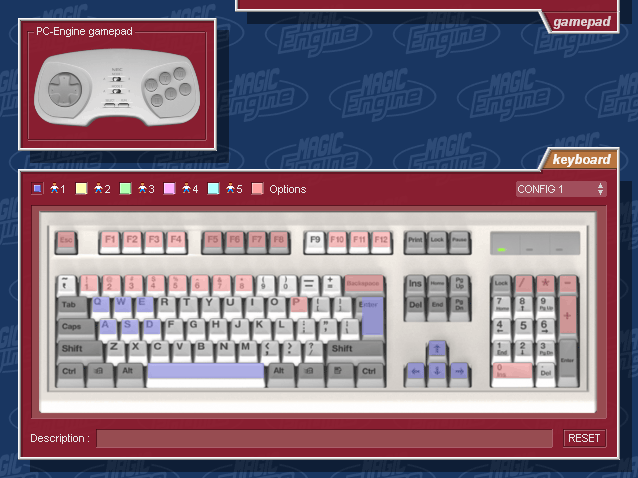
The keys highlighted in blue are game keys and the keys highlighted in red are emulator features. Hover your mouse over these keys to see what they're assigned to. Notice that when you hover over a game key, you see the button on the controller get circled, signaling to you which key is which on the real controller. - To reassign any of these keys, simply click on a key and choose what you want it to be from the little menu that pops up. If you accidentally clicked the wrong key, press the Esc key to exit out of the little menu.
Setting up a gamepad
- Before you open MagicEngine you must have your gamepad plugged in. If MagicEngine is open, connect your gamepad and close/re-open MagicEngine.
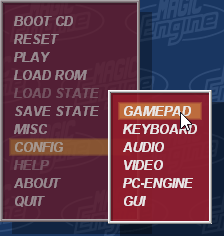
- Using the mouse or keyboard arrows, go to Config > Gamepad, as shown below:
- You'll arrive at the gamepad configuration screen:
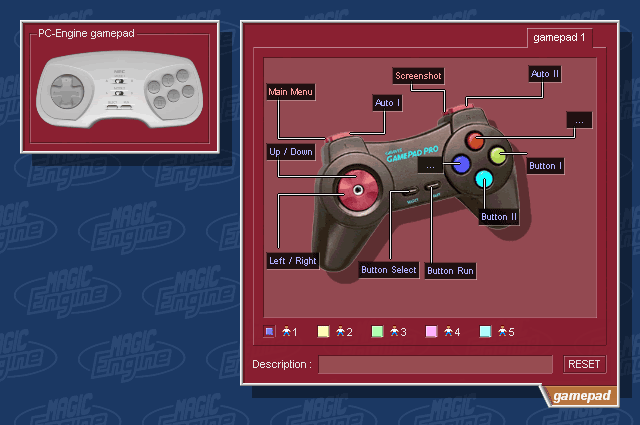
You'll see a picture of a gamepad with labels telling you which key is assigned to which. Hover your mouse over the highlighted keys to see what they're assigned to. Notice that when you hover over a label, you see the button on the upper-left controller get circled, signaling to you which key is which on the real controller. - To reassign any of these buttons, simply click on a button and choose what you want it to be from the little menu that pops up. If you accidentally press the wrong button, press the Esc key to exit out of the little menu.
- Note that you can assign emulator functions such as “Main Menu” and “Screenshots”, to spare gamepad buttons. Whatever you want. This feature is pretty useful.
Loading a game
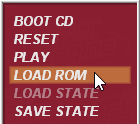
Click on Load Rom, or press the Enter key on Load Rom. If you placed your roms in the same folder as MagicEngine, they would be the first thing you see.
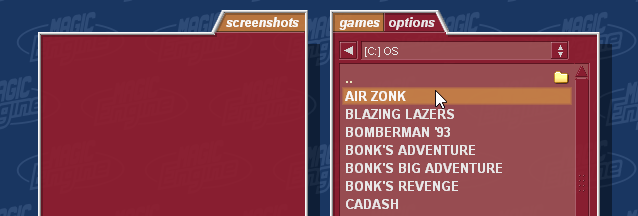
Otherwise, click on the "." and ".." to navigate your computer to where your roms are located (see below). Simply click or press Enter on a game to open it.
Booting a CD game
- The first thing you need to do is download the BIOS syscard files. I have them right here:
PC Engine CD Syscards (429 KB) - Extract the BIOS files from their zip file and place them in MagicEngine's folder like this . Then open up MagicEngine.
- Insert your TurboGrafx16-CD/PC Engine CD game into your CD-ROM drive. Give it a minute for Windows to detect it.
- In the main menu, click or press Enter on Boot CD. You'll see your game pop-up in a little sub menu. Click or press Enter on it.
*If you're using an old version of Windows (Windows XP, Windows 98, Windows ME) and MagicEngine does nothing when you try to boot your CD game, try installing ForceASPI. - The first screen you'll see is the BIOS screen, prompting you to press Run to continue. Go ahead and do so. You will always see this screen when you boot a CD game. Then your game will begin. Enjoy!
Loading a CD game from ISO
I need to disappoint you: MagicEngine does not support running TurboGrafx16-CD/PC Engine CD games via ISO files. And the authors of MagicEngine intend to never add ISO support. It's a shame because MagicEngine is the #1 emulator. Anyhow, hope isn't lost. There are two workarounds you can try.
Workaround 1: Use RetroArch
The easiest way to play games from ISO is to use another emulator: RetroArch. This is a popular multi-system emulator that loads ISOs easily and effectively.
Workaround 2: Burn your CD games to CD
If you burn your ISO to a real CD (a CD-R disc), you'd have no problem playing your games with MagicEngine. I have burning directions below.
Burning CD games from ISO
These directions are for burning either a BIN/CUE archive or ISO/MP3 archive to a CD-R. Also, you should know that the real TurboGrafx16 system does not have copy protection. You can play CD-R copies on it with no problem.
Must have a CUE sheet!
It is essential for your CD game you are going to burn to have a CUE sheet . You cannot proceed without it. If it's missing, no worries. You can use this helpful utility, Sega CUE Maker (87 KB), to generate a CUE sheet.
I. Convert MP3s to WAV
If your CD game is an ISO/MP3, then the MP3 tracks must be converted to WAV. You can do so quickly with an awesome free program known as WinLAME. You can download WinLAME here (1.5 MB). Here's how to convert MP3s to WAV with WinLAME:
- Open WinLAME. Click on the
 button, look for the folder where the MP3s are, select them all, then click on Open. You should see the MP3s you selected listed in the white box. Click Next to go to the next screen.
 - You'll arrive at the “Output Settings” screen. Under “Output Module”, choose Wave Output, as shown here . Click Next to go to the next screen.
- You'll arrive at the “Presets” screen. The default is fine. Click Next to go to the next screen.
- You'll arrive at the “Encoding” screen. Click
 to begin the conversion.
II. Edit the CUE sheet
- We need to open the CUE file and change all instances of MP3 to WAV. The CUE sheet is this file . Go ahead and double-click it.
- You've probably never opened a CUE sheet on your computer. Windows will prompt you with an “Open With” window. Choose Notepad from the list, like this: on Windows 10/11 , on Windows XP . If Notepad isn't showing, click Other Programs and it should be there on the list.
- So you'll have a Notepad window like this . Click on the Edit menu then Replace. In “Find what” type “.mp3” and in “Replace with” type “.wav” - as shown here . Take note that this is case-sensitive! If your wav files have “.WAV” instead of “.wav”, then you must type it in caps here as “.WAV”. Click Replace All when you're ready.
- I don't think this part is necessary, but I like to do it anyway just so things are consistent. Do another Replace to change instances of “MP3” to “WAVE”. Your finished CUE sheet should look like this .
III. Burning to CD-R
Now we can burn to a CD-R. You can use a CD-RW disc, but CD-R discs have a higher success rate.
- Download & install ImgBurn (it's free). You can download ImgBurn from the ImgBurn homepage.
*If you have an anti-virus such as AVG, it may flag ImgBurn for containing adware . Don't panic - it does not contain adware! This warning is false. All that ImgBurn does is show you ads during the install wizard (which is why AVG falsely flags it). ImgBurn is 100% safe. - Upon opening ImgBurn, click Write image file to disc, as shown here .
- Under “Source” click the folder icon, as shown here . Navigate your computer to where your CD ISO resides. Select the CUE sheet and click Open, as shown here
- Take a look at this picture . Insert the CD-R disc. Upon insertion, you'll see information appear (where indicated in the picture at “1”). Next, make sure your CD drive is selected (it should do it automatically).
- Click the icon to burn. Depending on the speed of your CD drive, your game could take maybe 2-10 minutes to finish burning. That's it! Enjoy your fresh copy of a CD game.
*If your burned CD game is not playing music, then you messed up. Go through my directions again and pay attention to every detail.
Fullscreen/window mode
Press Alt+Enter to switch between fullscreen mode and window mode. That's all there is to it.
Q: Fullscreen's screen is small!
When you enter fullscreen, you may find that the game's screen isn't quite blowing up to a fullscreen size. That's a quick fix. Go to Config > Video and increase the zoom.
Screen filters
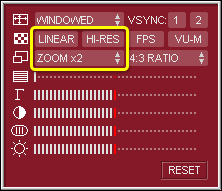
Screen filters enhance graphics to make them look better than the real thing! You can access this feature by going to Config > Video. You'll arrive at the window toward the right.
I highlighted in yellow the area of focus. There are three functions for screen filters:
- Linear - This is a screen filter that blurs pixels together. See below for a sample:
- Hi-res - This is a screen filter that attempts to round pixels together without blurring. See below for a sample:
- Zoom - By default, MagicEngine renders the screen at “x1” zoom. If you increase it to “x2”, “x3”, or “x4”, the Linear and Hi-res filters will look nicer! Also, increasing the zoom is important to enlarge the screen in fullscreen mode if you find that it's not touching the edges.
Linear + Hi-res
Here's a little trick. You can have both Linear and Hi-res enabled at the same time. See toward the right for a sample. It's nice, huh? I think this combination is the best filter setting.
Save states
Save states is a feature that saves the exact spot you are in any game. You can use this feature manually by going into the main menu or by quick keyboard shortcuts.
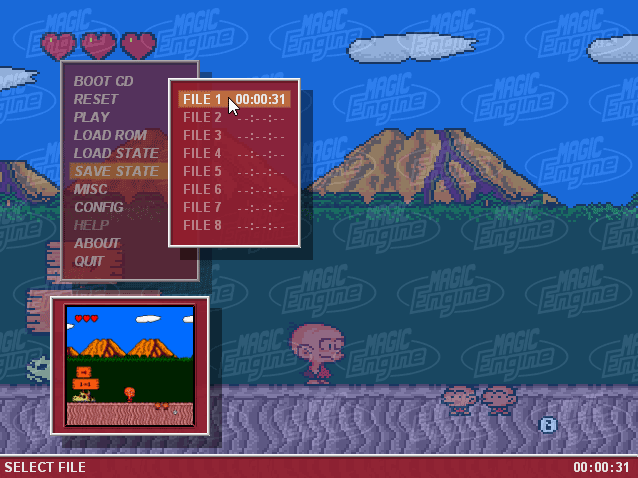
Capturing a state
MagicEngine's keyboard shortcuts provide you with 4 quick save slots. By pressing F1, F2, F3, or F4 you can save a state in either of these four slots.
If you go to Save State in the main menu, you have access to these 4 slots and 4 additional slots (8 total save slots). The menu also accompanies each save with a thumbnail snapshot.
Loading a state
To load a state you previously saved, press F5, F6, F7, or F8 according to the slot your save is currently in. For example, if you saved in the first slot then you'd press F5 to load from it.
Additionally, if you go to Load State in the main menu you have access to the full 8 save slots along with helpful thumbnail snapshots.
Capturing screen shots
To capture a screen shot, press the Backspace key. MagicEngine will dump the screen shot as a PNG image in the “screenshots” folder.
Finding ROMs
In my links page, I have some good links to sites where you can download ROMs. If you want to try to find more sites than what's in my collection of links, just Google around. For example, if you want to download Bonk's Adventure just Google “download bonks adventure tg16”.
The only tricky thing is that the TurboGrafx16 has several aliases. Below is a list of the ones I know of. Try them out during your ROM or ISO searches. “TurboGrafx16” is the NA name and “PC Engine“ is the Japanese name. Although even in NA, it's common for people to refer to NA games as for the PC Engine.
- TurboGrafx16, TurboGrafx16-CD
- TG16, TG16-CD
- PC Engine, PC Engine CD
- PCE, PCECD
Q: MagicEngine isn't saving anything!
If you're using MagicEngine for the first time and you're finding that you have all these problems:
- Save states aren't working. You save a state, then when you try to reload it nothing happens.
- In an RPG when you save your game at a save point and close/re-open MagicEngine, you find that the save is lost.
- Emulator configurations that you changed such as adding a screen filter aren't saved. When you close/re-open MagicEngine, you have to make those configuration changes again.
Then your problem is that you currently have MagicEngine in a read-only location on your computer. You must move MagicEngine to a more common location such as Documents, Downloads, or a folder on your desktop.