Walkthrough
 Contents
The game opens with the hero, Alen, running from 2 pursuing Lizardmen. He is trapped, and his sword is knocked off the cliff. Babilom, a servant of Alcahest, appears and commands the Lizardmen to kill you. Just in the nick of time, a Guardian teleports you out of danger. When you're at a safe location, you'll learn that it is a Guardian. It'll give you a Blade and Shield for protection, then bid you farewell for now.
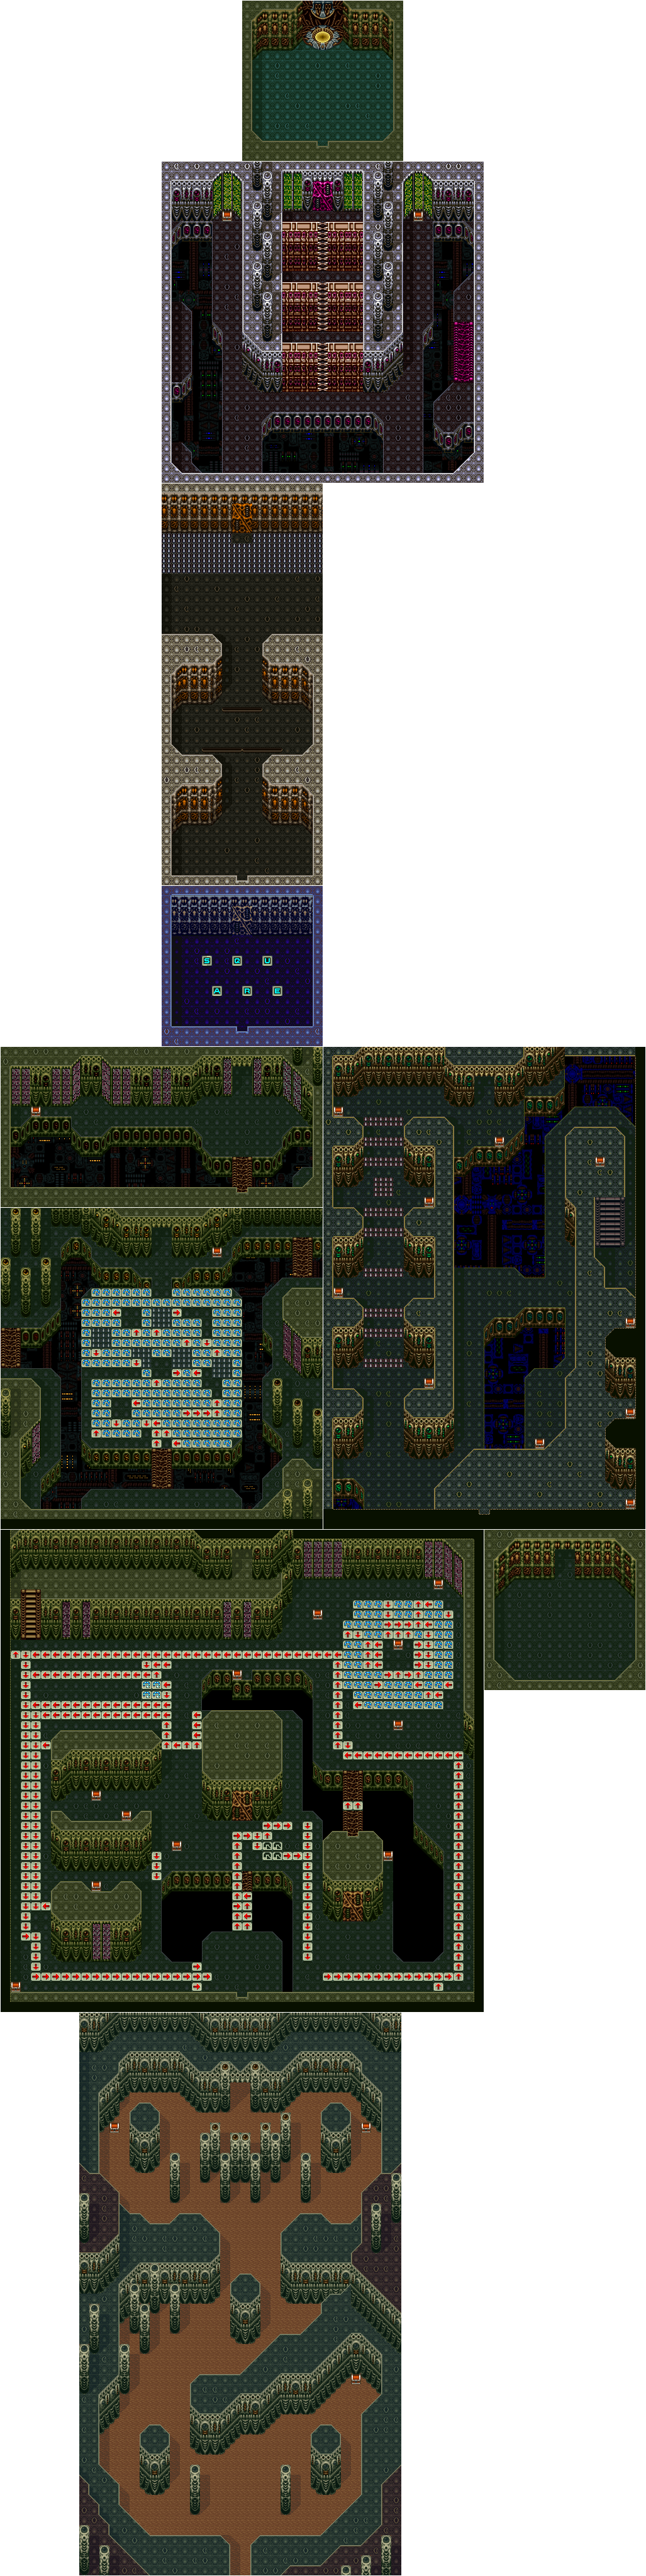
Stage 1 Searching for the Guardians
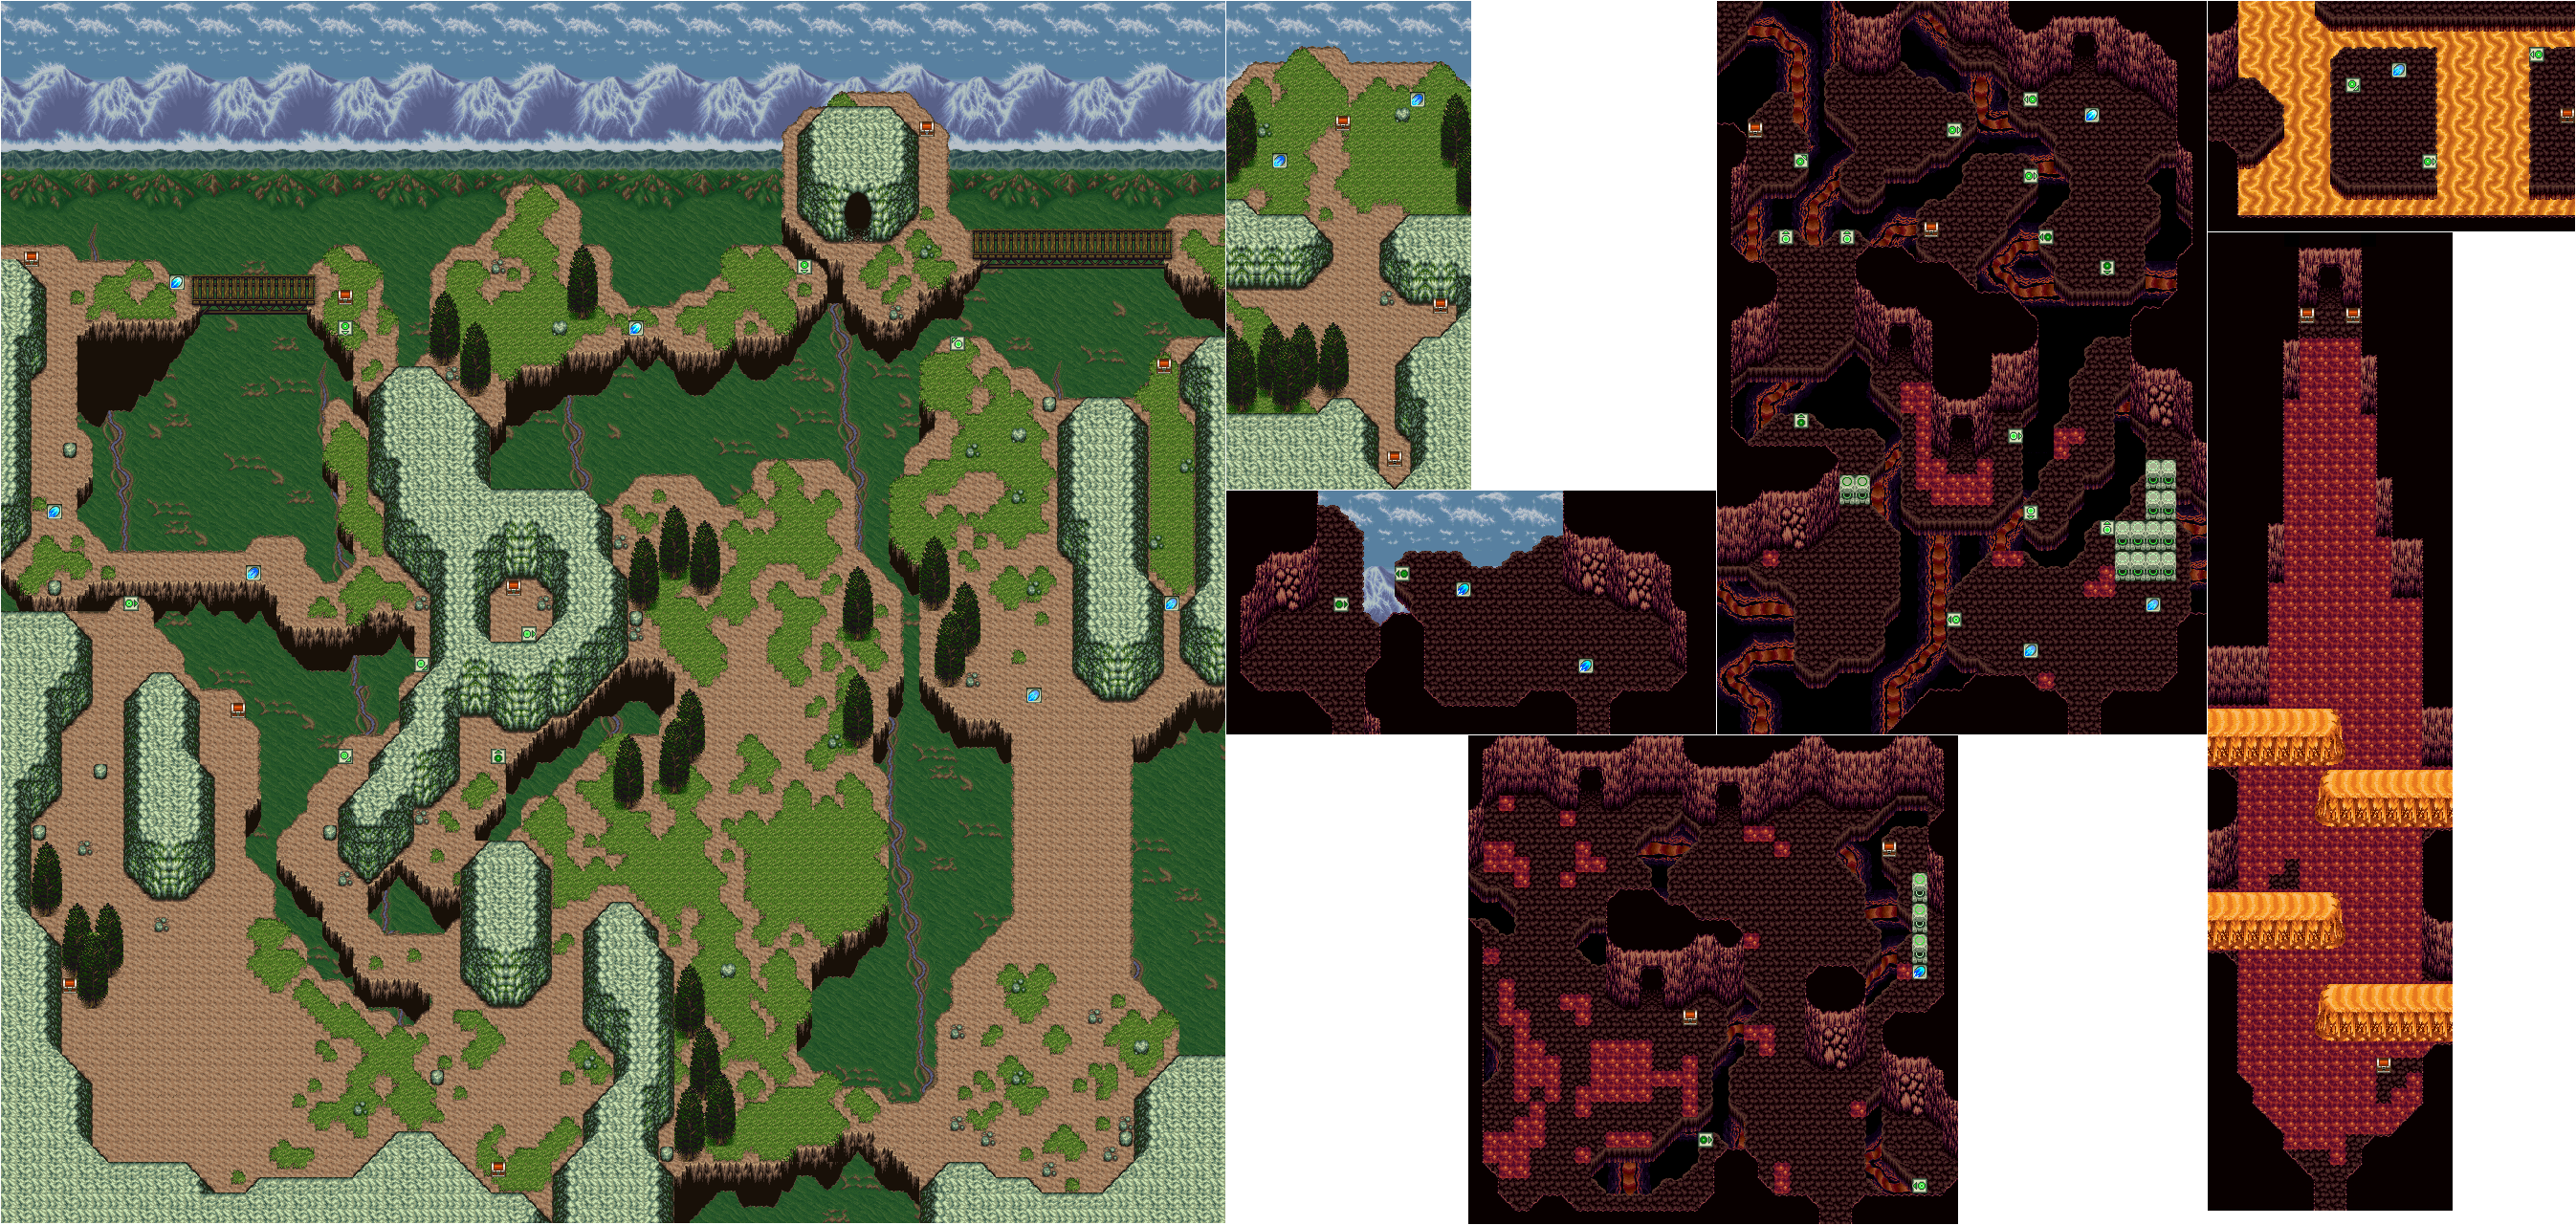 Stage 1 Map
When you have control of Alen, head to the right. Defeat the Wolves and hit the tile you see with your sword to uncover it. Walk on it to dash forward (when you hit a tile with a blue ball like that on it, you dash, so remember that). Continue on and hit the next tile to uncover a tile showing a ball with an arrow pointing downward. When you walk on such a tile, you jump in the direction the arrow is pointing. Go on that tile to reach the next platform. Continue southward defeating some Wolves and Slimes.
You'll notice a small path heading to the southwest; take it. Open the first chest you see to obtain an Aura Blade. Head directly north and use the tile to jump diagonally to the right. Hit the next tile and go northward to a chest containing a Holy Cup. Take the tile in that small area to the right area. Then, head back south and west to where you found the Aura Blade before. Head west a little more, then to the north. Open a chest to get a Telesma. Go back south and all the way west. Open the chest hiding behind the trees to get Blue Medicine to fully recover your health.
Continue northward and use the tile to be shot to the next platform to the right. Defeat the Wolves that are around, and head west and north by means of dash tiles if you wish. In the upper-left corner, take the Blue Medicine from the chest and head across the bridge. Open the chest there to get a Life Orb. Use the nearby tile to get back to the beginning of this path. Go south and use that tile to be sent east to the large field area again. This time, head south and to the east. You'll witness a wizard being surrounded by Wolves, but he destroys them. The wizard alerts you of the dangers ahead, as well as a poisonous cave, then disappears.
Continue northward and the ground will crumble as you move, preventing you from returning to the previous areas. At the other side, go east and north to a chest containing a Soul Orb. Go back around and continue northward to a cave. You cannot enter it right now due to the poisonous gases, so head east across the bridge to another area. Open the 2 chests to the east and south to get an Aura Blade and Telesma, then go north in there to be confronted by 2 Lizardmen. Defeat them (view the Bosses section if you need help that badly) and open the chest they leave to get the Air Mask stage item. Now, go back to the cave. Before you enter, open the nearby chest to get Blue Medicine. As you enter the cave, you'll be greeted by that wizard from before. His name is Garstein and he joins you as your partner. Now, enter the cave.
As soon as you enter, the Air Mask will take effect and clear the cavern of toxic gas. Head northeast and defeat some Bats, Flowers, and Beetles you meet. Cut through the 2 pillars and open the chest to get the Hammer stage item. Go back south and use it on the wall to reveal a chest; enter and open it to get a Telesma. Then, continue north into a darkened chamber.
There, since you can't really see, be slow and cautious with your movement for now. Defeat the Bats and head to the east, then northward. Cut through some pillars, and the wall to the north of that to find a Telesma. Head down and to the left, and hit the tile to the left of where the pillars were. Use it to jump upward to the next ledge. Open the chest to the southwest to get another Telesma. Use the nearby tile to go back to the main ledge. Head west and onto another ledge via the jump tile. Cut through a weak wall to find Blue Medicine, which you might need by now. Continue north and use the next tile to reach another platform.
From here, go north and there will be 2 tiles to jump from. Use the left one if you want a Blue Medicine, otherwise take the right one; they both lead you to the same area. Head east and south as far as you can go, then use the left-pointing jump tile to reach a middle ledge. Collect a Telesma, jump back across, and head north into the next room.
In this third well-lit area, defeat the Wolves and Slimes, and open the 2 weak walls to find an Aura Blade and a Telesma. Continue to the west end of the room, and break open another weak wall to find the Torch (stage item). Now, go south into the first room of the cave again. There, go south to an area where lava covers parts of the floor. Head east to a chest containing Blue Medicine if you need it. Otherwise, continue south and east along a narrow path. Take the tile at the end to reach an inaccessible island near the entrance. Break through the wall and take the Ice Boots.
Since you now have all the stage items, head across the chasm via the jump tile. Now, make your way through the few rooms in the cave to get back to the other side of this first room. This time, enter the new doorway to the left of the Blue Medicine chest (had you not taken it before). In that next room, simply go northwest into the following room. Open the chest at the start to get Blue Medicine. Make your way north through there defeating the Magma Walls and Sparks you come across. At the end, take the Red Medicine and Elixir, then enter the last room.
In here, you will meet the first Guardian of fire. Following its short introduction, a battle against Golem will commence, so visit the Bosses section for help beating it. After the fight, you will gain the power of the Guardian of Fire. Your sword's power will also go up from 4 to 8. Garstein will leave your party, then another scene will open. You will see an emperor talking with his soldier, Gordon, then Babilom appears and offers to help them. Upon the scene's closing, you'll gain control again in Stage 2 of the game.
Stage 2 Get the Dark Dragon
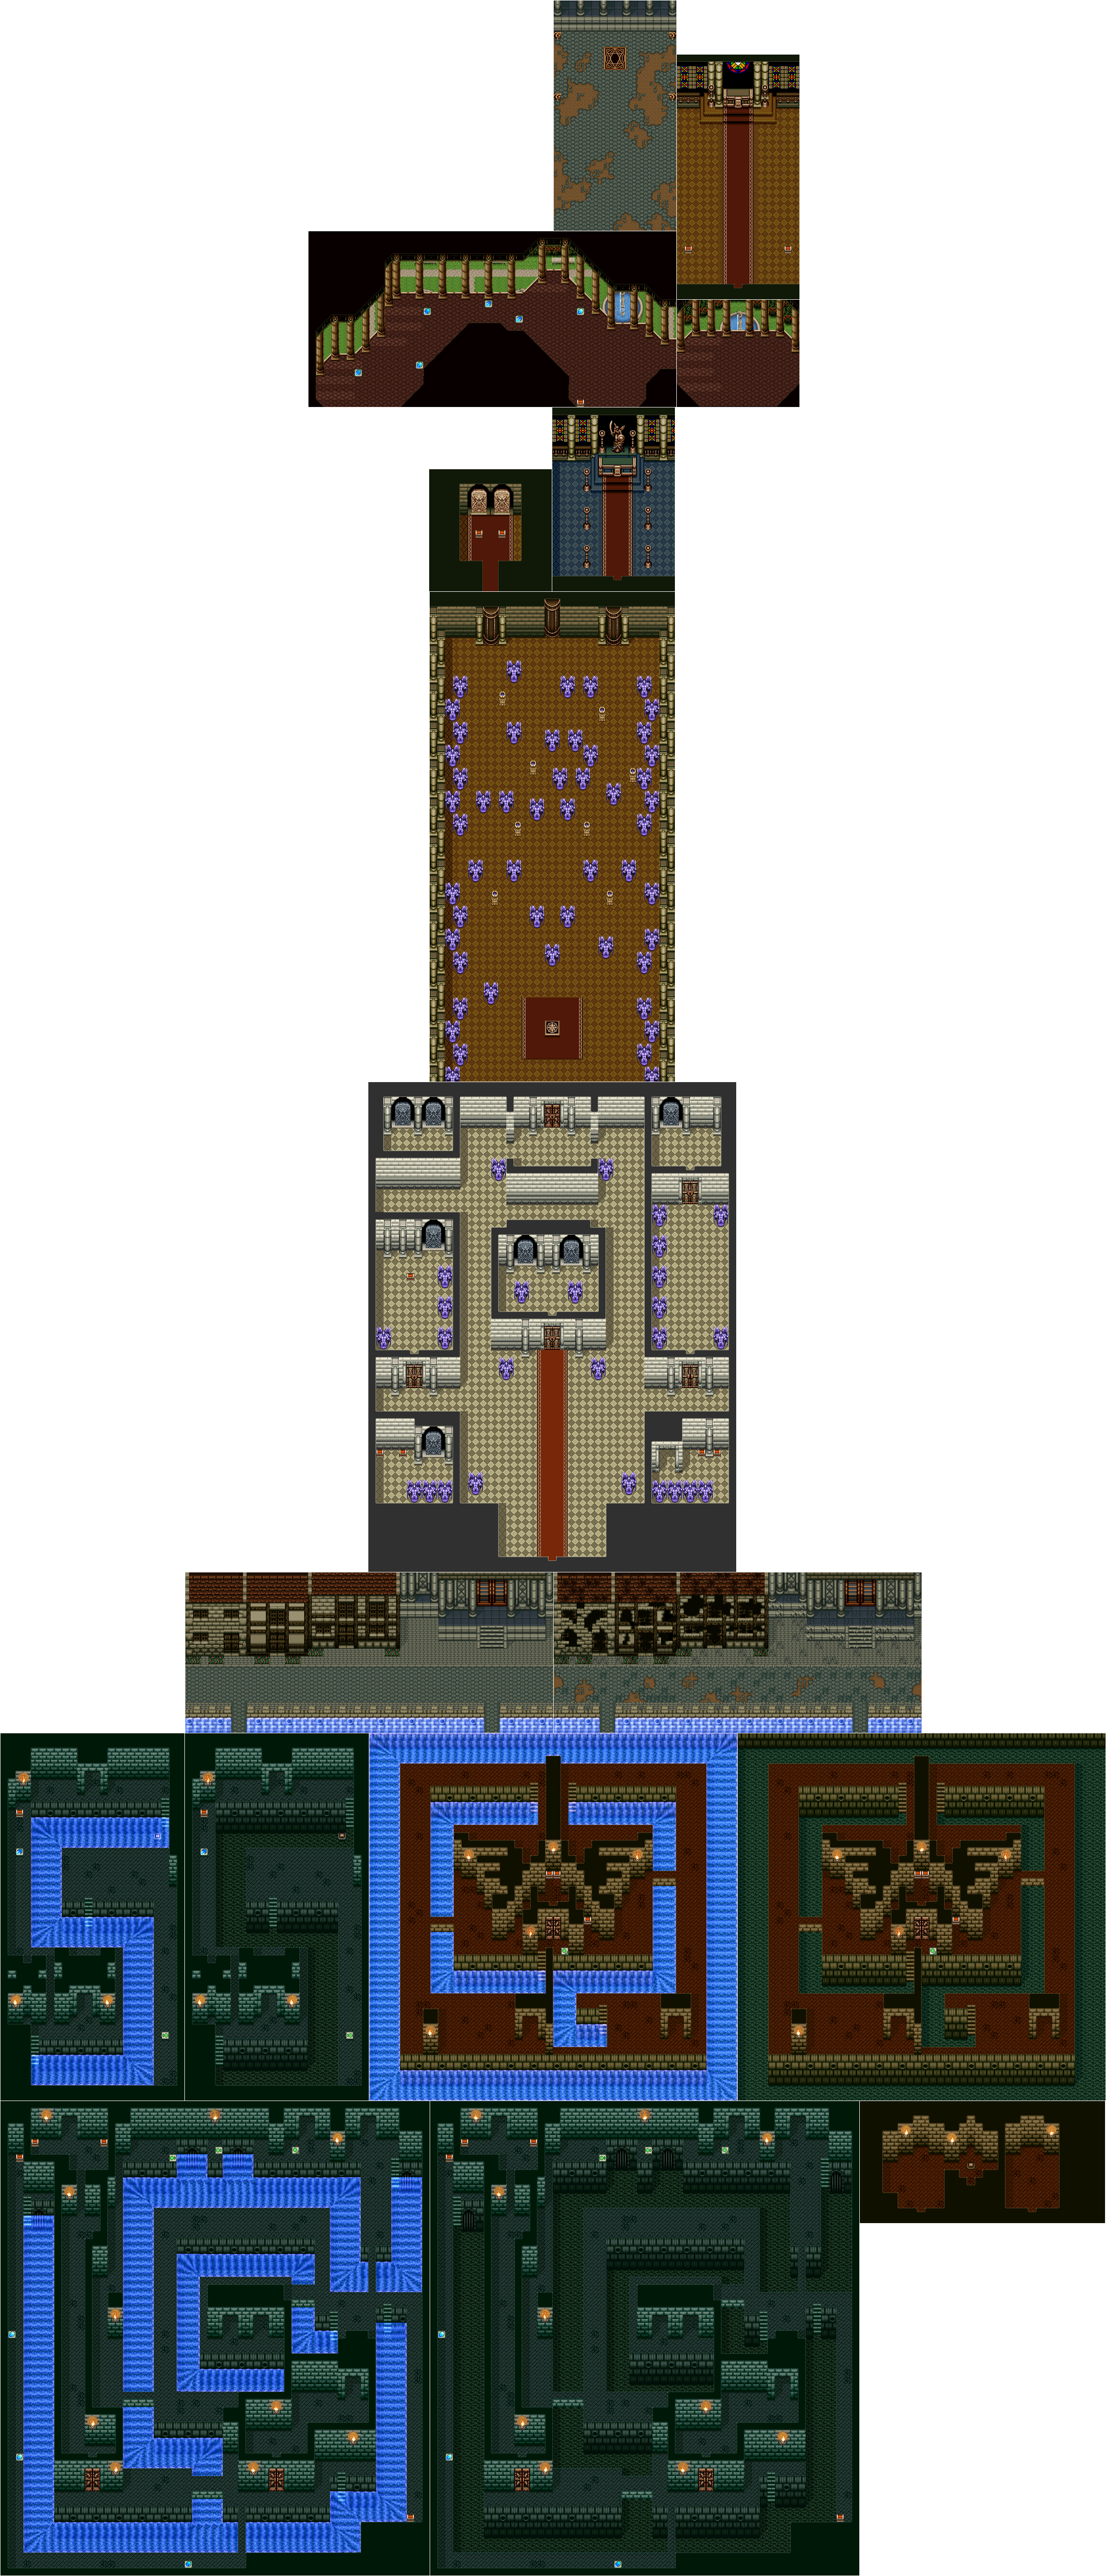 Stage 2 Map
Starting off outside of the temple, talk to the people standing around. You cannot enter the temple yet, so head all the way west. Take the path going south, and bombs will go off killing the people. The nobleman Gordon will come with his troops, and direct them to find and capture Princess Elikshil. After they ride off to the temple, Babilom and his cronies will come and follow Gordon. When you get control, head back to the temple and walk over the fallen guards to enter.
Inside the temple, wander around and defeat the Knights and Statues you come across. There are many rooms you cannot enter for now, but you will later on. Head to the very back of the temple, where you'll find a fallen guard on the floor. Talk to him to get the Sewer Key. Use it to unlock the door to the right of him, then enter the sewers.
Here, follow the path around until you reach a Fire Flower and a path split. If you need it, head east and south to a chest containing an Elixir. Otherwise, take the northwest path. Go west to the end where 2 Fire Flowers are sitting, then continue along that path. Go across a couple jump tiles to reach a doorway; enter that room. Defeat the Statue and step on the switch to drain the rapid waters in the previous room, then head out of here. Use the last jump tile to reach the ledge to the east. Continue north into another room.
In there, open the chest to get some Red Medicine. Go back to the previous room and go down the steps to the right to reach the now-drained area. Follow the path to the south end of the room, and continue along it to a path split. At that point, continue on the west path and follow it to the end. Go up the steps and defeat the Fire Flower in your way, and open the chest to get an Elixir. Now, head all the way south, using the dash tiles to get through the Zombies and Fire Flower at the end in a safer fashion. Head all the way east and north to another path split. You'll see a door nearby; open it and continue to another room. Open the 2 chests to get Red Medicine, and the Crystal Eyes. Now you can see the Ghosts you were unable to touch before!
Leave this treasure room, then in the previous room, defeat the 2 Ghosts if you want (use the Guardian of Fire's power). Continue through the door, then head west to another door. Go through it and head northward to another open doorway. Open the 2 chests to get Red Medicine and a Potion, then enter the next room.
There, go east and south into the drained area. Do NOT step on the switch; instead follow the path until you come to another stairwell leading out of the low area. Go up onto the upper platform, then head east and south to a chest containing a Large Potion. Use the jump tile to reach another platform to the west. If you want it, go northwest and defeat a Zombie, and continue to a chest to get a Sage Stone. Otherwise, go through the doorway you see to reach a new area.
In this room, go west and north, defeating Zombies and Fire Flowers on the way. At the end, jump into the rapidly moving water and jump out at the end. Go through the door and open the chests inside to get Blue Medicine and the Room Key.
Now, go south and use the jump tile to reach a south platform with a doorway on it. Go through the door to the next area. Continue through the doorway next to you to enter the temple again. Back in the temple, go west and to the south. Take the second path leading to the left and unlock the door with the Room Key. Dash straight up and open the chest to get the Warp Plate.
With all the stage items now, touch the monolith to the north to be warped to a new room. Touch the one to the left in the new area to reach a small treasure room guarded by Statues. Defeat the Statues and collect the Large Potion and Red Medicine. Go back to the room where you found the Warp Stone, then head south out of that room. Head to the east side of the temple room and go through the door. Go north and unlock the next one, and warp via the monolith. Warp through the following monolith to reach a new area.
In this room, there are many Statues and electrical poles around, so be careful. Head to the north wall of the room, where you'll find 3 doors. The left one leads you to the start of this room again, the middle leads to 2 chests containing Red Medicine and a Potion, and the right room leads to the Princess. Check out the middle room first, then the right room. You'll meet Princess Elikshil here, and she'll join you as your partner. You'll both warp via the god of protection's statue to reach a new room.
In here, head to the northeast while defeating the Red Wizards along the way. Continue east to the end of the room. Before you continue eastward into the second room, open the chest to the south to get an Elixir. Then, head to the next room. You will meet Gordon here. After some conversing, you will enter battle against him. View the Bosses section for help winning.
After you win, Gordon will run off and you'll be in a new room. Open the 2 chests to get a Telesma and Sage's Stone. Continue northward and you'll meet Babilom once more. He'll be trying to revive the monster sealed within this temple. After some more taunting, he'll revive the fallen soldiers as powerful knights who'll attack you. Check out the Bosses section once more for this fight.
After this fight, Elikshil will warn you of the sealed monster being freed, so you'll both run to catch Babilom. It is too late however, and the Dark Dragon is released for you to fight. Check the Bosses section once more for help defeating this creature. Upon winning, open the chest to free the Guardian of Water. You will also receive the Guardian Blade of Water, as you would expect. Following this victory, the dragon's head will bite Elikshil, turning her into stone. Babilom will tell you to come to the Mountain Fortress if you want to break that curse. This stage then ends.
Stage 3 Go for the Fortress
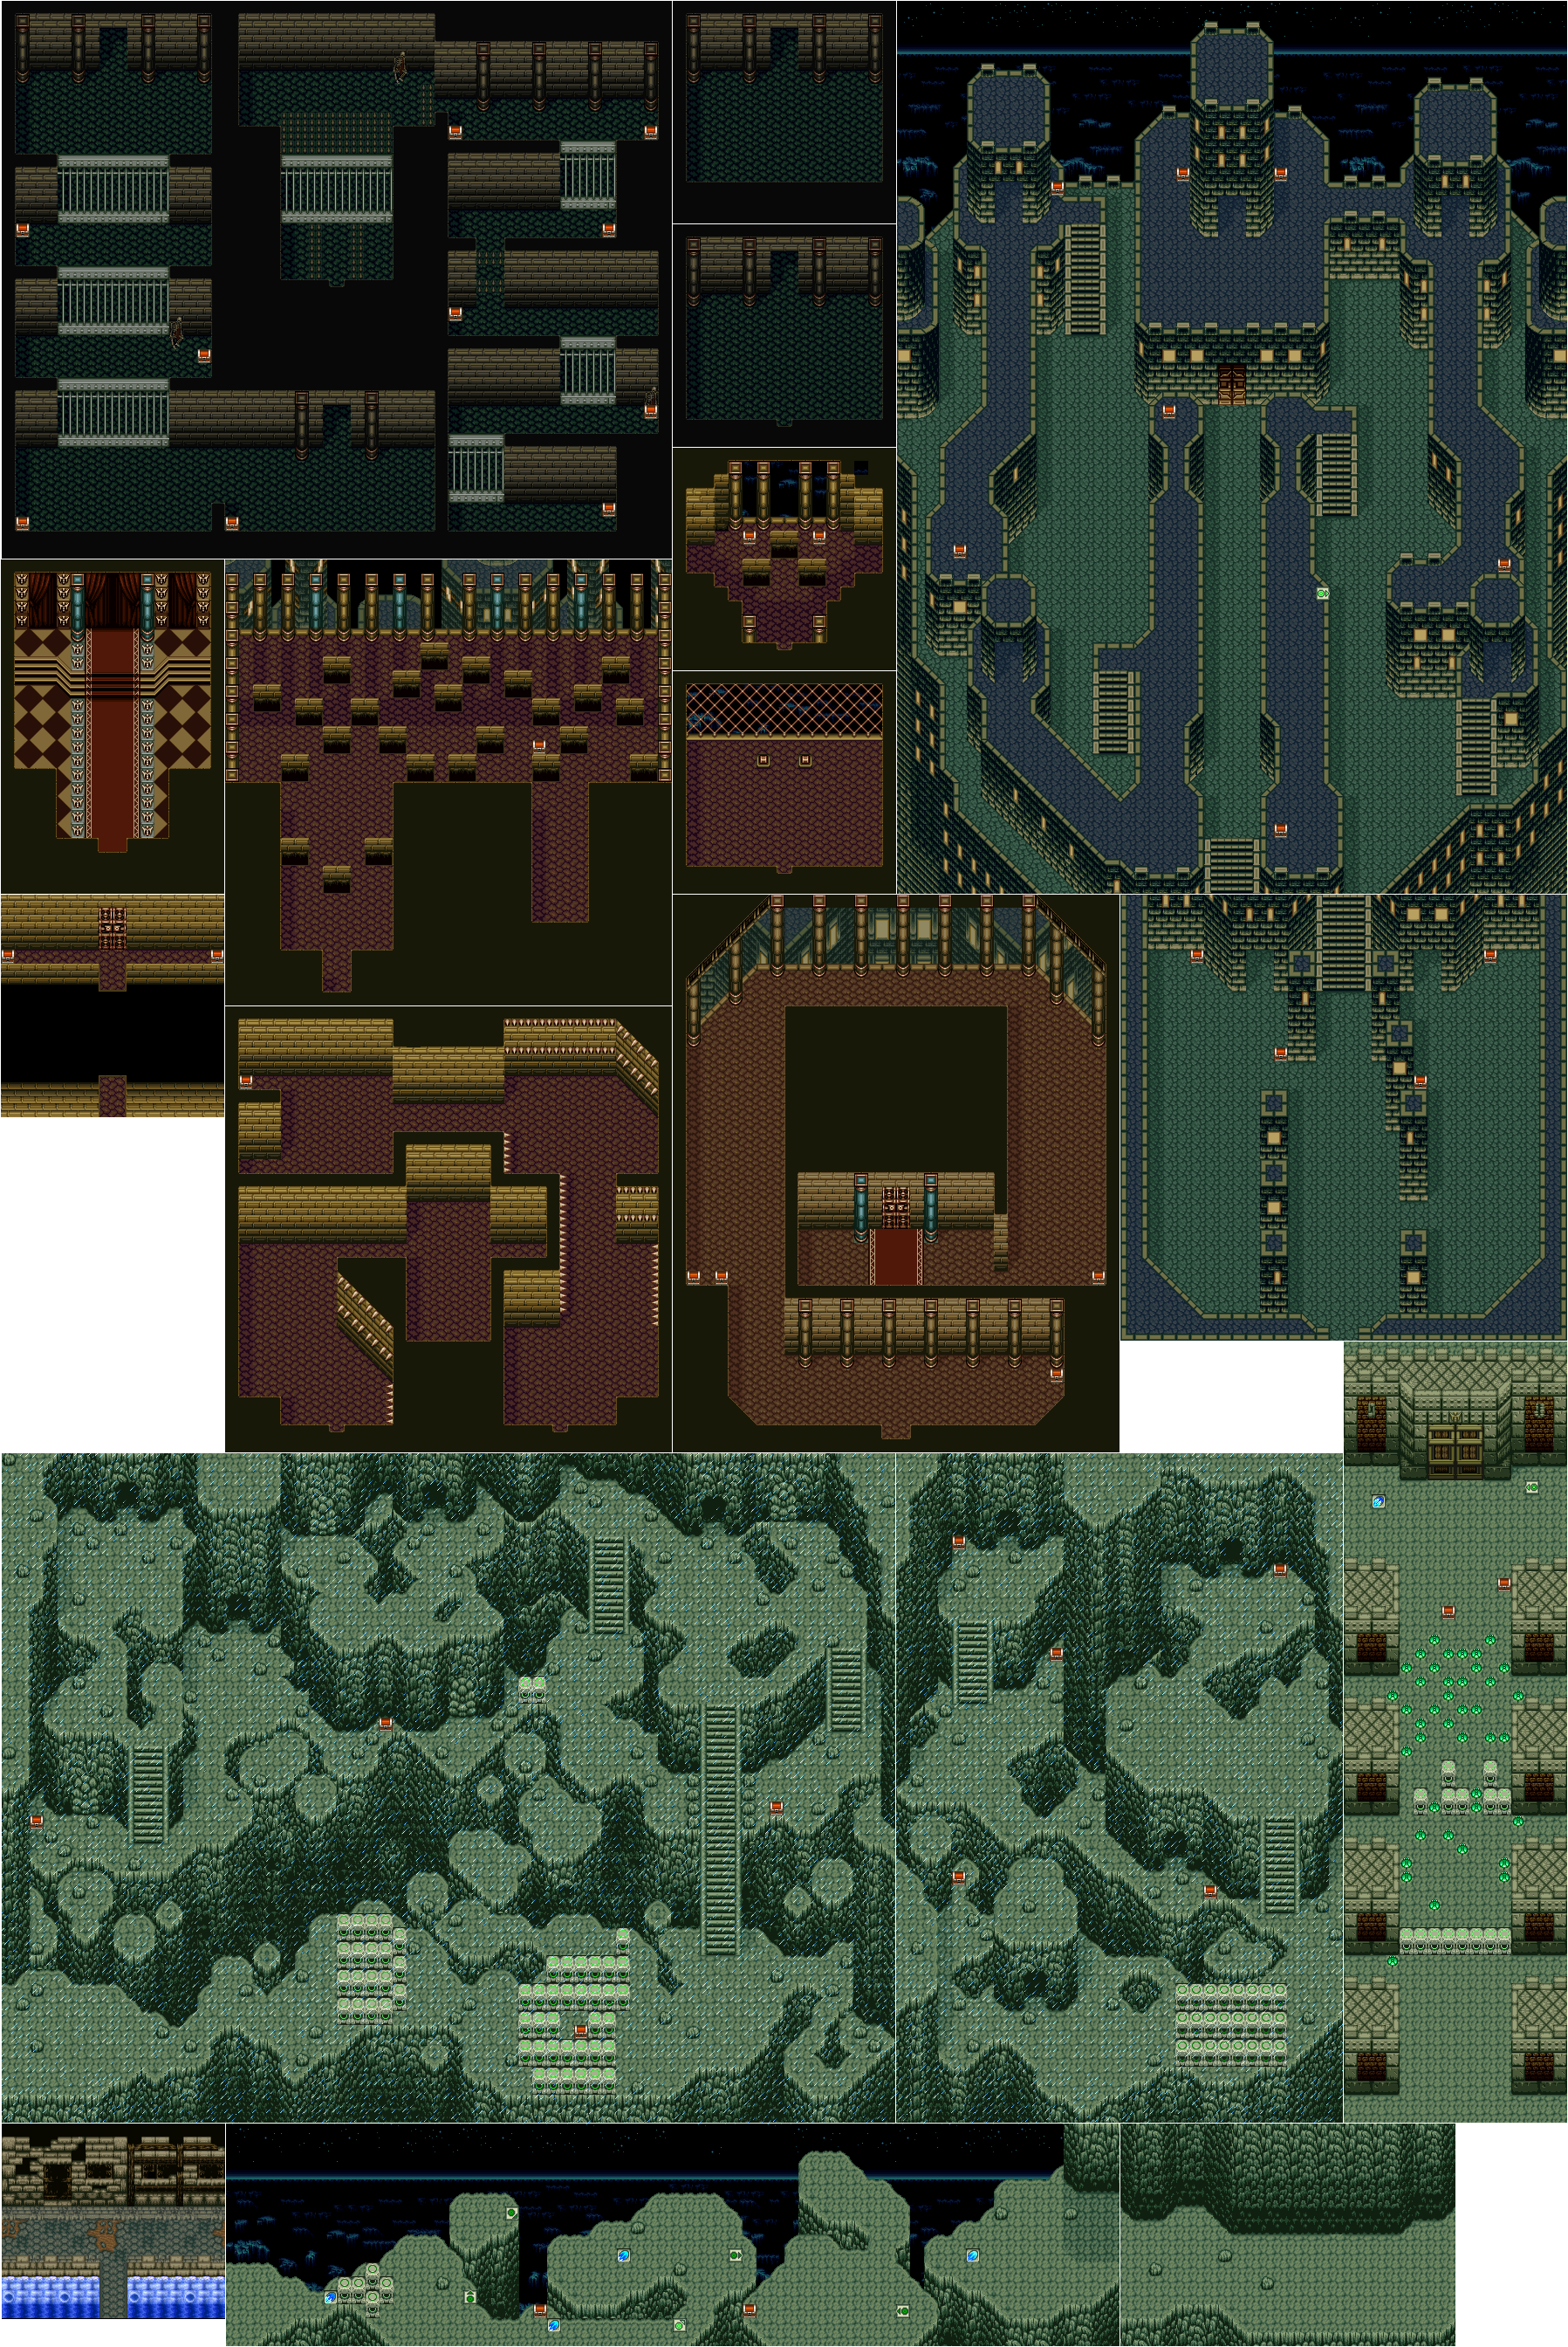 Stage 3 Map
This stage opens with Sirius and his men riding to the Mountain Fortress. He stops and thanks you for helping Elikshil, and to beware of the four generals at the fortress.
When you get control, head east into the next area. Go right and cut through the pillars, avoiding the dash tile. Continue southeast to a chest containing a Soul Orb. Go east and use the jump tile to reach the next platform. Head south and west there to a chest with Blue Medicine inside. Use the jump tile to reach the previous ledge, then go north and use the right-pointing jump tile to reach a new platform. From there, head east into the next area.
There, you'll see several soldiers on horses be eradicated by some energy wave. Continue onward and you will meet Gavaris, who is the Fighting Spirit General. He is the first general you'll have to face, so view the Bosses section for help getting through here. After the fight, take the Steel Hammer from the chest and you'll automatically be sent to the next area.
In this snowy area, head eastward, defeating the Ogres along the way. When you come to a section with 2 chests surrounded by pillars, cut down the pillars and open the bottom-right chest first to get an Aura Blade. Use it to kill the Fake Chest that comes to life nearby. Continue onward until you reach steps going northward. Go up them to the top, then go east and south to a chest containing Red Medicine. Head back up the steps and go north to a weak wall. Break it down and take the Holy Cup from the chest inside.
Now, head westward and you'll see a cave entrance. Pass it for now and go west, then southward. Continue to the southwest and cut down 2 pillars, and defeat the 2 Fake Chests. Open the real chest to get a Large Potion, though. Go back to that cave, and enter it.
Head to the south, defeating the Gale Knights you meet. Open a chest to get the Aura Blade, then continue southeast to find a Blue Medicine. Enter the next cave to reach a new area. Head southward, defeating the Ogres as you pass. At the bottom, go west and defeat a Fake Chest, then open the real chest to get an Aura Blade. Continue east and north, then to the southeast. Open the last chest to get a Life Orb. Go back northwest and enter the cave to reach the next area.
In this area, go all the way east while defeating more Gale Knights. At the far end, go up the steps and continue to another cave. Open the chest just outside it to get an Aura Blade, then enter that next room. There, kill the Ogres and go around to the weak wall. Open it and enter the fortress.
Inside here, head northward and cut through the first row of pillars. Avoid the constant line of giant orbs blocking your path. You'll notice many green tiles on the floor; they are mines. If you step on one, get away because it'll explode shortly after. Also, the giant orbs ahead explode, spreading 3 fireballs in your direction, so be careful of that as well. Make your way north through this area to the end. Open the chests you find to get Elixir and an Aura Blade, then continue.
You'll be confronted by two more generals, Sara (Blaze) and Gaza (Gale). They will both fight you, but you're mainly going against Gaza for now, so check out the Bosses section if you need help getting through this fight. After the fight, Sara will be upset and want to fight you to avenge Gaza's defeat. Babilom stops her, and they both retreat. So, open the large door and enter the following room.
In here, go around and collect the chests for some Blue/Red Medicine and a Potion. Then, go to the right side of the room and head through the doorway to the north to reach another room. Use the Water Guardian's power to get through this spiky-walled room, until you come to the chests at the end. Open the real one to get a Fortress Key. Go back to the previous room and enter the center doorway this time.
Head straight into a line of Spinning Blades; defeat them and continue to a locked door. Open it with the Fortress Key, then enter the next room. There, go north and west while defeating the Fire Knights. Many small sections of wall will come out of the floor to block your path, so go around them. Open the chest in the middle area to get Blue Medicine, then continue west and south. Kill more Fire Knights and Flamethrowers, and head into the room ahead.
Go south and east, then northward along the upper path, defeating the enemies on the way. Go all the way north and open the chest to get Red Medicine. Go back south and down the steps to a lower area. Down there, head north and up the steps at the other end. Open one chest to get a Telesma, then go southwest to get a Large Potion. Head north into the next room. You will see a confrontation between Gordon and Sirius here. Sirius will be dropped into the dungeon below, then Gordon will do the same to you.
Down here, talk to Sirius and he will become your partner. With him, go north into the next room. There, head southward through this room while defeating the Silver Gargoyles and collecting the items (Potion, Telesma, Blue Medicine) in the chests. Break through each set of bars by attacking them. At the end, open another chest to the east to get another Blue Medicine. Then, enter the next room.
There, go forward and you will meet Garstein again. He is chained down and cannot use magic, so he asks for your help. Continue to the following room. Follow the path throughout this room, but be careful where you step. Small spikes rise and fall in the floor here, so make sure you go past when they're down, or else you'll get hurt. Open the chests along the way to get 2 Potiond, 2 Telesmas, Blue Medicine, and finally the Chain Key stage item. Go back to where Garstein is and free him with that key. As thanks, he gives you the Detector stage item, then leaves.
From here, go south to the next room. Go west past the Silver Gargoyles, and you'll find a light on the floor. Step into it to reach a new room. Go down the steps and head northward here, defeating the Fire Knights as you go. Head up the next set of steps you see, then go south. Go all the way south to find a Holy Cup, then use the jump tile to reach a ledge to the right. Open the chest ahead to get an Aura Blade, then head directly north into a small room. Go around the walls that come up and defeat the Gold Gargoyles, then open the chests to get a Large Potion and Red Medicine. Then, exit this room.
Head to the west into a more open section. Defeat the Fire Knight and open 2 chests to get a Telesma and an Aura Blade. Then, go through the door into a new room. Make your way across the room by means of floating platforms. Avoid the fire from the Silver Gargoyles if you can. At the other side, kill them and open the chests to get 2 Blue Medicines. Go into the next room up ahead.
Here, defeat the Fire Knights and open the chest to the right to get a Telesma. Then, head west and north to another chest on the side, which has an Aura Blade inside. Follow the path around past some Spinning Blades further ahead. Open the chest past them to get a Blue Medicine, then go west and defeat some Flamethrowers. Open the door and enter the next room. Inside, you'll move ahead and meet the Emperor and Babilom. Sara will be brought in to fight you, so read the Bosses section for help defeating her both times.
After you kill Sara, Babilom will appear again and hypnotize you and Sirius. It doesn't work on you, but Sirius is hypnotized successfully, and leaves with Babilom. You will then be warped out of this place.
Stage 4 Jump Through the Anti-aircraft
 Stage 4 Map
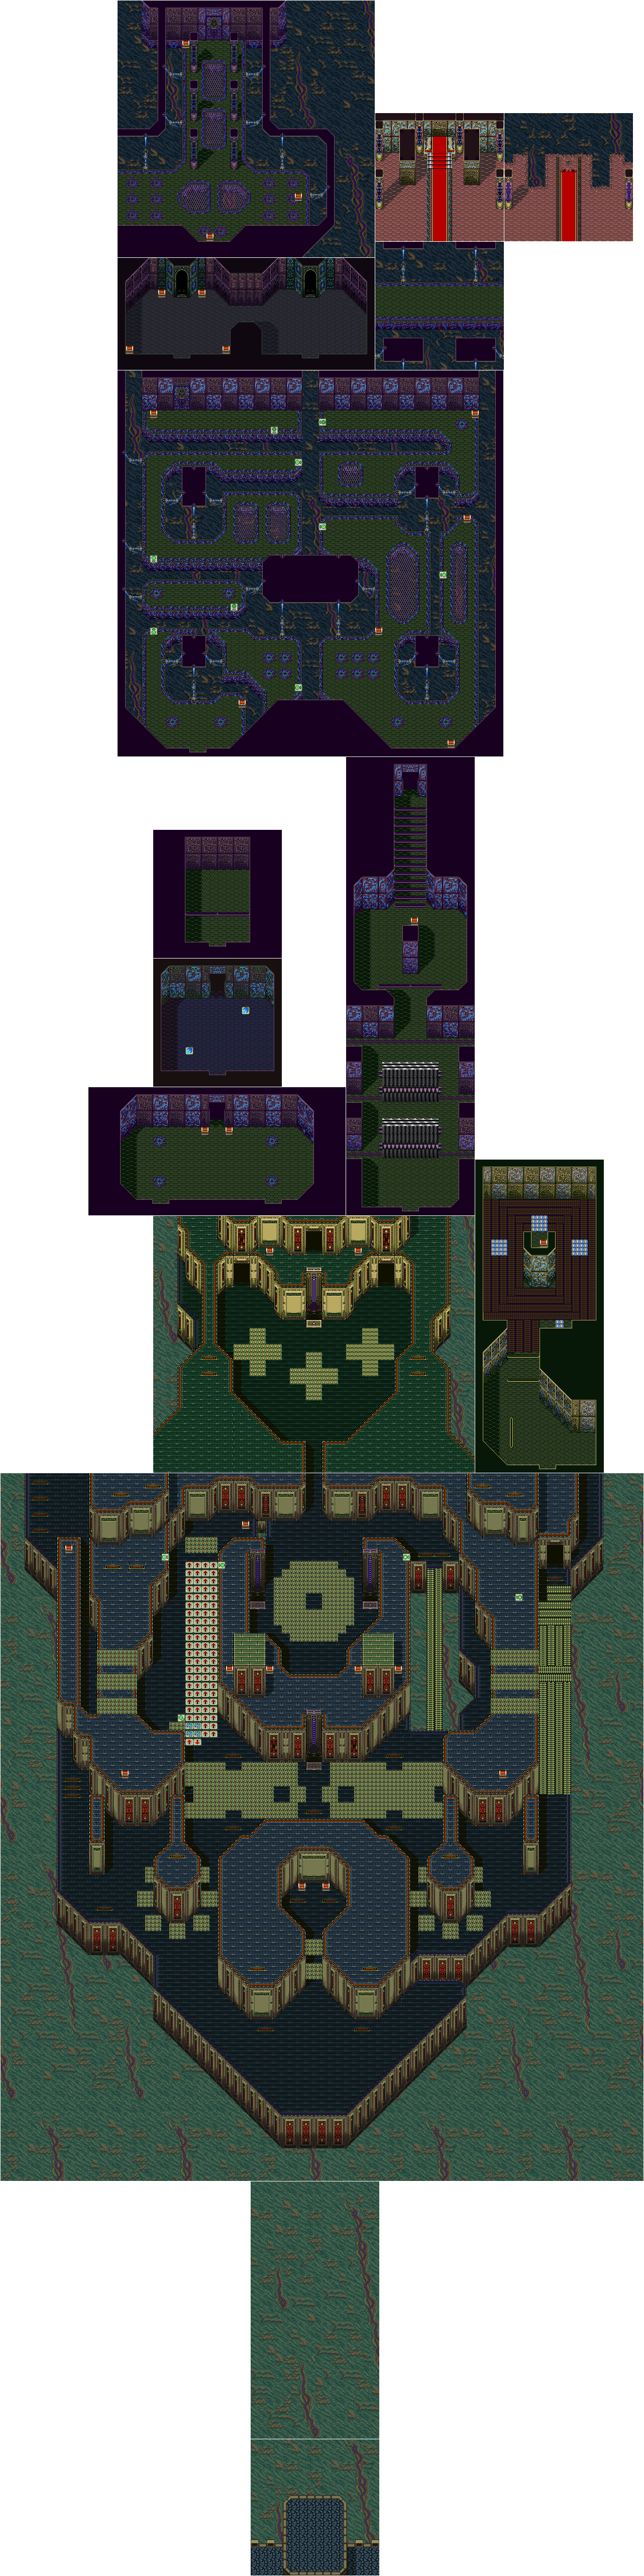
Starting here, you will see Garstein atop the temple. He will conjure up a Magic Board for you to use to reach the Sky Fortress. As you ride the board to the fortress, defeat the many Red Serpents that come at you for lots of experience points. When you make it there, Garstein will join you as your partner again.
From the start, head directly north to a path with spikes coming in/out of the floor. Run across when it's clear and defeat the Red Wizards, then open the chests to get Blue and Red Medicines. Go back south, then head northwest. You'll come to a wall surrounded by spike panels that rise/drop into the floor. Go northeast to a larger area of spikes. Head all the way east across the spiked floors. At the end, go south and east, defeating Red Wizards and Fake Chests on the way. Go east and north on some conveyor belts, defeating the Red Bombs floating around. At the end, enter the room. Head through here while avoiding the Lasers shooting at you. At the north end of the room, ride the conveyors and get to the chest in the middle area. Collect the High Armor upgrade, then destroy the Turret on the wall, and exit this room.
Now, make your way around and back to the large area of floor spikes. Get back across them and head to the northwest, where you'll find many arrow tiles. Go up them, shoot out the Turret, and open the chest to the right to get a Sage's Stone. Go back south to a jump tile; use it to go over the arrow tiles. Then, head to the east end of the spikes, and continue northward on a narrow conveyor. Defeat some Red Bombs and the Turret at the end, then continue to the next area to the north.
In there, defeat the Armored Knights that come after you. Head to the north end of the room, where you'll find a broken elevator. Go either left or right into one of the doorways to reach the new room. There, defeat the Armored Knight and the 2 Fake Chests, and open the real chests to get a Large Potion and Red Medicine. Enter the following room to the north. You will be confronted by Sirius here. Garstein will try to release him from hypnosis, leaving you alone to fight Sirius. View the Bosses section to get help here.
After the fight, Garstein will succeed in his spell, sending Sirius to his home town. With control again, head to the next room. Destroy the 2 Laser Guns and open the chests to get Red Medicine and the ID Card stage item. Now, backtrack several rooms to the room with the Armored Knights and the elevator in the middle area. Before you really continue here, go south into the first large area of the stage. There, go southeast and up the right elevator. Grab the Telesma from a chest to the south, then use the jump tile to reach a new ledge. Head south to a chest containing a Soul Orb, then use the other jump tile to get back.
Go back down the elevator, and ride up the west one. On that upper ledge, go south and open the chest to get an Aura Blade. Go north and use the jump tile to reach another ledge. There, head south to a chest containing a Large Potion. Go back across via the jump tile, and go down the elevator to the ground area. Now, head northeast along the path. Destroy a Turret and Red Bombs as you ride the conveyor southward. At the other end, go south and west to another elevator. Ride it to the upper platform, and open the chests there to get Red Medicine and the Hangar Key stage item.
Now, go back down the elevator and make your way back to the second room with the Knights. This time around, ride the elevator to the upper platform. Open the chests to get a Telesma and Blue Medicine, then enter the new room. Here, make your way northward cautiously, as Spike Walls speed out to harm you. Destroy those and continue onward. Watch out for the traps in the floor as you run along. Open the chest in the middle area to get Blue Medicine. Destroy the Lasers on the wall and dash northward across the floor traps into another room.
In this room, defeat the Fake Chest and open the real one to get a Telesma. Defeat the Armored Knight and use the jump tile to reach the next ledge. Defeat the Spinning Blades and head onto another platform. Kill the Armored Knight there and continue onward to yet another platform. Head south and kill a Fake Chest and another Armored Knight, then open the chest to the east to get Blue Medicine. Head directly north and open another chest to get Red Medicine. Use the jump tile to reach the left side of the gap, then open another chest to get an Aura Blade. Continue west onto another platform.
Continue onward and defeat another Armored Knight and a couple of Spinning Blades. Follow this path to the west, north, and east, then use the jump tile at the end to reach the right platform. Defeat a Fake Chest and Spinning Blade and open the chest in the corner to get a Potion. Head west to a final platform. Grab the Blue Medicine from the chest and open the door with the Hangar Key, then enter the next room.
There, defeat the 2 Laser Guns, then open the chests to get 2 Blue Medicines, a Large Potion, and a Telesma. Go east and south to another room, and you will be stopped. Here you will meet a cyborg known as Magna. It needs its Photon Energy in order to move, so you'll be sent to get it. Enter the next room, and you will run into Karouge, the Holy Blade general. You'll have to defeat him in order to get the Dispel Potion used to cure Elikshil, so you enter battle here. Read the Bosses section for help defeating Karouge. After you win, take the Dispel Potion from the chest and you'll be taken to the next area.
In this new area, go east and defeat the Armored Knights. Open the 2 chests to get a Holy Cup and a well-deserved Elixir. Head north along the path and open another chest in the corner to get an Aura Blade. Go through the door and enter the next room. There, you will meet the Emperor along with Babilom again. Babilom will give strength to the Emperor, who you will face next in battle. Visit the Bosses section again for help beating this guy.
Upon winning the battle, open the 2 chests that appear. You will get the Photon Power stage item, and the Guardian Blade of Wind. Following this, Babilom will appear and taunt you before leaving again. Garstein will teleport the two of you to where Magna the cyborg is. There, use the Photon Power to refill his energy. Garstein will leave, and Magna will take you out of the fallen fortress.
Stage 5 Go Through the Hidden Maze
 Stage 5 Map
At the start of this stage, you will land with Magna in a ruins area. He will mention an underworld below, which contains the Guardian Blade of Earth. Magna joins you as your new partner, too. Start off by defeating the Slimes and opening the chest to the northeast to get an Aura Blade. Head west and north, defeating Beetles and Flowers on the way. When you reach an intersection, go east and north to a chest containing a Soul Orb. Then, go south and west and north to another chest with Blue Medicine inside. Head east and talk to the wise man, then enter the ruins.
Here, go directly north on the line of arrow tiles to be sent to the next platform. Defeat the Robots you come across and continue east/south on the next conveyor. At the next stop, walk east and north to a chest containing Blue Medicine, then open the door in the front and enter that small room. Talk to the holograms of people there, and open the chests to get a Holy Cup and a Torch. Continue north out of this room. Go north and follow the path north and west (do NOT ride the conveyor). At the end of the path, go south onto the southmost conveyor heading west. Ride it until you stop on a pathway halfway along the conveyors. Go around the wall and open the chest to get a Telesma.
Continue along the path to 2 more chests, which contain another Telesma and Blue Medicine. Open one last chest to find a Potion, then enter the room to the right. The Torch will work in here, allowing you to see better. Open the chest to get an Aura Blade, then head onto the room of tiles ahead. On the blue reverse tiles, your controls are switched (press Up=Down, Down=Up, Left=Right, Right=Left). Make your way to the north end of the room, defeating the Robots on the way. Take the Life Orb and Red Medicine from the chests, then continue onward to the following room. Go west there and take the Blue Medicine from the chest. Talk to the scholar and he'll give you the Mysterious Card.
Now, go east and north into a puzzle room. You will see 6 tiles mixed around, which spell out SQUARE. Check out the Mysterious Card in your inventory and it'll list those letters in a specific order. Step on each letter tile in the same order and a door will open up; enter that new room. Go forth and the scholar will reappear, exposing himself as Babilom in disguise. He will taunt you as usual, then rush off, leaving you to fight a boss. Go forward to meet the Metal Crawler. Read the Bosses section for help defeating this creature.
After the fight, go across the spikes when they go into the floor, and enter the next room. There, go directly north to start, defeating the Centipedes you see. Open the chest to get an Aura Blade, then go back south and head to the east end of the room. Go north and kill a couple more Centipedes, and open the chest at the end to find an Elixir. Head back south and north through the middle area when the spike walls allow you passage. Enter the room at the other side.
Here, you will meet up with Babilom yet again. He won't be too happy you're there, hence he sends you away with a teleportation spell. In the area you end up in, defeat the Red Wizards and head east and south to a chest containing a Potion. Head all the way north and around the wall, then up the steps to the upper plateau. Defeat the Gold Robots and open the chests to get an Aura Blade, Red Medicine, Telesma, and a Potion. Then, go south into another room.
In this room again, defeat the Gold Robot and go down the steps to the arrow tile room again. Follow the path along the wall, collecting the Potion, Aura Blade, and Red Medicine on the way. After you get the medicine, there is a chest surrounded by tiles to the north for you to get. Walk onto the reverse tiles from the south, and walk onto the up-pointing arrow tile to reach the chest. Open it to get the Magnet Boots. Now that you can walk on the arrow tiles without being affected, get to the bottom-left corner of this large room. Open that chest you couldn't reach to get the Talisman.
Now that you have this important item, go north and up the steps, and into the previous room. Go east and north, then down the steps and around to the Red Wizards area. Head southwest and north along the path, defeating more enemies on the way. Make your way across the spike pits when it's safe and open the chests to get 3 Large Potions and Blue Medicine. Open the last chest to the east to get another Blue Medicine, then enter the next room. Head north through the middle area, passing between the opening/closing spike walls. Enter the next room where Babilom still resides. He'll try to warp you away again, but this time it won't work, so he'll have to fight you. Visit the Bosses section of this guide for help beating him.
After you defeat Babilom, open the chest that appears to unleash the Guardian Blade of Earth. Now that you have all 4 Blades, it's about time to go after Alcahest. Magna points out the gate that leads to the edge of the earth, and you both step in. Gordon stumbles in and follows you as well. Now, it's time for the next stage.
Stage 6 Open the Gate of Hell
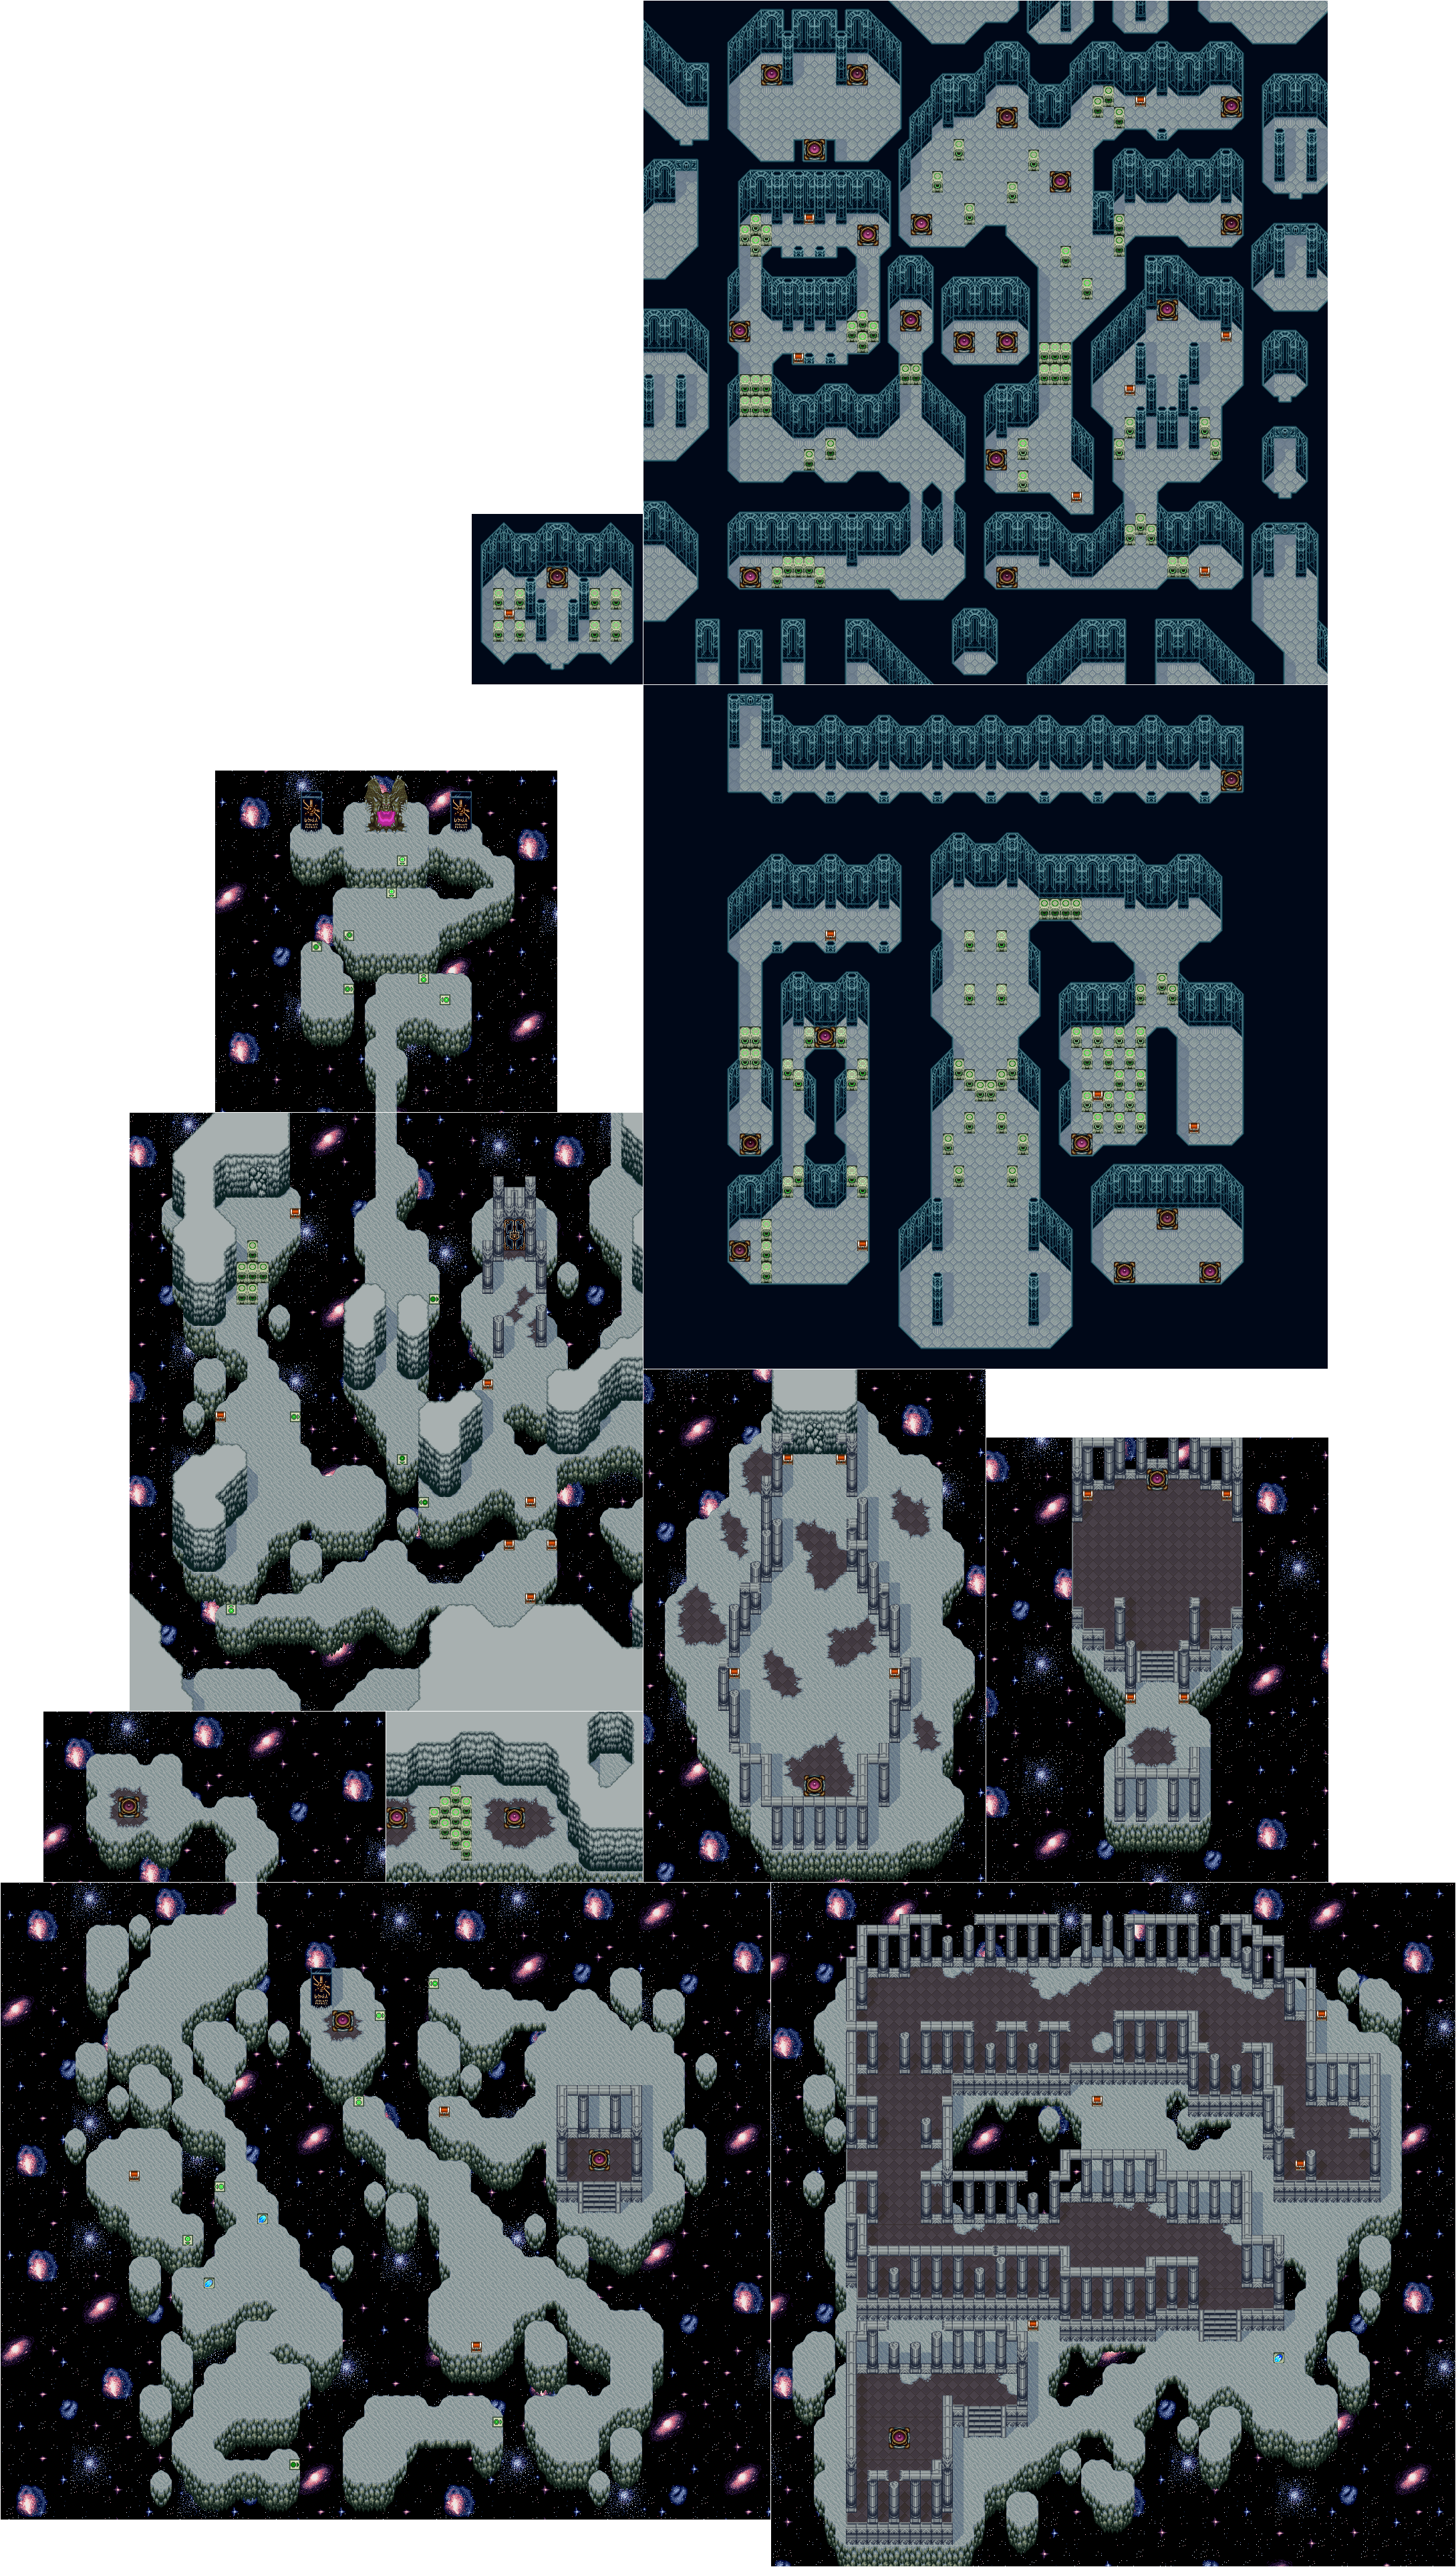 Stage 6 Map
You and Magna will arrive at the edge of the world, which leads to the underworld. Gordon will come out shortly afterward, ready to kill you. Magna intervenes and orders you to seek out the Dragon Gods. He stays behind to stop Gordon, so head onward to the next area. As a quick note before I continue, usage of the Guardian of Earth's special is REALLY helpful here, so feel free to use it to survive these enemy-infested areas ahead. If you feel you need it, use it, because I'm not going to tell you to unless necessary.
Here, head southward, defeating the Spinning Skeletons and Zombies on the way. When you come to a jump tile, take it to the left ledge and open the chest there to get an Aura Blade. Jump back across and continue onward. Take the jump tile at the end to reach the following ledge, then repeat on that ledge. Head north and west to a path split. Go south to a chest containing some Blue Medicine, then go north. Take the jump tile at the end to reach a ledge with a gate on it. Read the slab to learn that you need the Dragon Gem to petrify the Golem inside. You cannot get past, so don't bother stepping onto the gate.
Anyway, go east and south to a wall. Go southwest to a chest with the Hyper Hammer stage item inside, then go around the building and step onto the gate inside to reach a new area. In there, defeat the Zombies and Statues while opening the chests to claim a Potion and an Aura Blade. Destroy the Fire Flowers and 2 more Statues ahead, open the chests to get Blue Medicine and a Soul Orb, then break open the wall and enter that room.
There, head to the west, defeating the enemies you've seen, as well as Green Ogres and Crystals. Head north and east along the path, then south to a chest containing the Dragon Gem stage item. Now, backtrack to where you entered this large area. This time, head east and down some steps, defeating the Crystals, Spinning Skeletons, and Green Ogres you meet. Go east and north, then northwest at the split. Defeat the enemies, including some Fake Chests, then open the real one to get a Life Orb. Now, go all the way south to the very end, then go west. Go northwest and open the real chest to find Red Medicine. Then, continue to the gate, and step into it to reach the previous room again.
From here, go down the steps and head northward. Use the jump tile at the end to jump over to the left ledge. Step into the gate this time, and you'll reach the Golem's room. Cut away at the pillars in the way, avoid the Golem's shots, and hit it with your blade to clear it. Step into the gate it leaves behind to reach a new area.
In this area, open the 2 chests in front of you to get an Aura Blade and Elixir. Then, go forth and you will be stopped by Nevis, the Dragon God. After some dialogue, battle will ensue, so read the Bosses section to get through this fight. Upon defeating Nevis, she'll revert back to a human state. Talk to her and she'll tell you about the Black Pearl needed to reach the underworld. She will give you the Guardian Shield, too, before joining you as your partner. Now, take the Blue Medicines from the chests if you need them, then step into the gate to reach the next area.
In this new area, head to the south, and use the jump tile to reach the lower platform. Go east and open the chest to get an Aura Blade, then head all the way west and jump up to another platform. Head all the way north there, passing the jump tile for now. Cut through the pillars and collect 2 Telesmas from the chests. Break open the wall and take the Emblem from inside. Go back down and use that jump tile to get to the right area.
Back in the middle area, go north and use a jump tile to get onto the right platform. There, open the chests to the south to get a Telesma and an Aura Blade, then head back north by the door. The Emblem will grant you access into that room. Make your way through this room while defeating the Fake Chests, Green Ogres, and other enemies around and about. Make your way to the gate at the other end of the room, and step aboard to reach a new area.
You will then enter a room with 3 gates (including the one you used to enter). Take the bottom-right one to reach the next room. From there, go southwest onto the next gate to reach the following area. Next, follow the path around to another gate, leading to another room. Continue through the next couple rooms until you reach one with many pillars and 2 chests. Open the real one on the left side to get the Black Pearl. Defeat the Eyeballs and the Fake Chest. Then, step on the gate to be taken outside of the room you needed the Emblem to enter.
Now, head south and use the jump tile to reach the next ledge. Continue west and north to another jump tile; take that one to the middle path. From there, head northward into the next area. This time, you will meet Gordon here. He will challenge you, so read the Bosses section for help defeating him. After you win, get to the northmost ledge and go through the Demon's Gate, thus starting Stage 7.
Stage 7 The Black Castle of Power
 Stage 7 Map
When you start off here, Garstein will greet you. He will tell you that all your partners are available for use when you need them, then gives you the Summoning Bell. Now that you're ready, go on to the next room. Head northward, defeating the Eyeballs and Jokers you come across. At the first path split, head west and south to a black pillar with writing on it. It'll mention 4 metals that you need to collect and bring here. Go back to the middle area.
At this point, there aren't really any specific directions for me to give. If you wander around, you'll find more enemies, as well as gates that'll take you to rooms where you'll fight past bosses. Although, if you wander around, you can find some goodies in the chests, including a Life Orb, Soul Orb and Holy Cup. The bosses you can run into here are: Gavaris, Gaza, Sara, and Karouge. Each one will drop one of the 4 metals you need: Earth Adamantite, Fire Orichalcum, Wind Mithril, and Water Mercury.
After you have obtained the 4 metals, return to that black pillar we visited not too long ago. It'll use the metals to create the Guardian Mail for you! Now, make your way to the one gate you haven't yet entered (and if you entered it earlier, you couldn't go through). This time in that room, go forward and defeat the enemies, then go through the open door to another room. You will see a mirror, with a reflection of yourself walking out. Battle will begin, so read the Bosses section for help destroying this Mirror. Upon destroying the Mirror, this stage will end.
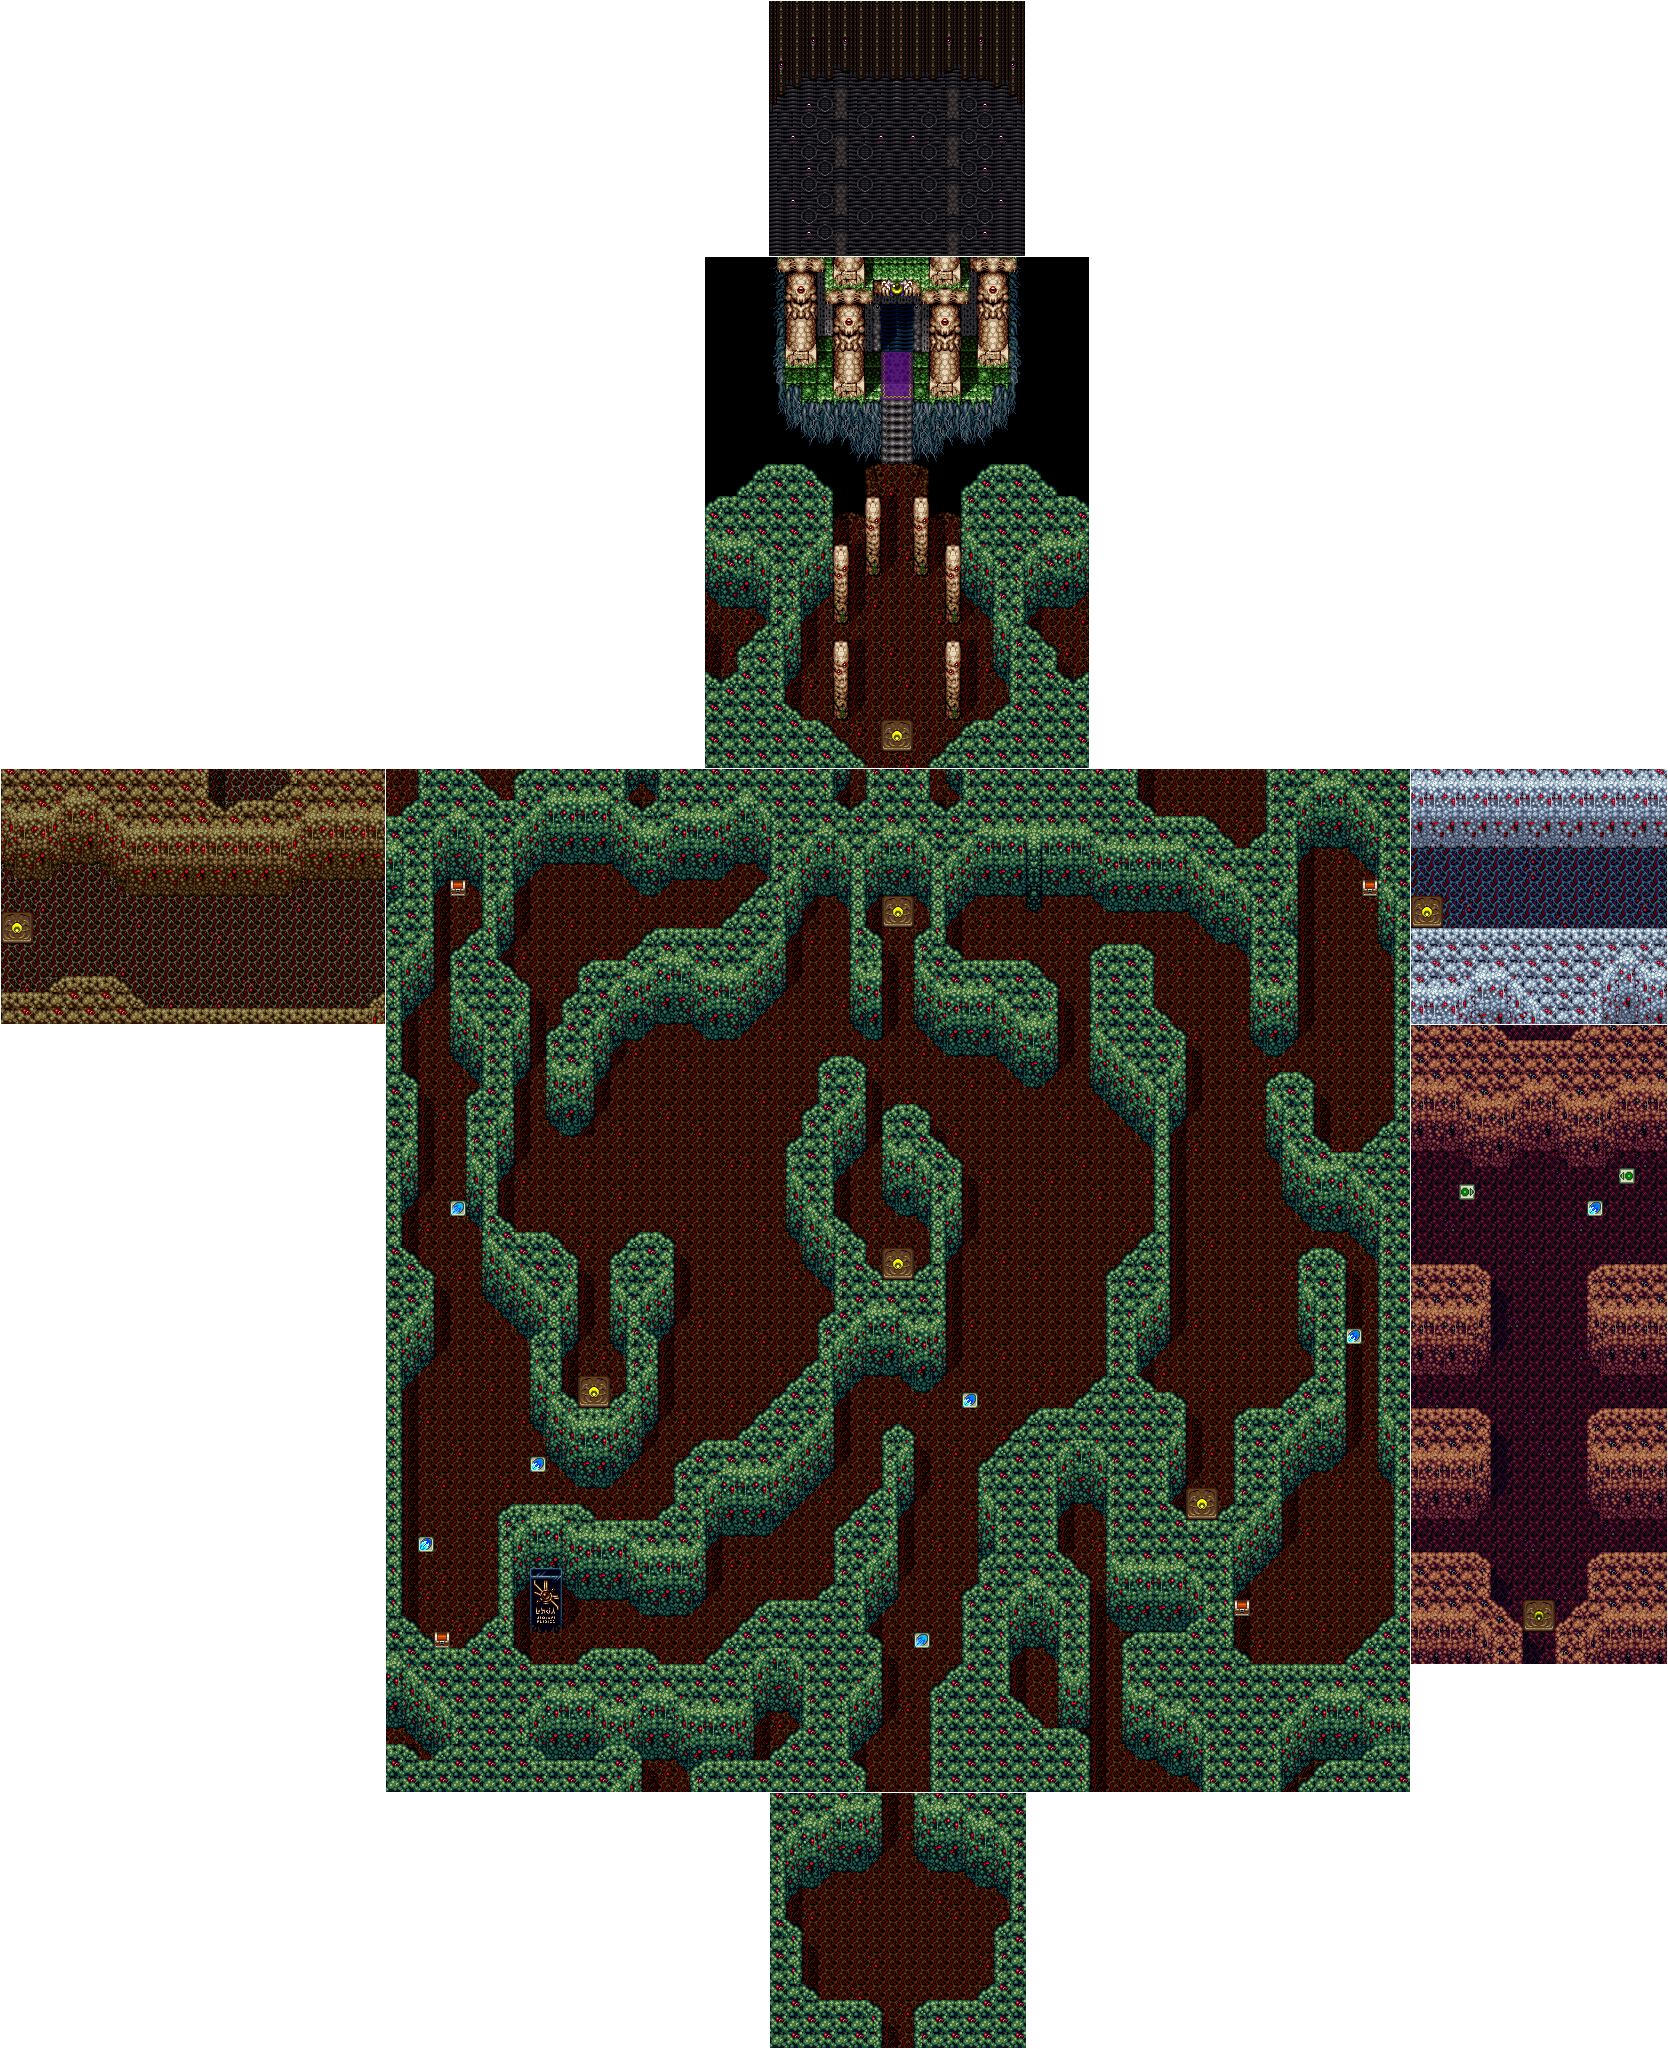
Stage 8 The Kind of Malice Lives On
 Stage 8 Map
When you start this stage, you will be met by Babilom once more. After he leaves, follow the path around this room. Defeat the Red Wizards and Zombies along the way. When you come to the first gate, step into it and get ready for a boss fight with the Dark Dragon. Use the strategy from earlier in the game to defeat it. After you win, you'll be taken to a new area. Make your way to the second gate, while defeating the Green Ogres, Flamethrowers, and other enemies along your path. For the next boss, you'll fight Gordon's second form.
After beating that boss, continue onward in the room you appear in. Step onto the gate at the end, and you'll be put against the Emperor. Defeat him, and you'll be in a new area. Head north and west, then south through here, defeating the enemies on the way. There are 3 paths leading northward you can take; the left and right paths lead to chests containing a Life Orb and a Soul Orb, and the middle path leads to a gate. Collect the treasures and step onto the gate. You'll have to fight Babilom again, so use the previous strategy in the Bosses section if you need the help.
When you end up in a new area after the fight, head straight to the north. Defeat the various enemies, then open the chests to get a Sage's Stone and an Elixir. When you're ready, go through the giant door into the next room. You will finally meet Alcahest in the flesh, and the final confrontation will ensue. Visit the Bosses section for help on getting through this last battle. After it's over, congratulations on completing Alcahest!
Bosses
Lizardman (x2)
- Found: Stage 1
- Experience Points: 2000 each
- Strategy: These two creatures you have to fight are really simple to beat, especially if you have the power of the Aura Blade. There are 2 dash tiles you can use to dash through them, causing damage. They move around trying to hit you and sometimes dash across to catch you off guard, so be prepared. Use the dash tiles or constantly attack with your sword until one is defeated, then concentrate on the other until it's gone too.

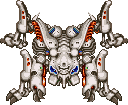
Golem
- Found: Stage 1
- Experience Points: 5000
- Strategy: The Golem may look big and tough, but it isn't too tough of a creature. It floats around in the middle lava area doing one of several attacks. It can dash ahead, hitting you on the platform you're on; it can shoot 3 giant energy blasts straight ahead; it can also send out small pulse shots that'll shatter into smaller shots going in several directions. Attack it when it's close by using the dash tile. Even when normally attacking, Garstein's magic shot will keep hitting the boss. Using some specials at this point can help, too. If you need help, get the Aura Blade from the chest on the right side. Deplete its life bar to win the fight.
Gordon
- Found: Stage 2
- Experience Points: 3000
- Strategy: Even when the battle starts, you'll be warned that Gordon is invulnerable to regular attacks. Also, Blue Wizards will appear and attack you as well, so be careful as you try to defeat them too. This guy isn't too hard, though; use fully charged defeat Gordon.
Knight (x4)
- Found: Stage 2
- Experience Points: 2500 each
- Strategy:Here you are faced with 4 rather tough Knights. They can be a bit annoying to fight, but as long as you have SP you should be just fine. Use the Guardian's powers to attack, as well as charged blade attacks for added damage. If your vitality is too low, Elikshil will recover it for you, provided you have 1 SP. Continue the attacking until you start killing these guys off, then you'll have an easier shot at winning.

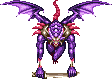
Dark Dragon
- Found: Stage 2
- Experience Points: 5000
- Strategy:Same as with the Knights, the Dark Dragon shouldn't be too hard provided you have plenty of SP stored. For attacking, it hovers along the back half of the room and shoots lines of fire at you. The dragon sometimes swoops down towards you, then goes back up at the other end of the room. It cannot be damaged by regular shots, so you have to use charged blade attacks and Guardian powers to cause damage here. If your vitality gets low, Elikshil will recover it for you. After you've harmed the boss enough, it'll start to shoot waves of energy balls at you, so avoid those easily and continue the attack until you win.
Gavaris
- Found: Stage 3
- Experience Points: 5000
- Strategy: Now, this may be a pretty tough battle for you to get through, especially since you won't have the help of Elikshil anymore. This battle can be won, though. Keep your distance for most of the battle and charge up your blade, then run in close and let loose with the spinning blade attack. Also, using the Water Guardian's attacks can help dispose of him quicker. Gavaris moves around sending waves of energy to follow you, or he'll jump in the air and attempt to fall on you; dash to avoid that attack. Just keep your distance so you won't get hurt as much, and only come close to attack with a charged hit, and you should make it through.
Gaza
- Found: Stage 3
- Experience Points: 5000
- Strategy: In this fight against Gaza, Sara will mimic him, so keep your guard up while fighting. Their battle pattern is very predictable though. To start, they'll go into their elemental forms and come down to your area, spinning around and trying to hit you. Use the dash tile on the left side to run through Gaza, hurting him (Sara doesn't get hurt). Then, use the jump tile on the other side to get back across safely. When the pair goes back up on the wall, their next move will be to jump straight down and dash at you, or throw projectiles. Again, use the dash tile to cause damage. The Water Guardian's powers can help you here, too. Gaza isn't too strong, so your attacks take a lot off him, but watch your vitality too.
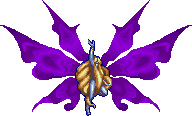
Sara
- Found: Stage 3
- Experience Points: 8000
- Strategy: For the first round against Sara, she is REALLY easy. She shoots 3 fireballs at you, which you can block with your shield, then she'll move around totally engulfed in fire. Attack strongly and don't touch her, and you'll win this quickly. Babilom will revive her, making her into a giant dragon creature. This time around, the battle gets tough! It'll shoot a barrage of fireballs northward, which rain across the room to hurt you. It can also fly around the room and sometimes dash into you, so always run around to avoid damage. Sometimes, she'll send a circle of energy at you, so be careful about that too. One effective strategy would be to keep your distance and charge your Guardian of Water Blade, then when Sara is on the ground, run in and attack, then move away and repeat. This pattern causes the most damage, so try it while avoiding contact with Sara's attacks until you win.
Sirius
- Found: Stage 4
- Experience Points: 5000
- Strategy: Although he may seem tough, Sirius is a pushover for you at this point in the game. There are 2 dash tiles that you can use in the room. Sirius only has 2 moves: using his mace to hit you from afar, or his special ability which shoots shots in all directions. When you see him start to glow, dash into him with a dash tile to prevent his special from working. Constantly use the dash tiles to attack and this battle should be over fast!
Karouge
- Found: Stage 4
- Experience Points: 7500
- Strategy: This final general is a real pain to face, seriously. He dashes around with his swords drawn, pausing in between dashes, giving you a chance to attack or run away. He sometimes glows, then charges quickly in your direction for a sword attack. Karouge will also shoot energy balls in several directions heading towards you, so try to avoid those as best as you can. He may even throw his swords at you like boomerangs; when he does, get behind him and attack with a fully charged Blade of Fire attack (this is the most effective attack to use). When he teleports, keep moving so he doesn't surprise you and cause damage. Be a bit patient and keep trying, and you'll win this battle.

Emperor
- Found: Stage 4
- Experience Points: 10000
- Strategy: Fortunately for you, this stage's final boss is way more tolerable than Karouge was. There are four heads that spin around the Emperor's shell, which detach now and then to shoot lasers at you. You can get 2000 Experience Points apiece by destroying the heads, so try to do that. This will also give you more room to attack the boss without dealing with heads hitting you. Equip the Guardian Blade of Fire for this battle, and use its charged attack to cause the most damage to the heads and the Emperor's body. Anyway, the Emperor moves around rather slowly, so dash around to avoid contact. Sometimes, it'll dash towards you, taking lots of vitality away if hit, so be careful. Also, watch out when he stops, since he'll shoot 3 lasers in different directions to your vicinity. Continue using the charged blade to attack, and the battle will be won.
Metal Crawler
- Found: Stage 5
- Experience Points: 10000
- Strategy: Despite its intimidating appearance, the Metal Crawler is quite simple, in my opinion. It also reminds me of the Helmasaur King from the SNES Zelda. It moves back and forth in the spike pit, sending out small helicopters to attack you (those can be destroyed quickly for 500 Experience apiece), and sending its arms into your area to cause further damage. Again, the Blade of Fire is great here, so use its charged blade to attack the arms to start. Each arm gives 2500 Experience Points when destroyed. After you handle those, you'll be safe to attack the body. Use more charged blade attacks to cause major damage to the body. Avoid the 3 green balls it shoots towards you, and continue the attack to win.
Babilom (First Form)
- Found: Stage 5
- Experience Points: 10000
- Strategy: For Babilom in his regular form, he shouldn't be too difficult. Simply equip the Blade of Wind and summon that Guardian to pummel Babilom with flurries of punches. All Babilom does is teleport around, shooting energy balls at you, so you can block those with your shield easily. After a while, he might create 3 clones of himself to attack as well. They can be defeated in one hit, so you'll be able to figure that out easily. Just use the Guardian to pull through this round.
Babilom (Second Form)
- Found: Stage 5
- Experience Points: 30000
- Strategy: For this second round with Babilom, he becomes a large green head that moves around the room. If you have any more MP, use the Guardian of Wind's special to cause some good damage (if you have the Sage's Stone AND Holy Cup, they'll help here). Switch to your Blade of Fire and use its charged attack to cause lots of damage when possible. As for Babilom, the head moves in a circular pattern around the room, sending long millipedes and blobs after you, which can be destroyed quickly with your attacks. Avoid those as best as you can, attacking the head with charged slices often, and you'll defeat him for good.
Nevis
- Found: Stage 6
- Experience Points: 15000
- Strategy: The fight against the Dragon God is simple if you ask me. It flies around shooting fireballs at you, sometimes dashing around to catch you off-guard. Equip the Blade of Earth and charge it, then line yourself up with the dragon and let loose with a nice dash attack to cause lots of damage. Avoid its attacks and repeat this several times to win.
Gordon (First Form)
- Found: Stage 6
- Experience Points: 10000
- Strategy: For Gordon's first (regular) form, he has no moves to hit you with. He just hovers around, sometimes jumping down and slashing at you with his sword, which you can avoid easily. Keep away when he's in the air; use the jump tiles to your advantage here. Use charged Blade of Earth attacks to cause lots of damage when possible, and you'll be set for this round.
Gordon (Second Form)
- Found: Stage 6
- Experience Points: 15000
- Strategy: Gordon's second form isn't as agile as his first, but he still has some powerful attacks to use against you here. He can hover around still, sometimes stopping to extend his arms ahead with a sword drawn to catch you off guard. Also, he may split into several smaller clones, which will fly around the area. Avoid those as best as you can, then when they combine again, resume the attack. Use charged Blade of Earth attacks, as well as the Earth Guardian's special to protect yourself. After you've weakened him enough, Gordon will send out small bats to follow you, so be careful. Just keep your distance and continue the attacking until you win.
Mirror
- Found: Stage 7
- Experience Points: 30000
- Strategy: Now, this fight can be a bit tough for some, but for me, it wasn't too bad. You just have to be patient with this one. Anyway, your reflection won't hurt you if you touch it, so don't worry. It'll conjure up a creature that'll try to follow you, which will then split into 3 smaller versions of itself. Those can be destroyed with your blade easily or blocked with your shield when you stay still. As for the mirror itself, it'll move quickly around the room, then stop in a single place for a moment, before moving again. Before it stops, charges up the Blade of Earth, then when it appears use the charged attack and dash through to cause damage. It'd be best if you have Elikshil as your partner here, so she can recover your vitality when needed. This fight will take a while, but keep away from the creatures that follow you and you'll be set.

Alcahest (First Form)
- Found: Stage 8
- Experience Points: 40000
- Strategy: In actuality, this first form of Alcahest is the hardest one to get through. There are several things he can do. Alcahest can create a black hole-like atmosphere, which keeps pulling you in a particular direction, so dash to get out of that. He'll move around and stop now and then, revealing a core. As far as attacking goes, constantly charge your Blade of Earth, then when the core is revealed, use the charged attack to cause damage, then get away quickly. There are times when Alcahest will stop, but not reveal the core; in that case, simply avoid the energy balls/beam that are shot. He sometimes calls upon the Chaos of Death spell, which will take LOTS of vitality from you. To prevent that, before it happens, use the Guardian of Earth's special to protect yourself. Just try to stay alive, while attacking when you can, and you'll get through the hard part of this fight in no time.
Alcahest (Final Form)
- Found: Stage 8
- Experience Points: 40000
- Strategy: For the second and final part of the battle with Alcahest, it gets much easier, fortunately. Your battle plan is going to be a little different, but it works. Start by switching to the Blade of Wind. As for what Alcahest does now, he can fly away, then drop meteors in the area, targeted at you. He swoops down and back sometimes, and even shoots out several meteors right at you (standstill to block those). Be careful when Alcahest goes offscreen because when he returns, he shoots an electric bolt out above/below him. As for you attacking, constantly charge the Blade of Wind and use the charged attack to jump stab whenever possible. Stay away from Alcahest's body when you're not ready for attack, so you don't get hurt by anything, and you should make it through this last battle easily.