Walkthrough
 Contents
A few notes before jumping into the Sailor Moon: Another Story walkthrough:
- If you want to know the attacks of the Sailor Senshi, I have them listed on the Characters page.
- If you want to learn about “Link Techs” (kind of like combo techs in Chrono Trigger), I've placed that as the last page of this walkthrough: Link Techs.
- This walkthrough is based on the original fan translation of Sailor Moon RPG (released in 1999). You're most likely using the improved fan translation (released in 2019). So, you may encounter different names for characters, locations, and items here.
Chapter 1 Her Destiny
Usagi's House
.png) Chapter 1 Map
Chapter 1 Map
We start off at Usagi's bedroom. She is currently taking a nap when, suddenly, Luna jumps over to an open window and tries to wake Usagi up from her slumber. After attempting twice, Luna finally wakes her up. Usagi asks what's wrong and Luna says there's something peculiar about the town, although she doesn't know what it is exactly. Usagi wonders if it's not Luna's imaginative mind, and the black cat replies it's not, as she's absolutely sure that there's something wrong with the civilians as well. The lazy Usagi ignores Luna and goes back to sleep. Luna tries to wake her up again and you'll be prompted by a yes or no question. Choose yes because you certainly can't play this game if you decide to choose otherwise!
Usagi finally gets out of bed, ready to head off to the town. Luna soon remembers about the diary and she reminds Usagi to take it with her. Luna tells Usagi that the Diary can be used to save the game, everything that has been done so far. But the game can only be saved when you talk to a Luna-P Ball. She'll ask if you have understood what she just said. I'm sure you did, so just say yes. Good, now we are all set!
In Usagi's room, you'll see a spinning Luna head, which is the Luna-P. You can use it to save now if you want. But since we just started the game, don't.
Walk out of Usagi's room and go downstairs. If you want to have some fun, then as soon as you get out of Usagi's room, go left and go down to enter a room. You'll be inside Usagi's brother's room. Talk to Shingo and he'll tell you to butt out of his room.
Once downstairs, go left and down to exit Usagi's house. Go right and you'll see a traveling merchant walking around. Talk to him and he'll say that he has lost his way. He notices that you look pretty tired, so he'll heal you with some of his medicine. We'll be coming back to this merchant again later on, as he will be very useful. Once you're done, keep going right until you enter the next screen.
 Juuban
The Town of Juuban
Here you can talk to all the civilians if you want, but most of them don't have anything interesting to say. There is this one civilian though who will presume that Luna the black cat is a bad luck (the nerve!). From where you just arrived at the new screen, head right, then go up. Now go left, then up, and keep going right, until you see a store that says “OSAP”. Head inside and a cutscene will ensue. Naru is in danger as she and her mother are being attacked by a Daimon. Usagi transforms into Sailor Moon and confronts the monster.
Boss: Persian-Cut
The first boss of this game! Since we are just beginning this RPG, this boss is very easy. Take this opportunity to get a feel of the game's battle mode. You can finish this boss in many ways. You can just attack her with physical hits, but that will take longer to take her down. She could knock you out if you're not careful. If you're running low on health, use the MoonCup1 to restore Sailor Moon's health fully and also become super. But you can't use her special attack since Sailor Moon's EP is very low at the moment. For a much quicker finish, use Moon Tiara Action twice, which does about 7 damage. Then just finish her off using physical hits.
Rewards after winning: 3 EXPs, 500 yen, Lifewater, Puzzle Piece
After the battle, Naru thanks Sailor Moon for defeating the monster. Sailor Moon tells Naru that everything is all right and if she's ever in danger again, she should call the super heroine. Once you get control of Sailor Moon, go left and you'll see a stairway. Climb them up. Go past the first door that you see and enter the second door. You'll see a treasure chest in this room, so pick it up by pressing X (A) and you will find an Ancient Doll, the first Collective Item in the game! When you're done, exit the room.
Go back downstairs and head out of the OSAP jewellery store. Upon getting out of the store, Sailor Moon yawns and decides to go home to take a nap.
Mamoru's Home
The scene is now switched over to Mamoru's home, as he is sleeping in bed. He starts having a dream. Mamoru wonders where he has just arrived. Suddenly, he hears the voice of someone he knows. And that someone is Kunzite, who appears right before Mamoru. Kunzite tells Mamoru that destiny draws near. An evil comet is approaching from an evil star to return destiny to its origins. It is a horrible comet with the power to return everything now in the future and in the past. It is giving birth to an existence in which all shall be returned to what has been. Mamoru is shocked, and he asks when returning destiny will happen. Kunzite tells Mamoru that this is from the distant future. Mamoru asks if he has anything to do with it and Kunzite replies that he shall choose which future. With that said, Kunzite disappears.
Mamoru's dream is over and he wakes up from bed. He wonders if that was really a dream, but he knows that he gets to choose which future. Suddenly, the Shitennou no Hako starts glimmering...
Hikawa Shrine
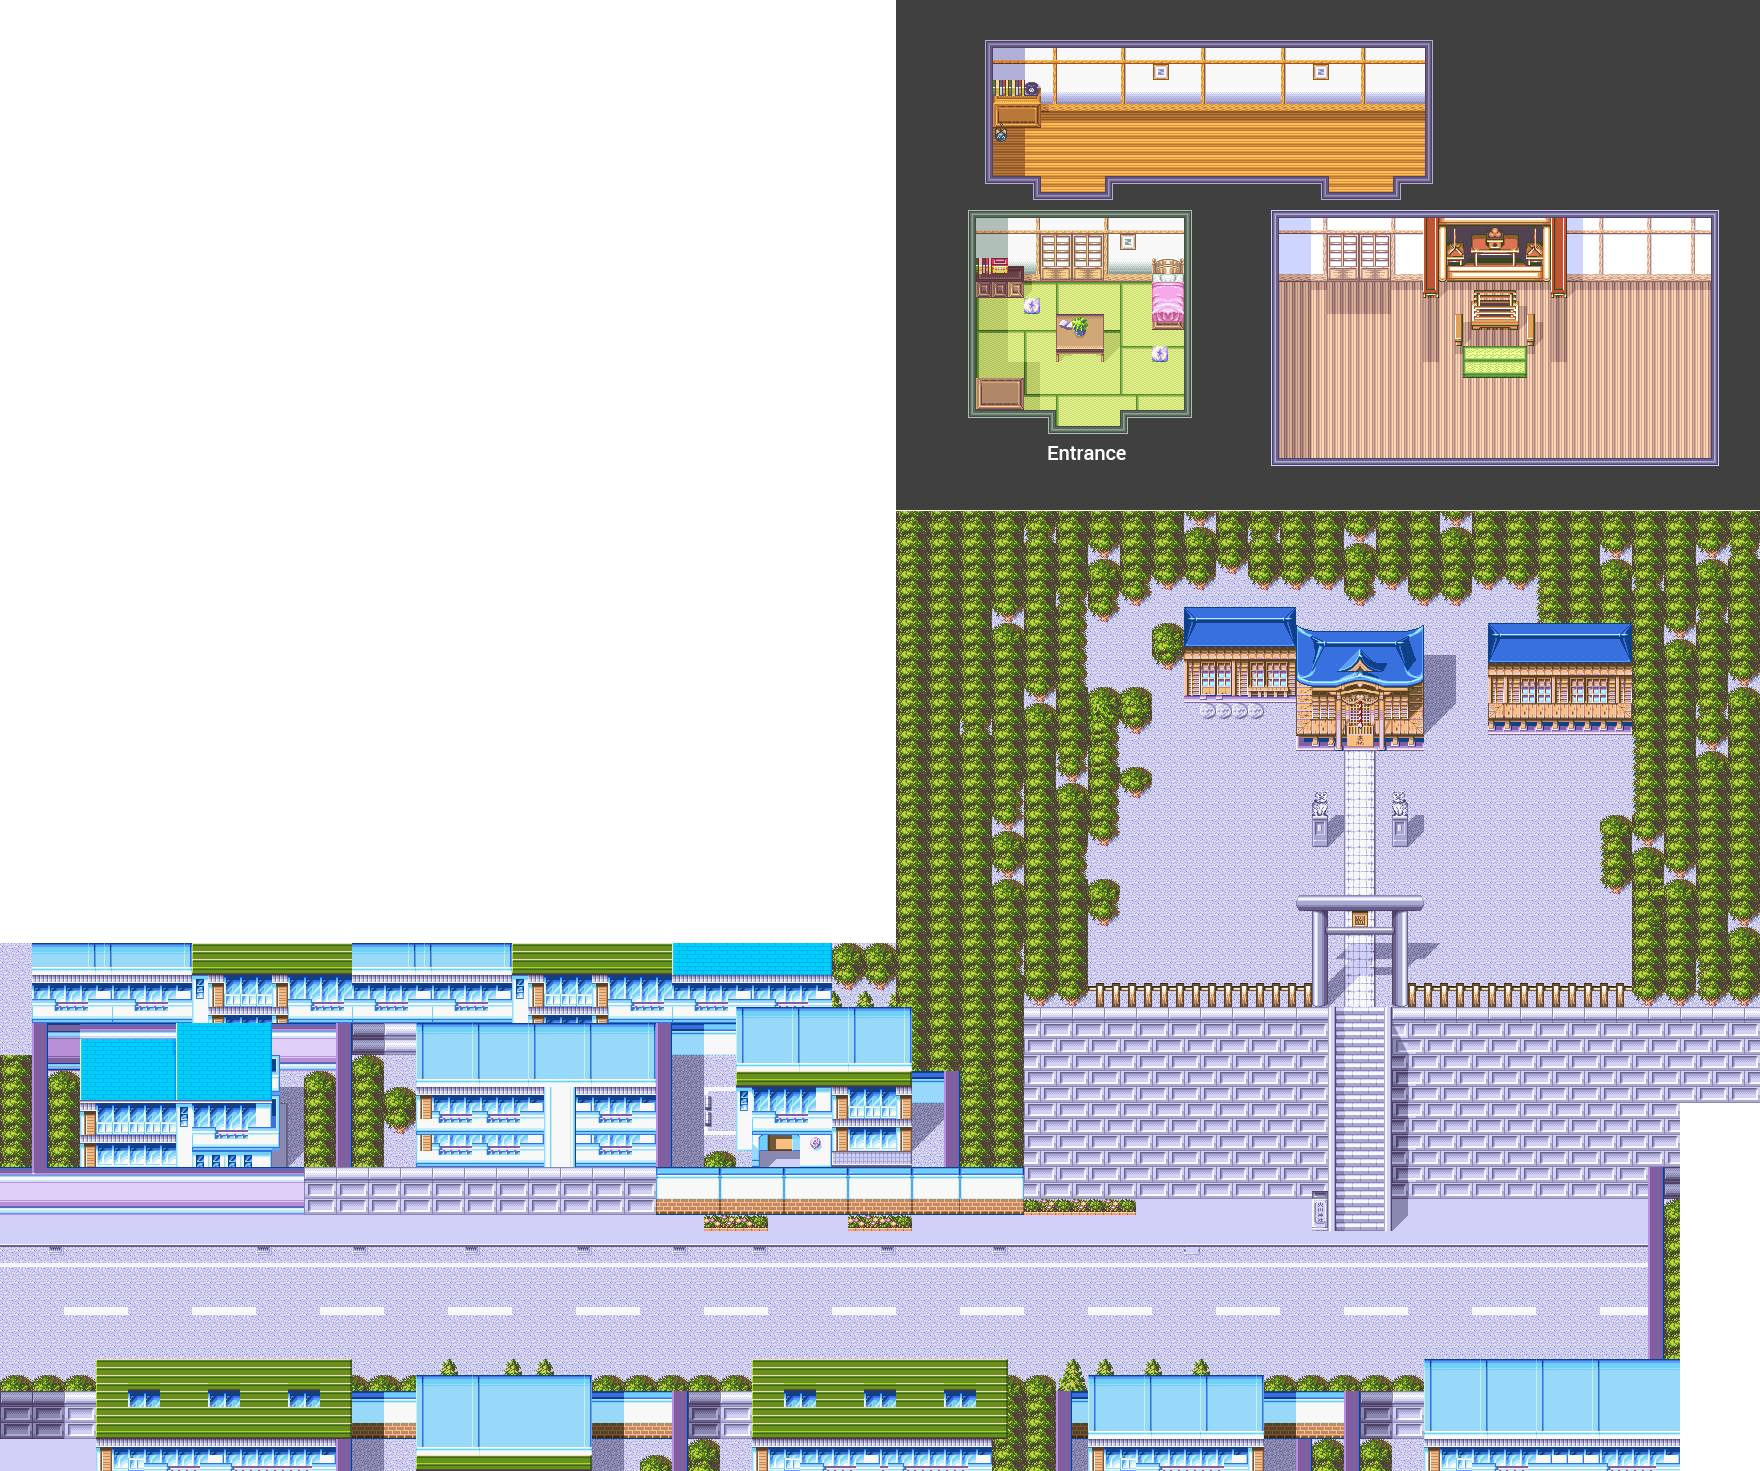 Hikawa Shrine
Now the scene switches over the Hikawa Shrine, where Usagi runs over to Rei and Makoto, telling them to transform. She reports that daimons have appeared again and wonders what in the world has happened. Makoto asks if the Death Busters have been revived. Rei, being the teaser that she is, asks Usagi if she didn't dream of that. Usagi complains about Rei's attitude. She turns around to ask Ami if she believes Usagi, but Ami is not here! Ami soon appears, saying that she was late because she just talked with Urawa-Kun. Rei tells everyone that they should go inside the shrine.
Inside the temple, Makoto tells Ami that it has been a long time since she and Urawa-Kun have met. Ami says that he came to Tokyo for his holidays. Rei soon asks Ami where has she decided to go out with Urawa-Kun. Ami states that the national exams are coming up soon and so she wants to go out with him to the library. Usagi, Rei, and Makoto all sweatdrop. Rei asks Ami the real question: what are the date plans? This causes Ami to blush a scarlet, as she implies that she cannot go out on a date with Urawa-Kun. But one day, Ami will feel that she is right for Urawa-Kun.
Minako has now arrived at the temple and apologizes for making the girls wait for so long. She notices Ami as her face is still blushing a scarlet. Makoto tells Minako that Ami has a boyfriend and he's coming soon. Ami is still reluctant about the idea that she and Urawa can be an item. Yuuichirou soon comes inside the temple and greets everyone. He goes up to Rei, telling her that she's looking better than ever today. Rei embarrassingly thanks him and Yuuichirou leaves. Having seen a scene of Rei and Yuuichirou, Usagi starts teasing her. She asks if Yuuichirou is her great friend, but Rei sweatdrops, telling her that it's nothing. Usagi interrogates Rei but she once again implies that it's nothing. She now asks Usagi who her boyfriend is. Usagi, of course, exclaims that she and Mamoru are the perfect couple and she wants to be with him always. In fact, he has already kissed her. That said, Usagi now blushes a scarlet. Minako and Makoto talk about wanting their own boyfriends, too.
Luna prompts Ami that she has to go and pick Urawa up from the train station. Ami remembers, and she runs off. Minako gets an idea and asks the girls if they should follow her. Makoto comments on how mean that would be, but Rei wants to find out more about Urawa and Ami. Usagi exclaims that they should all go, but Makoto is a bit reluctant. But with a 3 against 1 vote, the decision is unanimous, so Makoto decides to go after all.
Ami hops on to a bus that leads to the train station. Usagi, Rei, Minako, and Makoto arrive at the bus stop and get in on the next one.
Tokyo Train Station
Once you get off the bus, you'll have control of Usagi. Go right and then up to enter the station. As soon as you get in, Usagi and the others will spot Ami right in front of them! They quickly hide somewhere so that their cover won't be blown. As soon as Ami walks off, you'll have control of Usagi again. Talk to Minako, Makoto, and Rei in order to advance.
Ami is in front of a train, waiting for Urawa to come out. Back to Usagi and the others, Rei comments that the bullet train has arrived, as all the passengers are “walking” out to the exit of the station. Minako thinks Ami and Urawa are having a wonderful reunion. Makoto notices something funny going on. Suddenly, someone starts screaming and all the passengers are now running off to the station's exit. Makoto asks one of the passenger what just happened and they freaked out guy will say there's a monster inside the train. He runs off having said that. Another passenger tells Usagi and the others that the monster has trapped a boy on the train. Usagi says that they should check this out. In control of Usagi again, move up, up through the stairs.
Ami is just walking around until she hears Usagi's voice. She is glad that her friends are here. Suddenly, Usagi feels so many auras. Luna tells the girls to transform, and so they do. Once you're in control of Sailor Moon, go left and you'll see a Luna-P. Save your game if you want, then proceed inside the train. Once inside, just walk right until a fight ensues.
Boss: Combater
This is another easy fight, especially since you have all the Inner Senshi. On the first turn, Use Jupiter's Supreme Thunder, Mars' FireSoul, Sailor Moon's Moon Tiara Action, Mercury's Shabon Spray, and Venus' Crescent Beam to damage this monster decently. This monster will attempt to use an attack that requires more EV, so he can't use it. Just keep pummeling the Combater with physical attacks, since your Senshi probably don't have enough EP to use their special attacks anymore. It should all be over soon!
Rewards after winning: 26 EXPs, 400 Yen, Lifewater, Puzzle Piece
Pull out your menu and you'll see that your characters have gained 3 levels. Now they all have enough EP to use their special attacks more than once. Yay! Now keep moving right until you enter the next screen. Go right again until another fight ensues.
Boss: Combater
Same boss fight, only this time it's much easier since you have more EP now and you're much stronger, too! Use the same strategy that you used against the first Combater and this one will be no different. Try out some of the Senshi's available moves now, like Jupiter's Sparkling Wide Pressure, Mars' FireSoul Bird, Sailor Moon's Moon Spiral Heart Attack, Mercury's Shine Aqua Illusion, and Venus' Love Me Chain. Guaranteed that these attacks will finish the Combater off in just 2-3 hits.
Rewards after winning: 26 EXPs, 400 Yen, Lifewater
Open your menu again and you'll see that your characters have now jumped up two levels, now at level 6! Keep going right until you enter the next screen. Ami sees Urawa and goes up to him, asking if he's alright. Urawa tries to speak, but is too weak to do so. Ami tells him to hang on. Jupiter examines Urawa and says he's only unconscious. Sailor Moon wonders if Queen Beryl has been revived after seeing a Youma. Luna will tell everyone that they should get back to the Hikawa Shrine.
Hikawa Shrine
Hikawa Shrine
AAmi asks Urawa, who's in bed, if he's alright. Urawa replies that he is, but he tells Ami that he had just had a vision in his dream. The past and the future changed places. Urawa does not understand it very well, but he has a feeling that destiny will change. Ami asks him if the future has been replaced, but Urawa says no. Not only the future has been replaced, but the past has been replaced as well!
The scene switches over. In the room with the sacred fire, Rei performs a ritual, causing the sacred flame to burn bigger. Usagi wonders if the flame is showing the image of a new enemy. Suddenly, the flame starts talking, saying its name is Sin and after that, it blows up in front of Rei's face. Covered in soot, Rei decides to go take a bath. Usagi teases by saying Rei's face is pitch black (lol).
Minako has heard the name “Sin” from the talking flame and Makoto wonders if it's a new enemy. Suddenly, Rei's grandpa calls her, exclaiming that there was a telephone call from Haruka. Since Rei is busy taking a bath, Usagi decides to answer it on her behalf.
When you have control of Usagi, walk out of the room you are in now and go left until you see Rei's grandpa standing next to the phone. Talk to him and he'll let you take the call. Haruka will tell Usagi that something terrible has happened. Hotaru has fallen ill! Usagi asks if Hotaru's sick but Haruka is unable to answer her. She tells Usagi that the doctors are baffled about Hotaru's condition. Haruka tells Usagi to come over to the Juuban Hospital immediately, and hangs up the phone. Luna asks Usagi what's wrong and she answers that something terrible has happened to Hotaru-chan. Luna gets confused, but Usagi tells her that she has to go visit Hotaru at the Juuban Hospital.
Once you're in control, you'll see a Luna-P ball near the phone. Save your game if you wish, then go down to see Ami and Urawa. Ami won't say much other than thinking about destiny changing, so exit the shrine.
Luna will remark that many nasty things have been happening lately, so she decides to check out a few things on her own. Usagi will agree and Luna tells her that if anything happens, she should be contacted.
Head down the stairs to get out of the shrine, then go left until you enter the next screen.
The town of Juuban
From here, just keep moving left until you enter the next screen. Move left, then go up and enter the Juuban Hospital building.
Juuban Hospital
 Juuban Hospital
You'll see the front desk here as well as a Luna-P, so save the game if you want. Talk to the front desk and she will tell you that Hotaru's hospital room is on the third floor, the one on the far left. So go there now. When you're in the room, talk to Michiru and she'll say that they've been waiting for you.
She will wake Hotaru up, telling her that Usagi-san has come to see her. Usagi examines Hotaru and asks why she has grown into a child. Hotaru, in pain, says her pain only stopped hurting a while ago. She is fine since Usagi is now here. Usagi wonders what could've happened. Michiru answers that Hotaru started stumbling and Haruka says that she transformed back right in front of their eyes. The Mugen Gakuen has been revived too and something evil has begun happening. Haruka asks Hotaru if she's ever felt this kind of pain before. Hotaru says it was like when she was under the influence of the Taioron Crystal. Usagi-san's Ginzuishou seemed to help relieve the pain. Usagi wonders if Hotaru will turn back into Mistress 9. Haruka says that Hotaru has opened her eyes and is a Sailor Senshi now.
Hotaru will say that after she had collapsed, she felt as if she was enveloped in the darkness. But that evil power is an enormous power of darkness. She felt like her destiny was being influenced by something else. Usagi wonders what it could be..
A nurse soon walks in, saying that it's time for Hotaru's “check-up”. Michiru immediately tells the nurse that the room they are in now should be marked “No entry”. She directs the question, “Who or what are you!” Now exposed, the nurse reveals her true identity - a Daimon!
Boss: Palmacon
Not a hard battle here. Use Sailor Moon's Moon Spiral Heart Attack and have Uranus and Neptune use physical attacks, since their techniques aren't quite damaging. If you run out of EP for Sailor Moon, then just use physical hits until this boss is demolished.
Rewards after winning: 3 EXPs, 200 Yen, Bandage, Puzzle Piece
After the battle, Haruka points out that they have already defeated that Daimon before. Michiru says this was the second time a Daimon has attacked today. Usagi wonders why enemies beaten before are being revived. Hotaru will say if its destiny was changed the same way as hers, she thinks it might be possible. Haruka finds it preposterous about having the power to change destiny. She wonders who the heck these enemies are.
The scene switches over to a lair, where the five Oppositio Senshi report to Apsu, confirming that they have completed the first stage of their strategy. In a few places, previously beaten enemies have been revived and attacked some people. The destiny of the Juuban district of the 20th Century has been changed. Lord Apsu rewards the Oppositio Senshi with powers, which are the kind of powers needed to beat the Sailor Senshi! The Oppositio Senshi gives thanks to Apsu.
The first Oppositio Senshi, Nabu, says that with the power they have now, they can use it to defeat the Sailor Senshi. The second Oppositio Senshi, Nergal, feels that their destinies shall be changed for the better. The third Oppositio Senshi, Ishtar, thinks so, too. The fourth Oppositio Senshi, Marduk, is feeling anxious.
Suddenly, a boy named Anshar appears and agrees with Marduk. Anshar tells the Oppositio Senshi that it's too early to be satisfied since the Sailor Senshi are still not dead yet. To turn destiny into what they truly desire, they must retrieve the Ginzuishou from those who possess it. They shall only have a chance if they get the Ginzuishou. The fifth Oppositio Senshi, Sin, agrees with Anshar, who is her little brother. The power of the Ginzuishou is too strong to ignore. So, they have crossed over time protected by the Ginzuishou, and arrived at this time. Ishtar says it is their chance, since their power has become strong, too.
Nabu shares her insight that, at the moment, the Sailor Senshi are separated into two different groups. Anshar suggests that they should attack now. With that said, the four Oppositio Senshi teleport off. Sin tells Anshar not to act easy towards the Princess if he does indeed want to change destiny. She teleports off too, leaving Anshar speechless. He teleports off as well.
Outside the Juuban Hospital, Haruka suggests that they should check out the town a little. Michiru agrees and hopes that they can find a clue left behind by the enemy. Usagi also agrees, and she feels that something is about to happen. That said, Usagi proposes that they should go back to her house to make sure that everyone's safe. Haruka agrees, but suddenly a familiar voice is heard. Hotaru comes out of the hospital, saying that she wants to go too. Haruka ponders about her well-being, but Hotaru says she's a Sailor Senshi too and she can't just rest while everyone fights. She doesn't want destiny to be changed any more than it already has. Haruka is soon convinced about taking Hotaru along with them and so we are ready to continue.
Note: Random battles in Juuban have now started, so expect to get caught in multiple battles.
.gif) Accessing formations
Accessing formations
Before we move on, open up your menu screen and go to Formation. Select “Cluster” as this is a very good Formation. Make sure Sailor Moon is at the center and Sailor Saturn is at the back (since Saturn's stats are very low at the moment). Uranus and Neptune are ok at the front. Now exit the menu screen and let's get back to the game. Go left, down, then right and keep moving until you enter the next screen.
Go right, down, right, down, left, down, right, down, and then keep moving left until you enter the next screen. Go left and you'll see the same traveling merchant whom we met near the beginning of the game. Talk to him and he'll heal your party. Now keep moving left, then go up and enter Usagi's house.
Usagi's house
Upon entering, Usagi is relieved that nothing terrible has happened... that is until Shingo runs by, screaming like hell as a Youma is chasing him around. The 4 girls immediately transform into Sailor Senshi in order to save Shingo.
Go upstairs, then go left and enter Shingo's room. You'll find the kid unconscious, so talk to the Youma and a battle will ensue.
Boss: CureneyGreen
This guy has an attack called Sonic Wave, which will put one Senshi to sleep should it hit. Other than that, this is yet another easy boss fight. With your cluster formation, you can moondust this guy with your special attacks. Or if you run out of EP, just use physical attacks. Deep Submerge, World Shaking, Death Revolution, Moon Spiral Heart Attack, you know how it goes.
Rewards after winning: 5 EXPs, 2500 Yen
Shingo will thank Sailor Moon for saving his life. Sailor Moon tells him it's alright and “Shin...gottattatta”. Shingo gets confused, but he tells Sailor Moon that those people wanted to know where the “Gunzaichou” is. Of course we know what he means, right? The Ginzuishou!
When you're in control of Sailor Moon, exit Shingo's room, then re-enter it. Talk to him again and Shingo will comment on how cute Sailor Moon is and how she's different from his stupid sister, Usagi. Hearing this, Sailor Moon is speechless since Usagi just heard that! (LOL).
Go downstairs and exit Usagi's house. Walk down and you'll receive a transmission from Luna. She will tell you that she has found out some info about the enemy. That said, Luna tells you to go back to the Hikawa Shrine and Sailor Moon will say yes. She reverts back to Usagi afterwards.
Just so you know, random battles will still occur, so stay alert. Right, it's time to go back to the Hikawa Shrine. Go right and keep going until you enter the next screen.
The town of Juuban
Chapter 1 Map
Go right, up, right, up, right and up (past OSAP), keep going up, then move right and keep going until you enter the next screen. Keep going right until you see a flight of stairs. Climb the stairs up and enter the Hikawa Shrine.
Hikawa Shrine
Go up to enter the next screen. Remember that Luna-P you found right near the phone? You can save the game now if you want, then go right and enter the next room.
Usagi transforms into Sailor Moon and speaks to Luna. She asks Luna what she knows about the enemy so far. Artemis says that he looked up some info on the Crystal Palace's computer. It appears to be that the enemy has arrived from the future. Sailor Moon recalls about the Black Moon, but Artemis says these enemies are from beyond the time of the Black Moon. They have the power to manipulate time. They've used the Time-Space Door to get here. It seems they've come to the past. Luna is reluctant to let Queen Serenity know about this event because surely the enemy will just close the Time-Space Door. They must be planning something in the future as well. Artemis shows the remaining Senshi one of the enemies that are blocking the Time-Space Door. A hologram of Sin is shown, as she is one of the enemies. Artemis tries to change the image, but the computer is making strange sounds. It must be broken. Luna tries to fix it but suddenly, the image of Sin starts speaking! Artemis compliments Luna on fixing the computer, but Luna says she hasn't done anything yet.
Sin calls herself the “Opposite”. Uranus exclaims there's something weird about this. Sin introduces herself as one of the Senshi who changed destiny. She wants to kill the annoying Sailor Senshi. She completely rules “Her Destiny.” Sin shows everyone holograms of the abducted Inner Senshi and also Chibi-usa! Sin directly tells the remaining Senshi that if they want Lady Serenity (Chibi-usa) and the Inner Senshi back, they should head over to Juuban Junior High School. She'll be expecting the remaining Senshi to come, especially Sailor Moon. Afterwards, Sin disappears.
Sailor Moon is extremely worried about Chibi-usa and her friends, but Luna tells her that it's definitely a trap. Sailor Moon knows that, but she can't abandon her friends. Luna suggests that, for the time being, they should find out more info about their enemies. Neptune agrees with Luna and says that they don't understand their enemy's strength, nor their true form. It's too dangerous to accept their invitation. Uranus seems to disagree. She says if there is a trap, they can just destroy it as they go in. Neptune is a tad reluctant with the idea, but Sailor Saturn wants to go help Chibi-usa and the others. Even when saving the world, Sailor Moon just can't abandon her friends. A universe without the other Senshi is something she will NOT accept! Neptune is still reluctant, but Uranus snaps her out of it. Now, with their decisions made, it's time to go Juuban Junior High to save our friends!
Once you're in control of Sailor Moon, exit the room. Go left and save at the Luna-P, then go down and exit the shrine. Go down the flight of stairs, then go left until you enter the next screen.
(Note: random battles will still occur)
The town of Juuban
Chapter 1 Map
Before we go to Juuban Junior High, I suggest you buy some accessories from OSAP. Go left, down, left, and down. Enter the OSAP store and buy the following items: 4 Anklets, 4 Tiaras, and 4 Bracelets. Trust me, you'll be needing these accessories for the upcoming difficult boss battles. If you don't have enough Yen to buy them all, then just purchase what you can (and trust me, all this spending money will be worth it). Pull out your menu and equip your four Senshi with one of each of the accessories you just purchased. Once you are done, exit the OSAP store. Go right, then move up and keep going, then go left until you see the front entrance of Juuban Junior High. Move up and Sailor Moon will tell everyone that they have to help the others.
The scene switches over to the Opposito Senshi who, as you should know by now, are the rivals/evil counterparts of the Inner Senshi. Sin asks how the Inner Senshi are doing. Nabu says the Inner Senshi are wandering around inside of their illusions. Only Lady Serenity continues to be protected by the Ginzuishou. Sin says while “Lady” is in their hands, she can't be touched by a single finger. They just need to be patient a little longer. The scene moves over to Chibi-usa, who is unconscious.
Sailor Moon and the others will enter Juuban Junior High.
Juuban Junior High School
Go up, right, and keep moving until you find the last door before the stairway. Enter and go up, left and you'll find a Luna-P. Save your game, then exit this room. Go left and keep moving until you find the last door in the hallway before the other stairway. Enter the room and you'll find that same traveling merchant who heals your party if you talk to him. Awesome!! Make sure to come back to him each time you finish a boss battle.
Before you proceed, open up the menu screen and go to Formations. Make sure Saturn is in front, while Neptune is at the back. Now exit the room and go right. Enter the first door that you see and you'll find Mercury! She is unconscious as a Youma tampers with her mind. The Youma says that Mercury is dreaming wonderful fantasies and tells you not to intrude. Mercury's dream scene is shown, where she has become a doctor and just treated a sick child. Suddenly, she gets a call from her husband, Urawa. He tells Ami that it's their anniversary today, so she should come home early. The dream scene is over, but the Youma is now angry that you have intruded.
Boss: Muhreed
This battle is somewhat harder than the previous bosses we've faced. But still, it is an easy one. Use Sailor Moon's Moon Spiral Heart Attack, Uranus' World Shaking, Saturn's Death Reborn Revolution, and have Neptune as the healer. Watch out for this monster's Toxic Mist attack, as it induces poison should it hit. If you run out of EP (which I doubt), just use physical attacks to whittle the boss' HP. Rinse, lather, and repeat until it's over. It was worth buying all those accessories from OSAP, now wasn't it?
Rewards after winning: 5 EXPs, 500 Yen, App.Medic, Puzzle Piece
The Youma will vanish and Sailor Moon will examine Mercury to see if she's alright. She says she's alright, but tells Sailor Moon to go help the others. Mercury will go and help them out later.
Exit and go left and enter the next room. Speak to the merchant to get fully healed. You can go back to the Luna-P if you want to save the game. If not, then go up the left stairway to proceed. Go up, then right, and enter the first door that you see. Move a bit up and you'll find Sailor Mars, who is unconscious.
You'll also find a Youma that's trying to corrupt her mind with fantasy dreams the same way the other Youma did to Sailor Mercury. Speak to the Youma and it'll ask you a yes or no question on whether you have come to Rei's rescue. Hmm.. Usagi and Rei DO argue a lot at times and they jerk one another around. But still, a friend is a friend, I suppose. What would Sailor Moon do? She would say yes, of course! We are here to save Rei, aren't we? But even if you answer no, you'll still have to fight this monster.
Boss: Muhreed
This is the same boss. Defeat this monster the same way you did the last one.
Rewards after winning: 5 EXPs, 500 Yen, App.Medic, Puzzle Piece
Sailor Moon tries to wake Sailor Mars up. Suddenly, we are shown Mars' dream scene, involving Mamoru! Mamoru apologizes to Rei and express his true feelings for her. Rei is so happy and hopes that she isn't dreaming. Too bad it IS a dream (lol for her). Usagi finally wakes her up and Sailor Mars slowly says “Mamoru-sama...” Hearing this, Sailor Moon gets agitated. Mars gets up and notices her. Sailor Moon asks why Mars just said Mamoru's name and interrogates about what she just dreamt. Sailor Mars thinks of a quick excuse and falls over, pretending she's injured. She tells Sailor Moon to go and help the others. Sailor Moon is a bit peeved about Rei's involvement with Mamoru!
Exit this room, then go back down the stairway. Enter the room with the traveling merchant to get all healed up, then exit. Now go up the first floor stairway, then up the second floor stairway. Now on the third floor, go right. Keep moving right, past the 4 doors in the hallway, then enter the fifth door.
You'll find Sailor Jupiter here, who is having fantasy dreams. And of course, there's a Youma who's corrupting her. The Youma will tell you not to intrude since Jupiter's fantasy dreams are coming true. The monster gets distracted by turning its back, chattering on about Sailor Moon having wonderful dreams, like dating that boy she likes. Seeing as how the Youma is distracted, Luna gives the quiet signal to Sailor Moon. She complies and quietly exits the room, taking Jupiter with her. The monster will realize that he was so busy talking that Sailor Moon got away. He quickly follows Sailor Moon and another boss battle begins.
Boss: Jarcock
Just like Muhreed, Jarcock is easy. In fact, he's quite a pushover. Deal with him the same way you dealt with Muhreed. Use Moon Spiral Heart Attack, World Shaking, Death Reborn Revolution, and you could try out Neptune's Deep Submerge. You can take him out in two turns. The only thing you need to watch out for is his attack, Fascination, which causes a Senshi to randomly attack her allies. Other than that, this guy will be moon-dusted!
Rewards after winning: 5 EXPs, 100 Yen, Puzzle Piece
After the battle, Makoto's dream scene will ensue. She is talking to a guy named Sempai and admits her crush on him. Sempai is surprised by this, but he decides to accept Makoto as his girlfriend. He asks her to bring along some of her homemade-bentou lunches tomorrow and Makoto happily replies that she will. The dream ends. Sailor Jupiter tells Sailor Moon that she should go and help everyone else first.
Exit the room and keep going left until you find the stairway. Climb them up to proceed to the fourth floor. Go up, right (past the two doors in the hallway), and enter the third door to find Sailor Venus.
Sailor Moon tells Venus to hang in there, but she's feeling very weak. Suddenly, a mysterious voice is heard, saying that Venus is going to live in a dream world forever. Venus' dream scene ensues. Minako runs over to her friend, Hikaru-chan, and tells her about the good news. She has found true love at last, which is with Minami-mempai from the soccer club. Minako plans on giving him a love letter today. She tried to give him the letter before, but something always stopped her. Hikaru notices a Sailor Moon video game at the Game Crown Center and Minako is enticed, saying that she wants to be just like Sailor Moon... The dream scene ends.
Sailor Moon pleads Sailor Venus not to die and tells her to wake up. Suddenly, from out of nowhere, the Youma appears and attacks.
Boss: Jarcock
Jarcock again?! Oh well... Defeat him the same way you did in the previous battle.
Rewards after winning: 5 EXPs, 100 Yen, Puzzle Piece
Sailor Venus will thank you for saving her and she tells you that Chibi-usa is being held at the rooftop. Luna will decide to keep an eye on the Inner Senshi, so it's up to Sailor Moon to save Chibi-usa-chan. Let's get to the rooftop then!
Exit the room and move left until you find the stairway. Climb it up and you'll be at the rooftop.
Sailor Moon will see Chibi-usa here, but she'll also see Sin. Nergal will appear and say Chibi-usa is dreaming. And she has realized what's happening to her. She shall have a good destiny. And so shall the annoying Sailor Senshi! Sin demands the Ginzuishou from Sailor Moon in exchange for Chibi-usa. Sailor Saturn warns Sailor Moon not to give the Ginzuishou to them. Ishtar and Nabu appear. Ishtar says that they shall make her dream until they get what they want. Nabu ominously says Chibi-usa will die if she keeps dreaming. Her happiness is only in her imagination. Sailor Uranus will tell Sailor Moon that the enemies are only trying to scare her into giving them the Ginzuishou. Neptune will tell Sailor Moon not to let the Opposito Senshi trick her.
With no other choice, Sailor Moon reluctantly accepts Sin's offer and WILL give the Ginzuishou! Saturn, Uranus, and Neptune are shocked, but Sailor Moon will give it. But only if Chibi-usa is given back to her. Marduk appears, saying that the Ginzuishou is more important than Chibi-usa. Sailor Moon wants to help her, so she has no choice... Sin brings over Chibi-usa to Sailor Moon and she demands for the Ginzuishou to be handed over.
Just when all seems hopeless, a rose out of nowhere lands. Much to Sailor Moon's delight, it's Tuxedo Kamen! He'll tell Sailor Moon not to give the Ginzuishou, but she ponders about Chibi-usa. Tuxedo Kamen enlightens Sailor Moon that Chibi-usa is being protected by the Ginzuishou's power. And soon, she shall awaken from her sleep on her own. Tuxedo Kamen asks the Opposito Senshi why they want the Ginzuishou. Sin replies that changing the fate of the world is very difficult, much to Sailor Moon's and Tuxedo Kamen's confusion. Sin says they desire to change fate of the planet because they want to control the future. Sailor Moon contemplates but Tuxedo Kamen tells her that the Opposito are manipulating her, by making her and himself imagine things.
A dream scene of Usagi, as a housewife, and Mamoru, as an office worker, ensues. Usagi asks Mamoru to come home early since it's Chibi-usa's birthday. Mamoru knows that and he promises that he won't be late for home this time. That said, Mamoru leaves for work. But before he goes out the door, Mamoru is stopped by Usagi. She says that he has forgotten “something”, but Mamoru is confused. Then he remembers that the “something” is kissing. So the romantic couple kiss one another and with that done, Mamoru leaves for work. The dream scene ends.
Still caught in the fantasy, Sailor Moon and Tuxedo Kamen are unable to move. Chibi-usa now wakes up and examines her parents. She tries to wake them up but can't. Sin gives the signal to her comrades to strike Chibi-usa now! Tuxedo Kamen regains his senses, and he goes up in front of Chibi-usa to protect her. A large, dark field of energy is created, and it strikes Tuxedo Kamen as he screams in pain! Sailor Moon regains her senses, and she sees Tuxedo Kamen injured. She asks if he's alright and Saturn comes over in front to Tuxedo Kamen. Seeing the perfect opportunity to disarm a Sailor Senshi, Sin fires a dark beam of energy and strikes Sailor Saturn! With that course of action done, the Opposito Senshi disappear. Sailor Moon and Chibi-usa are shocked but they tell their two injured friends to hold tight.
At Mamoru's apartment, Usagi and Chibi-usa have placed him in bed. Usagi feels it was her fault for letting this happen to him. Chibi-usa feels that the blame should be given to her. Haruka and Michiru enter Mamoru's room and tell the two that Mamoru should get some rest. Usagi and Chibi-usa leave the room.
Michiru says that although their numbers are now limited, they must continue. But Haruka says it's hopeless, it's hopeless to continue. She says that they are failures since they could not protect their king. The two leave Mamoru's room and meet up with the other girls in the living room.
Haruka asks how Hotaru is doing and Ami replies that she'll be healed soon. Rei finds the new enemies perplexing and Ami realizes that Urawa's prediction about destiny changing is coming true. Makoto apologizes to Usagi for falling into the enemy's trap. Minako says there was no other way they could've prevented this from the beginning.
Suddenly, Rei senses something and the girls wonder what it could be. Their attention is directed at the ghostly spirits of Queen Beryl's 4 Generals - Jadeite, Nephrite, Zoicite, and Kunzite! Kunzite's spirit appears and says that they are now protecting Prince Endymion from death. Makoto exclaims that they are Queen Beryl's men. Nephrite's spirit appears and says they did serve Queen Beryl for a while, but they were originally followers of the Prince of Earth, Endymion. And now they have returned to serve their former master once again. Minako wonders why the generals have appeared as ghosts.
Zoicite's spirit appears and says that Endymion is unconscious due to negative energy. Rei asks the generals why they are here. Jadeite's spirit appears and he says that Endymion's condition is quite abnormal and perhaps the enemy is in possession of Negative Energy. Perhaps in large quantities. Kunzite's spirit appears again as he says that they have to force upon the opposite side, which is Positive Energy. Rei figures out that with Positive Energy, Mamoru will return to his senses again!
Makoto asks how the Senshi can deliver the Positive Energy. Jadeite's spirit appears, and he says that the Shin no Ishi's power will be necessary. Nephrite's spirit appears, and he shows the Senshi a “Kage” (darkness) stone. Zoicite's spirit appears, and she says that the Kage stone was originally a combination of “Hi” (lightness) and “Kage” stones. Kunzite appears and says that the two elements, Kage and Hi, returned to their original stones. But this never happened by itself. Jedite appears and says that their Hi Power is inside other stones, which are sleeping somewhere on Earth. They are the stones that carry their power, all of their power.
The four generals confirm the following locations of their stones:
- Jadeite's - in Nepal
- Nephrite's - in Canada
- Zoicite's - Switzerland
- Kunzite's - Turkey
Kunzite requests the Sailor Senshi to travel to these places and bring back the Hi Stones. With their Master's Rose crystal, the Barazuisho...to which Minako wonders what it could be. Jedite says that this stone is somewhere in Japan. The Barazuishou is similar to the Ginzuishou. Nephrite says that when their stones are gathered in the same place, the Barazuishou will appear. Zoicite says when all the five stones are brought together, Mamoru will be healthy again. With all that said, the generals' spirits vanish after begging the Senshi to find the Hi stones. You get all 4 Kage stones from the generals afterwards.
The girls now discuss finding the Hi Stones. Minako tells Haruka and Michiru that it's the obligation of the Inner Senshi to search for the stones. Michiru agrees and Haruka gives the plan that they will look for the Barazuishou and the enemy's hideout while the Inner Senshi are occupied. Ami decides to search in Switzerland, Rei searching in Nepal, Makoto searching in Canada, and Minako searching in Turkey.
Usagi wonders about what she can do to help. Makoto tells her that she should stay in Japan with Mamoru. Usagi asks why and Ami answers that both Mamoru and Hotaru are injured and so, it is up to her to look after them. Rei tells Usagi that for Mamoru's own good, they should go while she stays. With Usagi's power of love, Mamoru will be revived! Usagi thanks her friends and she will stay behind.
Rei announces that it's time for the Inner Senshi to go to their assigned countries. Usagi wishes her friends luck. Chibi-usa, who is eavesdropping, decides to find the Barazuishou herself so that Mamo-chan will be healthy again. She exits the apartment building and runs off to find the Barazuishou.
Luna will prompt you to save the game. Save now and this is the end of Chapter 1, but this game is just starting to unfold.