Walkthrough
 Contents
Chapter 2, Part 1 Sailor Mercury
In a snowy region, Mercury has arrived at Europe's tallest mountain and comments on how high it is. Zoicite's Hi Stone is dormant somewhere under all this snow. Suddenly, Mercury sees a bunch of Youmas approaching her! Not wanting to get ambushed by them, Mercury jumps off the mountain. She falls hard on the snowy ground. A man approaches and finds her badly injured, so he decides to take her back to his home for medical help.
Kainess Village
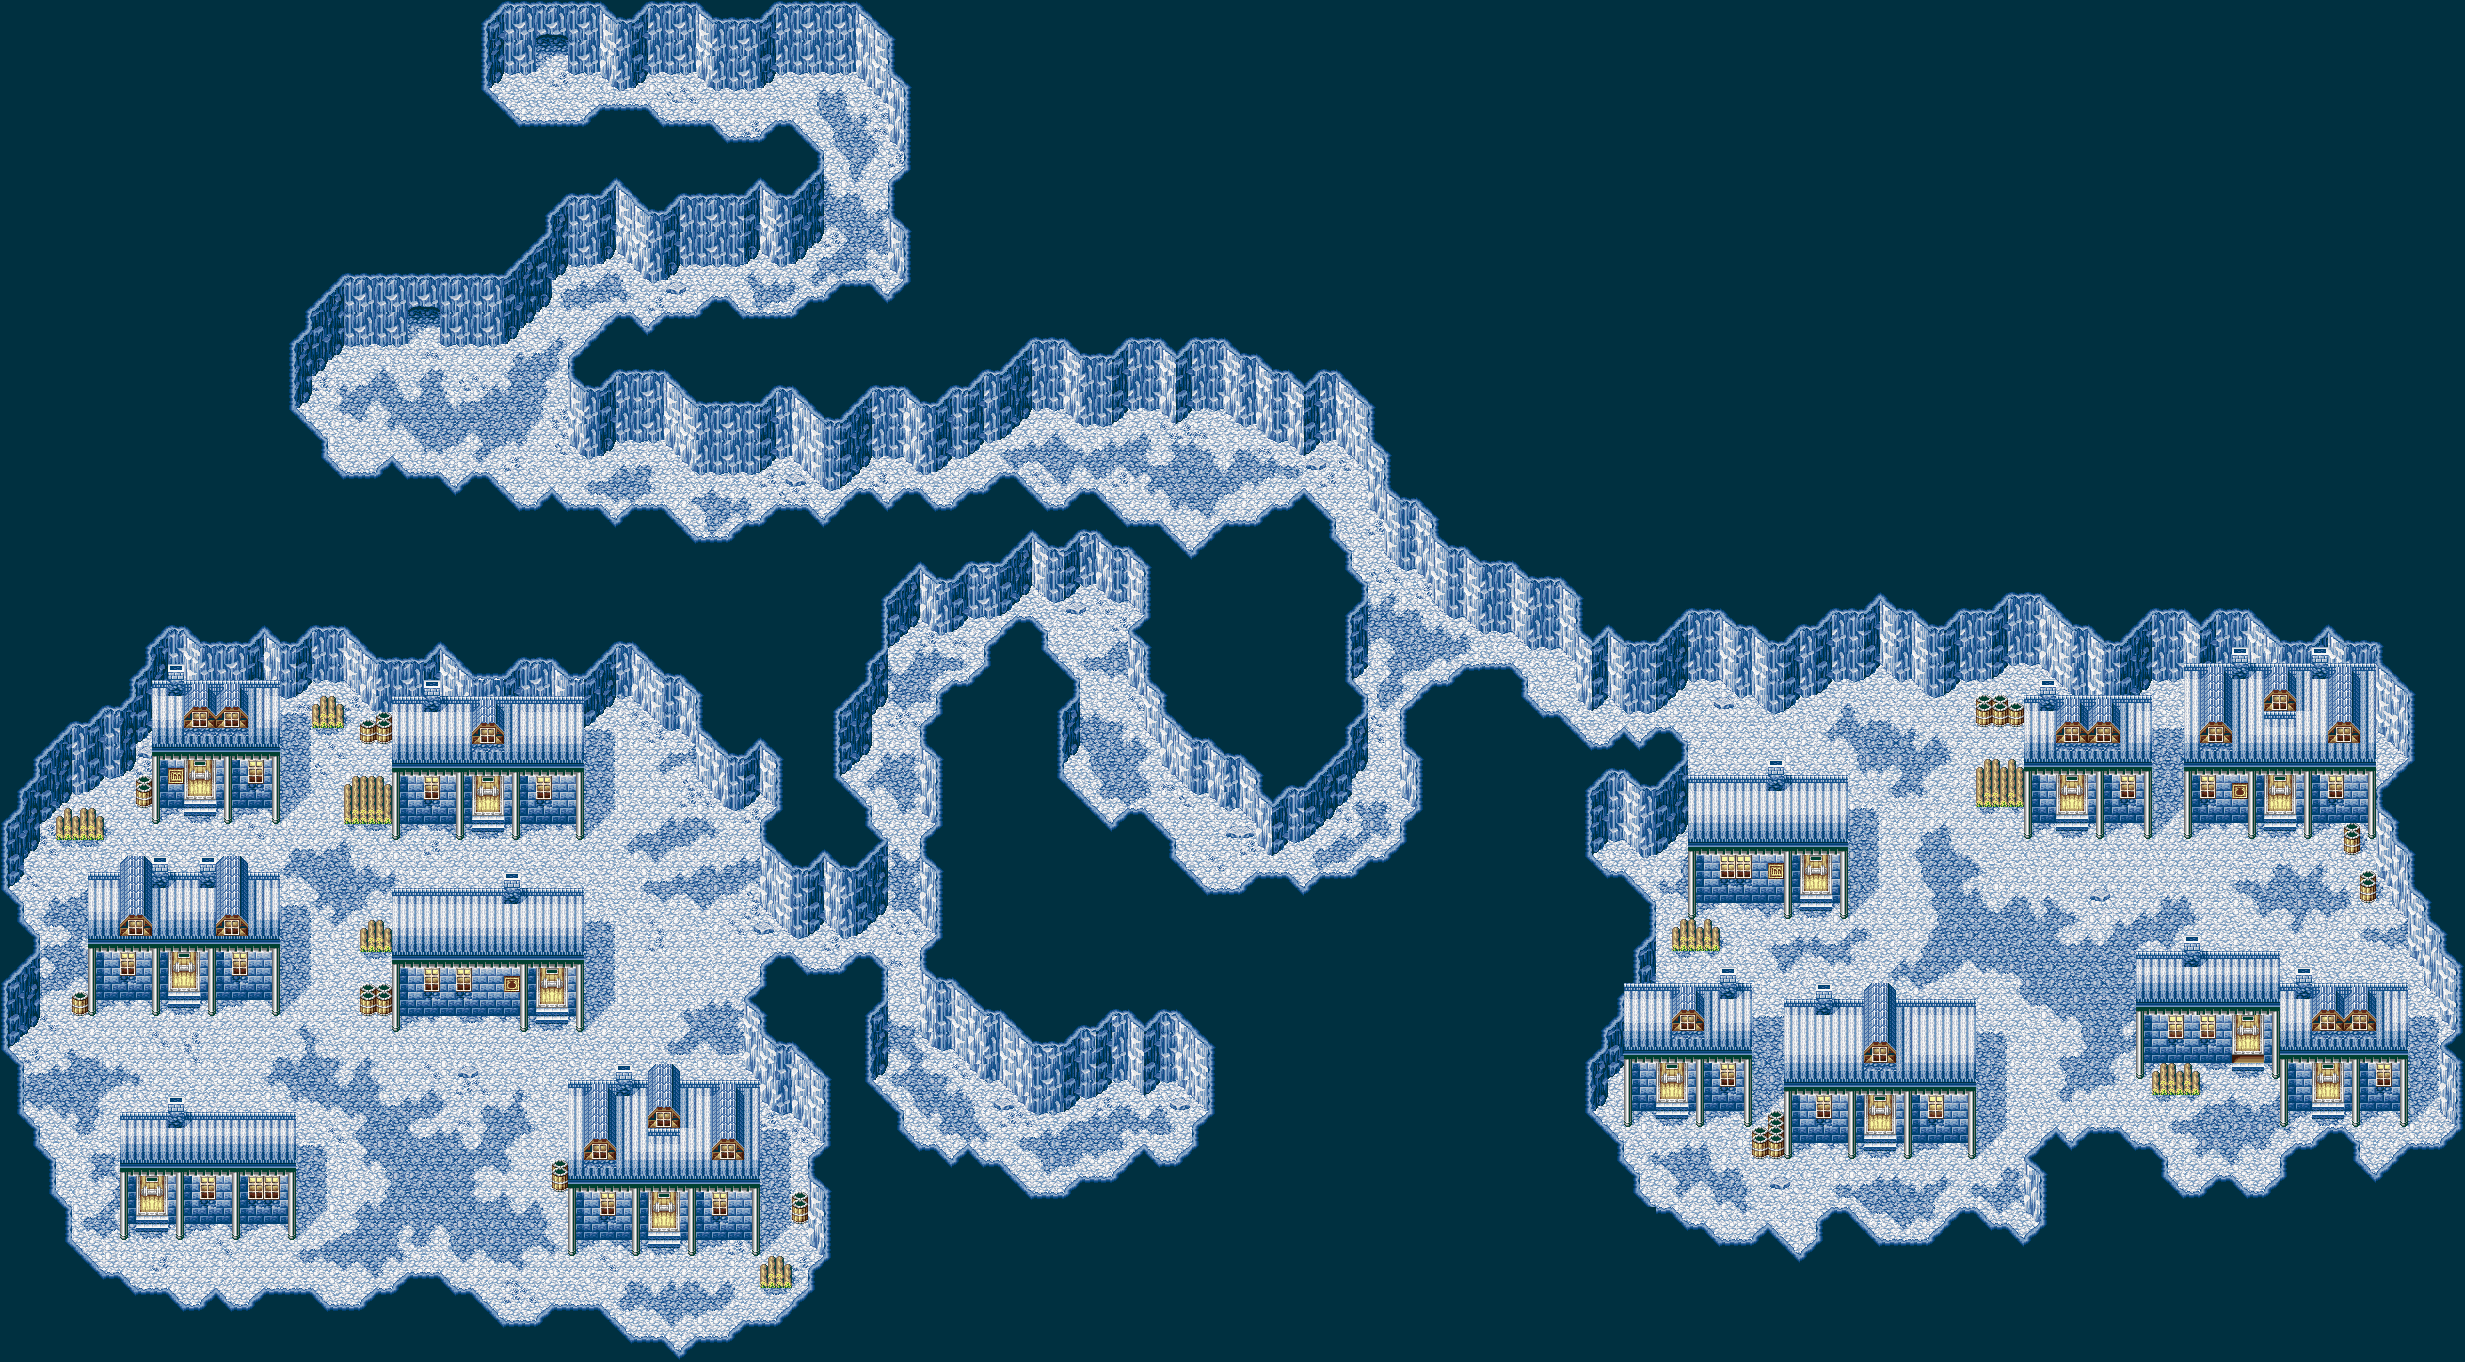
.jpg) Chapter 2-1 Map
Chapter 2-1 Map
Now at the guy's house, Mercury regains consciousness and wonders where she is. The man will say that Mercury was exhausted, and she fell here, underneath the glacier. Mercury asks who the guy is. The man is called Hans, and he asks who she is. Mercury almost says her real name, Ami Mizuno, but ultimately says it's Sailor Mercury. She thanks Hans for helping her and asks where she is right now. Hans answers that she is in Kainess Village, a village that lies underneath the glacier. For 200 years, this village has been beneath the glacier. Sailor Mercury is the first person to come here in years. He tells her not to strain herself.
When you get control of Mercury, exit the house.
Zoicite's Kage stone will start glimmering, hinting that the Hi Stone is here somewhere. Zoicite's cave should be somewhere near the Kainess Village. Re-enter Han's house and you'll witness that his mother is ill. Hans complains about her mother's condition, as it gets worse by the day. Go and talk to him.
Hans needs someone to head over to Andeng Village to fetch the doctor for her mother. Mercury tries to help out by giving Han's ill mother Doctor Scwartz's medicine, but Hans refuses to allow that medicine. Hans says he has already tried using that medicine, but it was hopeless. Mercury asks him where Andeng Village is and Hans says it is east of here. He asks if Mercury will get Schwartz for him and Mercury answers yes. Hans tells Mercury to take care and warns her about monsters that are outside of town. It could be very dangerous. Mercury assures Hans that she will be fine and Hans will tell her to be careful. When you get control of Mercury, exit the house.
Now before we move on, open the menu screen and take a look at Mercury's stats. They are VERY low at the moment and the random battles here will be impossible to win with the kind of stats she has right now. Exit the menu screen and follow my lead.
Go right until you see a building with a sack image. This is the item store (be sure to keep this in mind from now on). Enter and speak to the cashier. Buy the following accessories for Mercury: 1 Anklet, 1 Bracelet, and one P.Earring. You can also purchase some recovery items. Make sure you buy plenty of BathMedic because you'll be needing them later on. Now equip Mercury with the accessories you just purchased for her, so that her stats become decent. When you're finished, exit the store, then go right until you exit Kainess Village.
Outside the Village
 Villages
It is extremely recommended that you build up some levels for Mercury here while you have the time. You'll be facing a tough boss battle later on so the more levels you gain, the better. Get up to at least level 11 or above and you'll be fine. And I'm sure you know that as you win random battles, you get puzzle pieces too, right? This is great! You earn levels and get closer to completing the puzzle too at the same time.
Once you're done building up some levels, just follow the path until you come across an intersection - either up or right. Go right and you'll be in Andeng Village.
Andeng Village
Once you have entered, go right and keep moving right until you see five barrels. Press X (A) on the middle barrel and you will find the first hidden puzzle piece in the game! There is another hidden puzzle piece to be found here, so go down and you'll find a house that has six barrels next to it. Press X (A) and search them all. One of the six barrels will contain another hidden puzzle piece. There's nothing else to do here. You could talk to all the people if you want, or we can just move on. If you want to save the game, look for a building that says “Inn”. Go inside and you'll find a Luna-P. Talk to the front desk if you want to get recovered.
When you're done, exit Andeng Village.
Outside the Village
Upon getting out of the village, we are back at the intersection again. So this time, go up and follow the path until you find a cave. Enter it.
Cave - Front Entrance
 First Cave
Go up, right, and you'll come across an intersection - up or right. Go up and you'll find a treasure chest and a Luna-P. Open the chest and you'll find some Sapphire Earrings, which are VERY useful since it's Mercury's Gemstone type accessory. Equip it right away by replacing one of Mercury's currently equipped accessories (I would unequip the P.Earring). Save at the Luna-P if you want, then let's move on.
Note: This is a great place to gain some extra levels and you get helpful recovery items too after winning. I suggest that you gain a few levels here until you are level 16 or higher. This time, go down at the intersection and follow the path until a scene starts.
Mercury will see Dr. Schwartz, who has built himself a research area in the cave, and she calls out to him. But Schwartz is pretending to be too busy to notice her. Mercury gets peeved and yells out, “HELLO ALREADY!!” and the old man finally hears her. Schwartz asks how Mercury got to him since there are so many monsters around here. Suddenly, Dr. Schwartz approaches Mercury and starts flirting with her, asking how old she is. Confused, Mercury says she's 15. Schwartz says he's going to be 60 this year. The old fool now asks when her birthday is. Mercury, still confused, answers that it's on September 10. Schwartz asks Mercury if she's a Virgo (a virgin) and Mercury answers yes. He finally asks her if she has a boyfriend, but Mercury tells him that she came here for something very important. Schwartz apologizes to Mercury for his sexual harassment, as he says that he tends to go crazy over pretty ladies. To this, Mercury calls him a pervert!
Schwartz wants to know what Mercury wants to tell him. She tells the doctor about Hans' mother, who is very ill, from Kainess Village. Schwartz wants to help, but he can't because there are too many monsters outside of the cave. Mercury proposes that he should come along with her. Hearing this, Schwartz starts gloating over the fact that he's going on a “date” with Mercury.
Go right and you'll find a treasure chest. Open it to find a Sapphire Earring, which is another helpful accessory for Mercury. Equip it right away by replacing either the Anklet or the Bracelet. It is up to you, but I would replace the Bracelet.
If you try to go to that opening at the top, Schwartz will disallow you to enter. So get out of the cave the same way you got in.
Once you exit the cave, backtrack to Kainess Village and enter Hans' house.
Kainess Village
Hans will thank Mercury for bringing Schwartz, and he asks for the doctor to see his ill mother. After examining Hans' mother, Schwartz says that the cure for this ominous disease is “Halyomoss”. Hans wonders if that's some kind of mochi rice cake. The good doctor explains that the Halyomoss is the only cure for this very rare disease. Unfortunately, the doctor doesn't have any of it on him right now. Mercury asks where some Halyomoss can be found and Schwartz says there is a small cave behind his lab, so that's where it can be found. Hans decides to get some right away, but Mercury fears for his safety, so she volunteers to go get some. Hans and Mercury ponder about one another's safety, but ultimately they do decide to go together. Schwartz stays behind to look after Hans' ill mother.
Exit the house. Before you leave the village, it would be a good idea if you stock up on some BathMedic and IceShards. If you need more money, do some random encounter battles.
Outside the Village
Go back to the cave and enter.
Cave - Front Entrance
First Cave
Inside the cave, go back to the place where you found Schwartz and enter that opening we saw, but couldn't enter, earlier ago. Go right, then up, and Hans will point out the Halyomoss, which is up a wall. Hans manages to get it, but abruptly the wall opens up, revealing a secret room! Mercury and Hans enter the room and at long last, Zoicite's Hi Stone has finally been found! A seismic disturbance ensues, causing Zoicite's Hi Stone to fall into a hole the earthquake has just created.
Mercury decides that, while she's here, she should go find Zoicite's Hi Stone. After all, this is what Mercury came here for, right? Hans tells Mercury that it's too dangerous to go down that hole, but all of a sudden, both he and Mercury fall into it. Hans asks Mercury if she's okay and Mercury replies that she is. She wonders where Zoicite's Hi Stone could be. Wouldn't you know it, it's Nabu who has the stone! She appears and demands to fight with Sailor Mercury. Mercury will tell Hans to get to safety and he obediently runs off. Nabu wants to kill Sailor Mercury first, then she'll go after Hans.
 Second cave
If you choose yes, after escorting Hans to the village, you will then have to take the other entrance of the cave located above the first entrance you took. Go down the stairs that you find inside, then follow the path around until you see a Luna-P. Save, then proceed further down and you will find Nabu.
If you did choose No, then keep reading.
Mercury decides that, while she's here, she should go find Zoicite's Hi Stone. After all, this IS what Mercury came here for, right? Hans tells Mercury that it's too dangerous to go down that hole but all of a sudden, both he and Mercury fall into it. Hans asks Mercury if she's okay and Mercury replies that she is. She wonders where Zoicite's Hi Stone could be. Wouldn't you know it, it's Nabu who has the stone! She appears and demands to fight with Sailor Mercury. Mercury will tell Hans to get to safety and he obediently runs off. Nabu wants to kill Sailor Mercury first, then she'll go after Hans.
Boss: Nabu (battle one)
If you have been following my walkthrough up to this point, then this is a very easy match. Nabu will only use physical attacks on you. A single Shine Aqua Illusion should take out Nabu in one hit.
Rewards after winning: 30 EXPs, Yen, MoonShard
Nabu will compliment Mercury on how pretty damn tough she is. Anshar had warned her about this. Mercury asks if Anshar is the name of her leader. Nabu thinks about answering Mercury's question, but instead, she wants to kill her for the good of their cause. Mercury asks Nabu why she's doing this and what kind of goal is she trying to achieve.
A flashback scene starts, with Nabu and Ishtar walking around the stores in Crystal Tokyo. Nabu answers that her goal is to take over the power of this world's Ginzuishou and exploit it. Nabu starts talking to herself, which confuses Ishtar. Suddenly, the voice of Apsu is heard by Nabu, and she wonders where it came from. Apsu's voice tells Nabu that the Ginzuishou have powers that cannot last for an eternity and Nabu agrees. Apsu invites Nabu to join her evil campaign so that they can find out how the power of the Ginzuishou works. Nabu accepts Apsu's proposition, and she is abruptly beamed up. The flashback ends. Nabu concludes her answer by saying that her goal is to get the Ginzuishou from the Sailor Senshi. And she will stop at nothing to get it!
Boss: Nabu (battle two)
This time, Nabu is much harder and her defense is a lot higher than in the first battle. She uses an attack called Tempest, which does little damage (thanks to Mercury's Accessories), and also Toxic Mist, which causes a Senshi to go Numb if it hits.
I hope you have some BathMedic items available so you can get rid of the poison ailment. Otherwise, this battle will be a pain. Use Mercury's Shabon Spray over and over, until her EP runs out. If you have any EP-restoring items, use them and repeat the process. If not, just keep using physical attacks on her until Nabu is defeated.
It could take a LONG while since physical attacks seem to have a likely chance of either missing or doing 1-5 damage per turn. But Nabu should eventually run out of EP herself, causing her to either use attacks that require EP (which would cost her a turn) or just use regular attacks on you (which don't do much at all). If you're low on health, use Lifewater or other HP recovery items. Good luck!
Rewards after winning: 270 EXPs, 2500 Yen, Puzzle Piece
Exhausted from fighting Sailor Mercury, Nabu decides to retreat. She hands over the Hi Stone to Mercury. Yay! But Nabu tells us that we won't be able to get all the stones in time (we'll see about that!) and she tells Nergal to hang in there. If Nergal can stop us, then we'll never be able to heal Tuxedo Kamen. With that said, Nabu tells Mercury that the battle between the two of them is not over yet. Mercury tells Nabu to wait, but she vanishes. Mercury sees the Hi Stone and picks it up. Hans calls out to Mercury, and she asks why he hasn't gone back home yet. Hans tells Mercury to take care on her way back home and she thanks him. Hans wants to go back home, so he can help out his mother.
Kainess Village
Hans thanks Mercury for saving his mother's life. He is in Mercury's debt. Mercury just came into his life all of a sudden and has achieved her goal too, so they are even now. It is time for Mercury to say farewell to Hans. Hans tells Mercury to come to visit again sometime, and she says she will someday.
Outside, Mercury has saved Han's mother and has retrieved Zoicite's Hi Stones. It was no trouble at all. Suddenly, a familiar voice is heard - it's Dr. Schwartz! He confesses his love for Sailor Mercury and proposes to her. But Mercury quickly runs off (lol) and Schwartz tries to chase her. Luna will appear from out of nowhere, asking if you want to save the game. Save, and we are finished with Sailor Mercury's wacky scenario.