Walkthrough
Contents
- Bowser's Keep
- Mario's Pad
- Mushroom Way
- Mushroom Kingdom
- Bandit's Way
- Return to Mushroom Kingdom
- Kero Sewers
- Midas River
- Tadpole Pond
- Rose Way
- Rose Town
- Forest Maze
- Pipe Vault
- Moleville
- Booster Pass
- Booster Tower
- Booster Hill
- Marrymore
- Star Hill
- Seaside Town
- Sea
- Sunken Ship
- Return to Seaside Town
- Land's End
- Belome Temple
- Monstro Town
- Side Quest: The Three Musty Fears
- Side Quest: Culex
- Bean Valley
- Nimbus Land
- Barrel Volcano
- Return to Bowser's Keep
- Factory
- Other Side Quests
- Secrets
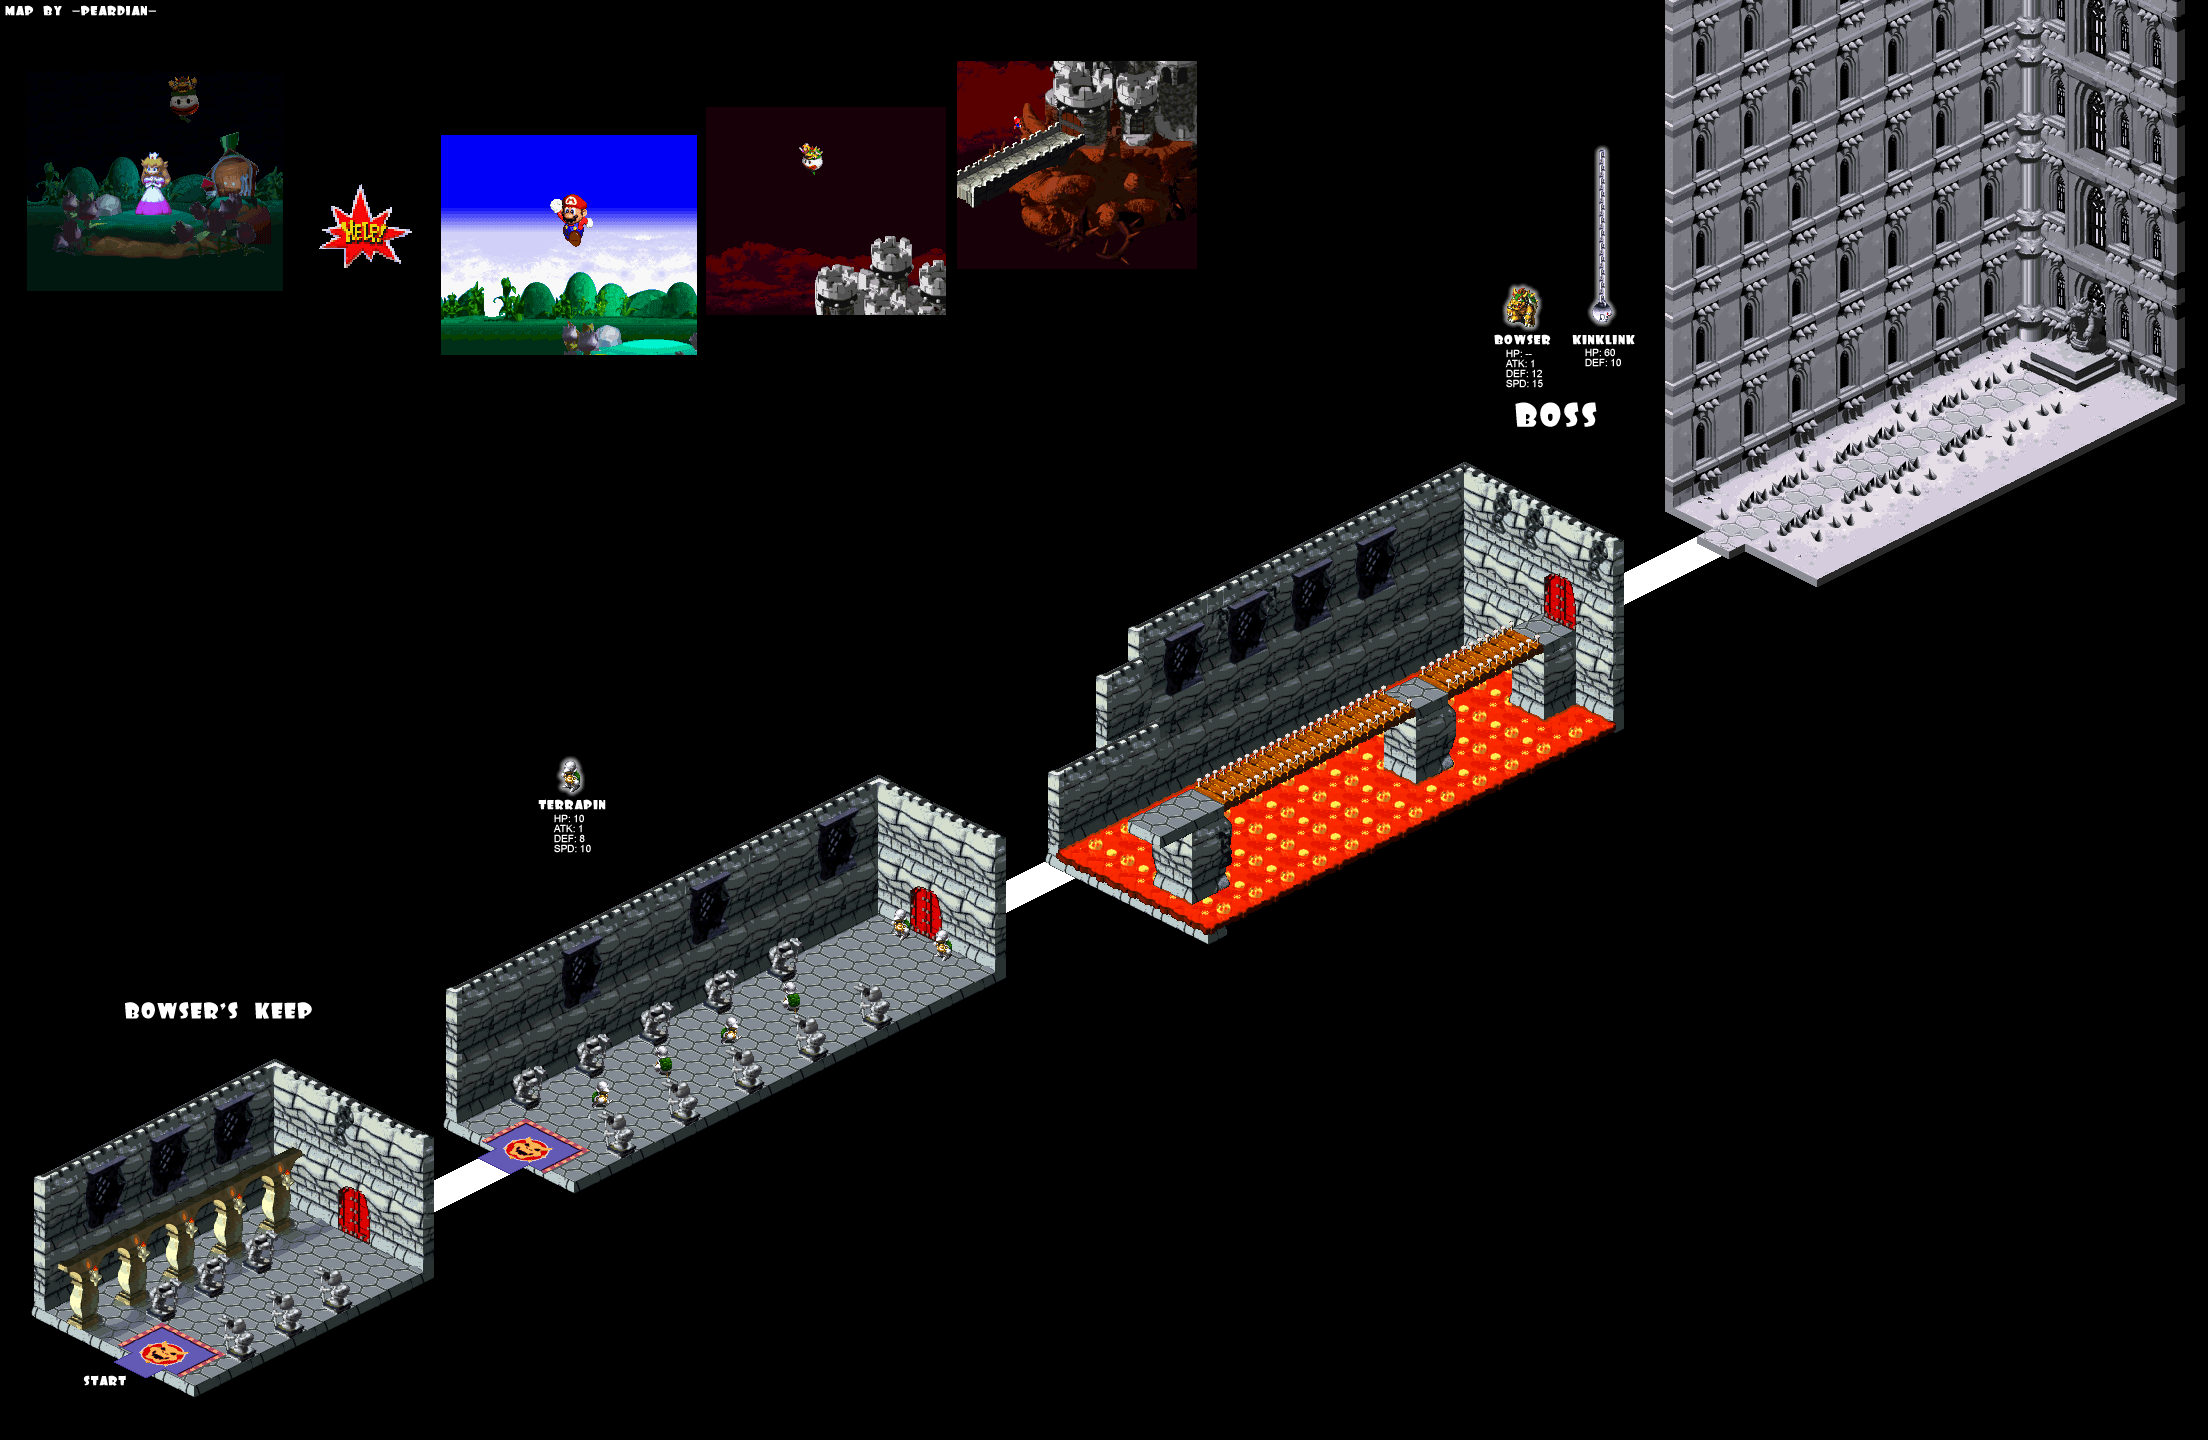
Bowser's Keep
Map
 243 KB
When you enter the castle, you'll notice a number of enemies walking around. Bumping into these enemies will trigger a random battle. There will be an in-game tutorial on battles coming up soon but for now they remain quite simple so you won't really have to worry too much even if you have trouble figuring out what's going on, the A button attacks that's all you need to know. Follow the linear path through the first few rooms until you reach Bowser. The boss battle begins!
Boss: Bowser
Don't even attack Bowser. Instead, aim each one of your attacks at the chain clamp behind him. Bowser cannot be defeated, but soon enough, Princess Toadstool will begin telling you to nail that chain. Obviously, it's going to help if you've been doing it the entire time.
The next scene begins at Mario's Pad.
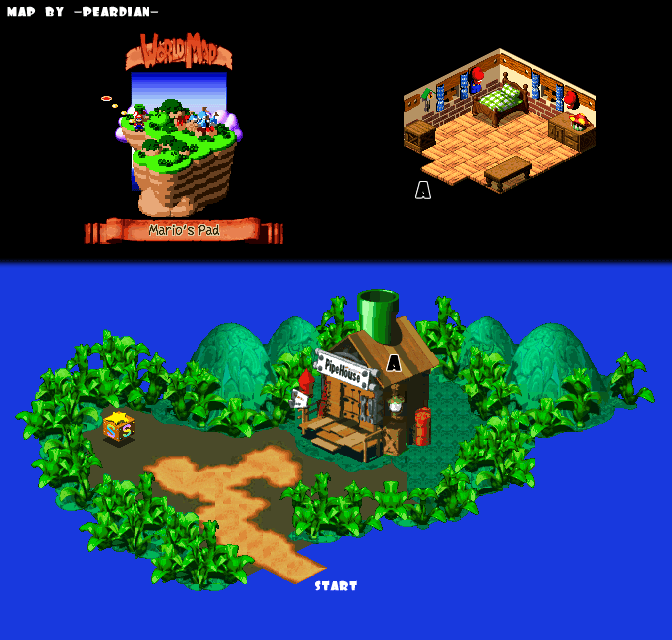
Mario's Pad
Items
- Mushroom
- Mushroom
- Mushroom
- Mushroom
Map
 54.2 KB
Press the jump button to jump off the hanger. If you examine the light on the table in the corner, you can take a rest for the night, but at this point you really don't need to. On your left is a save point. Jump on top of it to be brought to the save menu. Leave Mario's Pad and return to Bowser's Keep. After a scene you have no choice but to return once again to Mario's Pad. Speak with Toad and then try to leave to begin the tutorial. He'll give you a 'Mushroom' at the beginning of the tutorial and then three more at the end. Leave Mario's Pad now and head to Mushroom Kingdom via Mushroom Way.
Mushroom Way
Items
- Honey Syrup
- Flower
- Flower Tab
- Hammer
Map
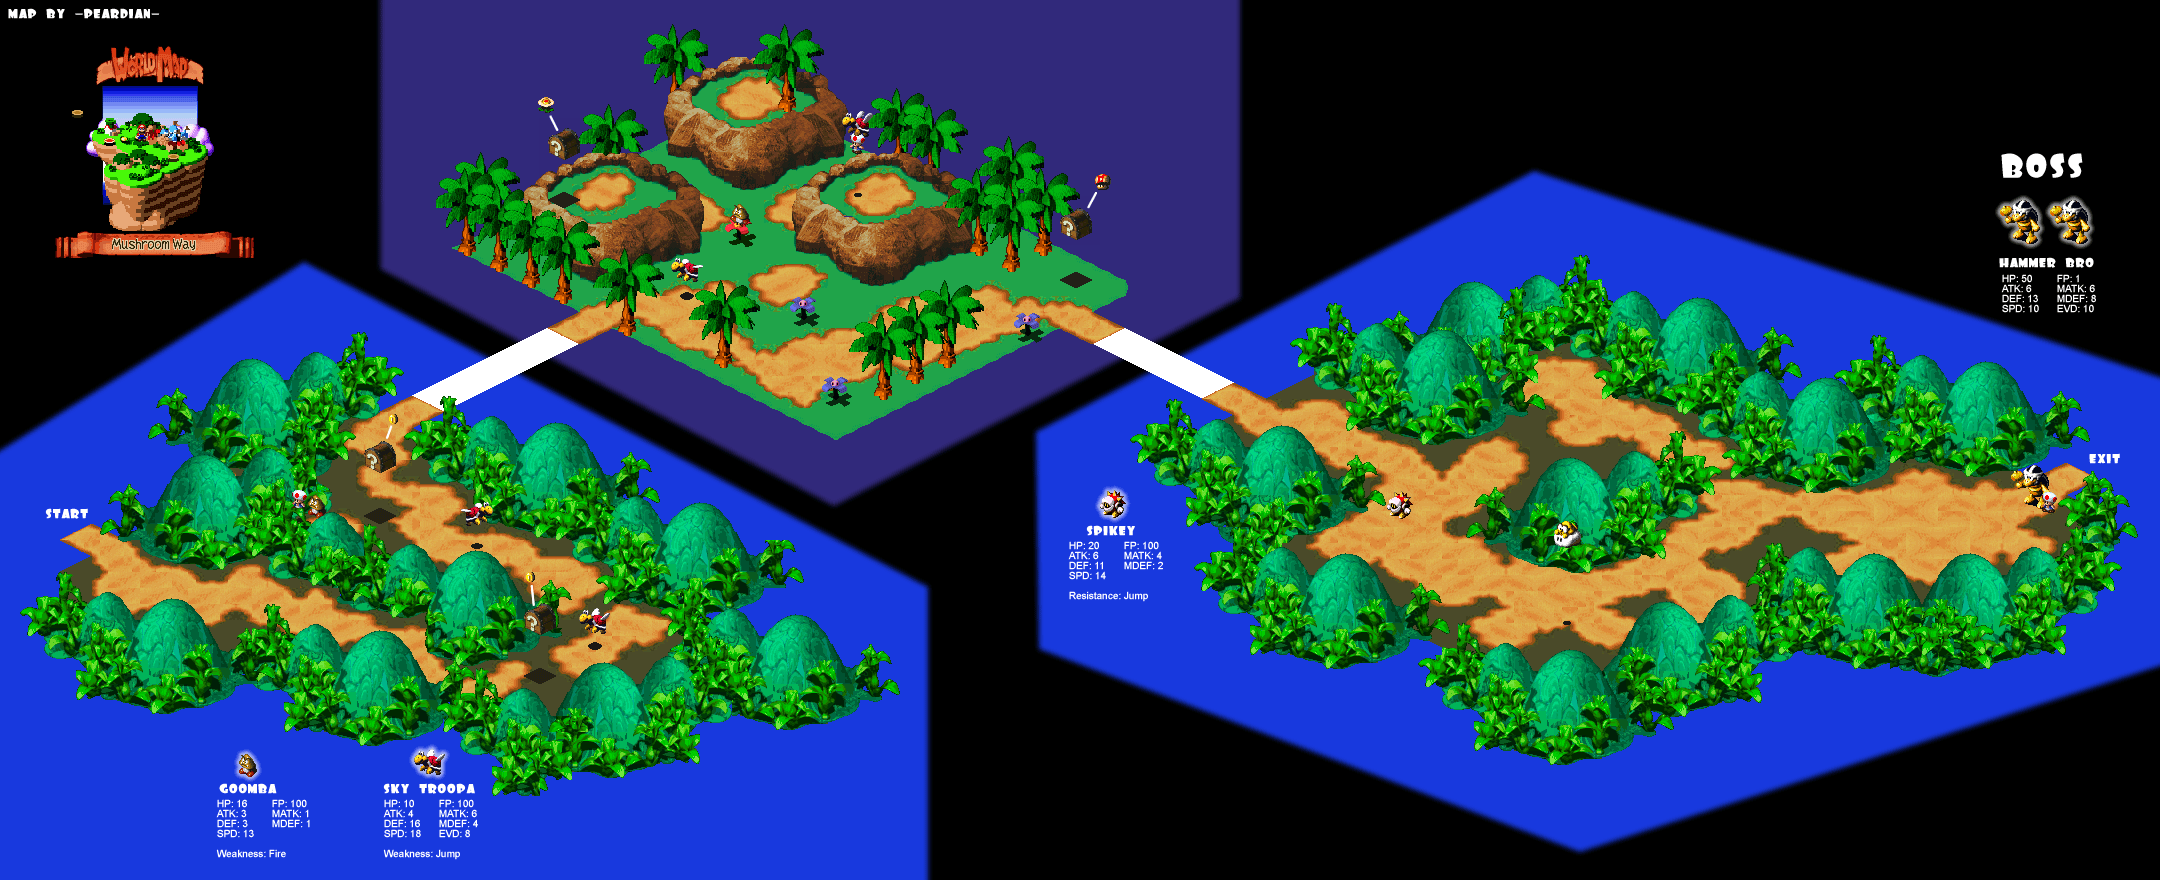 279 KB
Star heading down past the Goombas, remember that bumping into an enemy will trigger a battle, but battles lead to experience and stronger characters, so you're probably not going to want to avoid battles. In fact, you should fight as often as possible. When you come to the first question mark box, you should be able to jump and hit it about five times to get a coin each time. The same applies to the question mark box up the road from here. You'll notice that Toad is trapped on the left by a Goomba, defeat the Goomba to free Toad. For helping him, he'll give you a 'Honey Syrup.'
Around this time, you'll probably get your first level up. When you level up, not only do your stats increase normally, but you also get the chance to increase a stat of your choice as well. This kind of thing may be opinion, but when going for the best characters, I find its most preferable to just stick with one thing for each level up rather than rotating. For Mario, I would pick Power for every single level increase for the rest of the game. For other characters who use magic, I would pick the magic power option and I never really select HP for anyone. But the point is, it's up to you.
On the next screen you'll find a Goomba on a spinning flower, jump onto the Goomba and fight it, now you can get on the spinning flower yourself. Press the jump button to get a super jump in the direction you're currently facing while the flower spins. First, you're going to want to jump left and hit the chest to get a 'Flower,' a flower technically isn't an item, it's more like an item that is used automatically. It increases your Flower Points by one (flower points are like MP, they let you use magic and abilities.)
Get on the flower again and jump to the right. Jump up toward the Sky Troopa to fight it and rescue Toad. As a thank you gift he rewards you with a 'Flower Tab.' Flower Tabs work exactly the same way as the Flowers do just like you got on the other side, the only difference is that you actually have to go into your inventory and use them there.
Before leaving this map on the right, be sure to jump and hit the treasure box with a Mushroom inside. The Mushroom will fully restore your HP and FP automatically. In the next area, you'll encounter a new monster. Before you go any further to the right, stay here and start fighting. There's a boss coming up and I would recommend at best you be at level four to fight the boss, but level three would probably be acceptable. The enemies in this area will spawn infinitely, in the event that they stop appearing, simply go back to the previous screen and return again to find a fresh supply. When you think you're ready to take on a boss, then make your way right.
Boss: Hammer Bro (x2)

You have to fight two of the enemy you saw on the map. They have a few basic attacks. The most basic is a simple hammer strike where they come up to you and bonk you on the head with their hammer. This can easily be defended against with some good timing on the A button. The less easy to defend and slightly more powerful attack is Hammer Time, the boss throws a number of hammers at you for moderate damage.
At level four, a couple of well placed timed hits should have the boss dead in a relatively short time. When one of its companions is defeated (or sometimes before), the boss will use Valor Up. This will increase its defense power, weakening your attacks by almost half. After this, he will revert back to the normal pattern. You can easily defend against him in this state. Finish him off again with a few nicely placed blows from your fists.
For defeating the boss you are rewarded with a 'Hammer.' The Hammer is a new weapon for Mario, more powerful than his basic fists, so it would be a good idea for you to go into the menu now and equip it before you forget! With that, you can leave Mushroom Way and select the Mushroom Kingdom from your map.
Mushroom Kingdom
Items
- Flower
- Flower
- Map
- 10 Coins
- Flower
Map
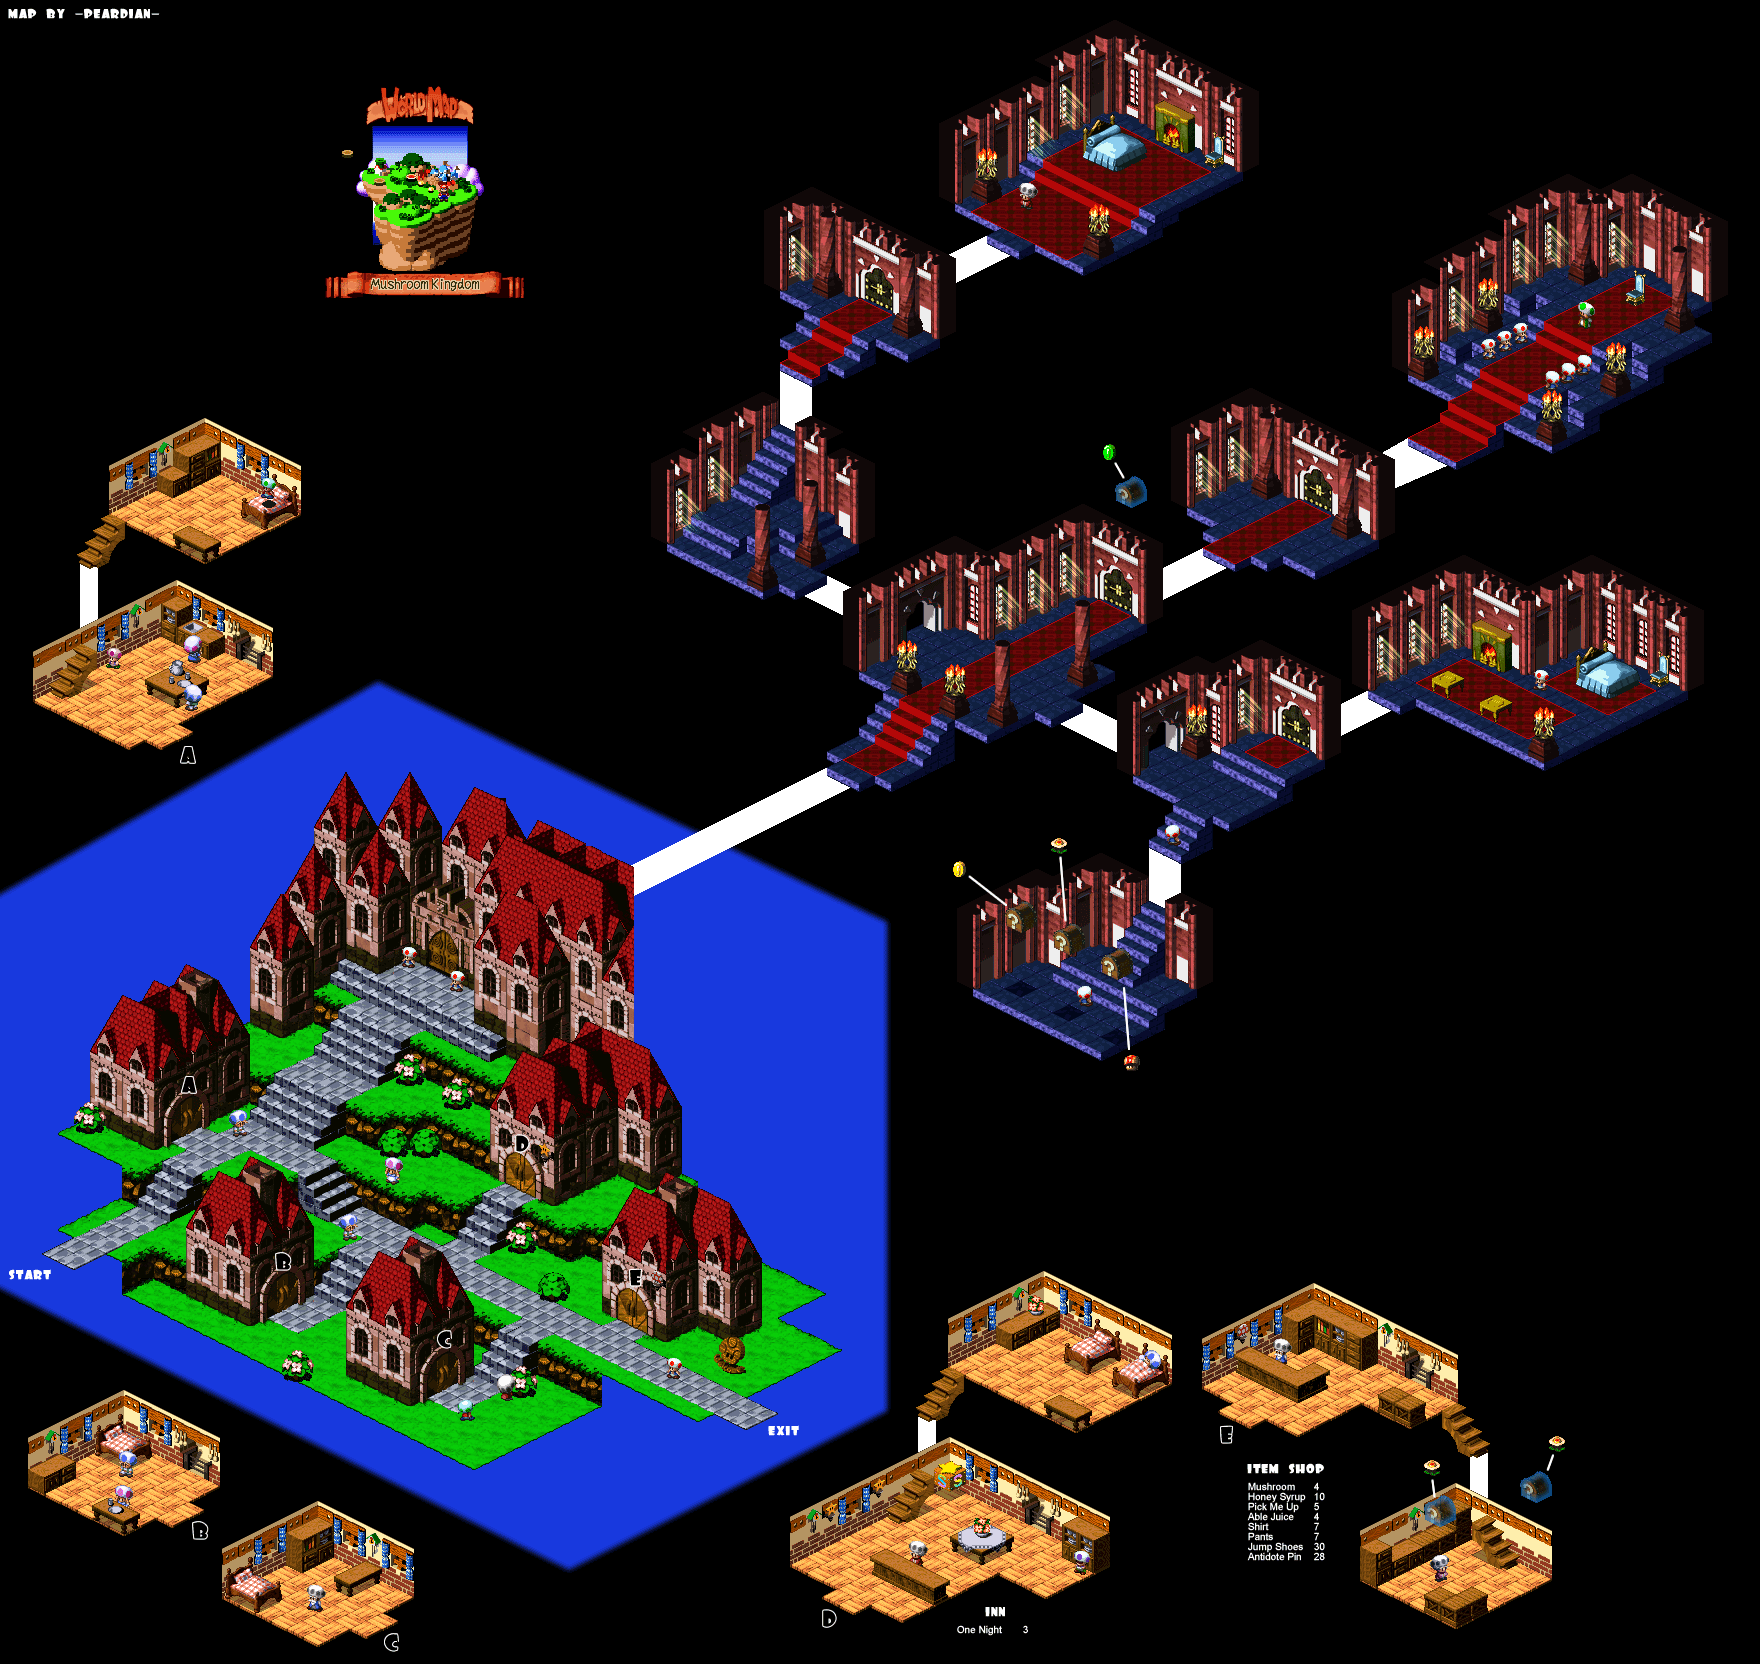 265 KB
Inside Mushroom Kingdom there are a number of things you can do, visit people's houses, converse with the townspeople, do some shopping or some sleeping, whatever you want! Enter the item shop (the shop with the mushroom symbol on it) and go downstairs. Speak to the woman here and when she tells you to stand directly in front of her, do so, and then jump. This will reveal a hidden treasure chest with a 'Flower' in it. As she mentions, these invisible chests are hidden all over the world, so you'll need to look hard to find them all! Speaking of hard to find invisible chests, don't even leave this room. You need to get the old woman to walk over to the far right corner, just right at the bottom of the stairs. Stand in her way so she can't move back, only in that direction until you eventually get her over there. Now stand on her head (this is the exact corner, remember) and jump to reveal another hidden chest, jump once more to get a 'Flower' from it.
Item Shop
- Mushroom 4 Coins
- Honey Syrup 10 Coins
- Pick Me Up 5 Coins
- Able Juice 4 Coins
- Shirt 7 Coins
- Pants 7 Coins
- Jump Shoes 30 Coins
- Antidote Pin 28 Coins
The time has come to head to the castle. Follow Toad into the Chancellor's room and explain everything that has happened so far. After this, you are given a 'Map' and told that you have permission to take anything you want from the vault. The vault is located to the right of the main castle entrance. Go right and then down. The chest on the left contains '10 Coins,' the one in the middle has a 'Flower' while the one on the right will fully restore your HP & FP. Leave the castle and watch the scene. Head down and speak to the little marshmallow boy. When the woman asks how you're going to take care of Bowser, press the jump button. After the scene you've now got Mallow in your party, be sure to equip him before you continue. Head to the right side of town and speak with the little toad boy. With that, it's time to leave and head for Bandit's Way.
Bandit's Way
Items
- Flower
- Wallet
Map
 535 KB
The reptile appears right at the beginning but quickly runs away. There are a few enemies in this area, but nothing special to pick up. Continue down and right to reach the next screen. Use the spinning flower to jump up onto the raised area and then from there jump onto the yellow platform. When you jump to the second one, the first one will spin across so you can keep jumping without worry, grabbing the coins between each of them. It's okay if you fall, you don't have enough bounce to get up onto the raised ground but you should be able to jump back onto the yellow platforms, no problem.
In the next area chase the reptile all the way up to the top, but don't follow him left, instead go right and you'll find a wolf enemy guarding a chest. Defeat the enemy and then jump to open the chest and refill your HP & FP completely. The next area is the one you've been waiting for. The first chest close to the yellow platforms has a star inside, anyone who has played a Mario game before knows that a star makes you invincible and allows you to defeat enemies instantly, well when combined into an RPG it allows you to gain massive amounts of experience with little effort. While the star is in effect, you can run through enemies and kill them instantly, new ones will spawn and run at you, allowing you to take out tons of them. After the star has worn off all the experience for the battles will go to you and you'll most certainly get at least one level up, if not more.
After doing this use the yellow platforms to get across to the chest on the right as well. This chest contains a 'Flower.' The next screen is the last. You'll find the lizard, but he is cornered. The chest in front of you will fully heal your HP & FP, so don't get it if you don't need it. You can always use it later. What you need to do is run around this area and sneak up behind Croco. The first two times you do this he'll run away but on the third time Mallow is able to corner him.
Boss: Croco

Croco actually has quite a bit of HP. Mario should be at least level four for this battle and Mallow should be level three. Mallow's normal attack even with a timed hit is pathetically weak, so he should focus on using Thunderbolt for the entire battle and then HP Rain whenever someone gets hurt. The most useful attack in this battle is the Fire Orb. Not only does it deal massive 90+ damage if you press the button really quickly, but often it will also set Croco's tail on fire! You don't actually see this, but you will get a message saying Croco is dousing a tail fire and he won't do anything on his next turn.
The basic hammer attack also works well when you run out of Flower Points. Croco has two attacks, the first is a rushing body slam which can be defended against easily using the A button at the right time. He also has a more powerful bomb-throwing attack. After he's taken a certain amount of damage, Croco will use a Weird Mushroom ability which gives him +60 HP to his already high HP total. Be sure to hit hard and hit fast here!
When the boss has been defeated, not only will you get Mallow's coin back but you also get a 'Wallet.' Use the spring pad to bounce back to the first screen and run up from there, now return to the Mushroom Kingdom.
Return to Mushroom Kingdom
Items
- Flower Tab (x3)
- 10 Coins
- Wake Up Pin
- 10 Coins
- Flower
- Cricket Pie
Map
265 KB
Seems like there's something seriously wrong going on in this town. The first thing to do is go left and drop down, fight the enemy chasing this guy in circles, once you've rescued him he'll realize you've got the wallet that was stolen, give it to him in exchange for a 'Flower Tab.' Rescue the little boy a well in front of the item shop and he'll give you '10 Coins.' Next enter the house on the far left side of town, defeat the two enemies on the first floor and then go upstairs and defeat the single enemy there to get a 'Flower Tab.' Now it's time to head into the castle. Make a right and go up this time, you'll find a little mushroom man hiding in the corner, speak to him to get a 'Wake Up Pin.' The treasures in the vault have been restocked so you'll want to go down there and open them again, they contain '10 Coins,' 'Flower' and full HP & FP. Return to the front hall and rescue the little mushroom man who keeps running by. Continue left and defeat the enemy in front of the stairs, then the two enemies at the top of the stairs. Now you can enter the princess's room. Toad will give you a 'Flower Tab' here. You can save your game using the save point and speak to the old woman beside the bed to fully heal yourself. Now make your way to the throne room and prepare for a boss fight!
Boss: Mack

Mack starts off the battle with four of those normal bouncing enemies alongside him. To defeat all of them, quickly use Mallow's Thunderbolt spell a couple of times (or once if you're strong enough) and you'll be able to take them all out. As an added bonus, this can often stun Mack and make him lose his next turn. The boss' most powerful attack is the Flame Wall, which hits both of your party members and can't really be defended against. At a decent level (level five or level six), it should barely dent your party at all. This is really Mack's only real attack.
Besides this, the only other thing he does is respawn those four normal enemies. In fact, once his HP gets low it's the only thing he will do, meaning that as long as you have enough Flower Points to cast Thunderbolt every turn and you're able to kill all of them with a single cast, you'll go for the rest of the battle without taking damage. As for Mario, the Fire Orb spell is pretty ineffective against this boss. If Mario is at level six though he can do some pretty severe (100+) damage with the super jump as long as you can bounce somewhat decently.
When the battle has ended speak with the Chancellor to trigger a scene. Before leaving the Mushroom Kingdom return to the item shop now that you have Mallow's coin back, the shopkeeper will give you a 'Cricket Pie' for Mallow's grandfather. Now leave the Kingdom and select the Kero Sewers from the map.
Kero Sewers
Items
- Trueform Pin
- Flower
Map
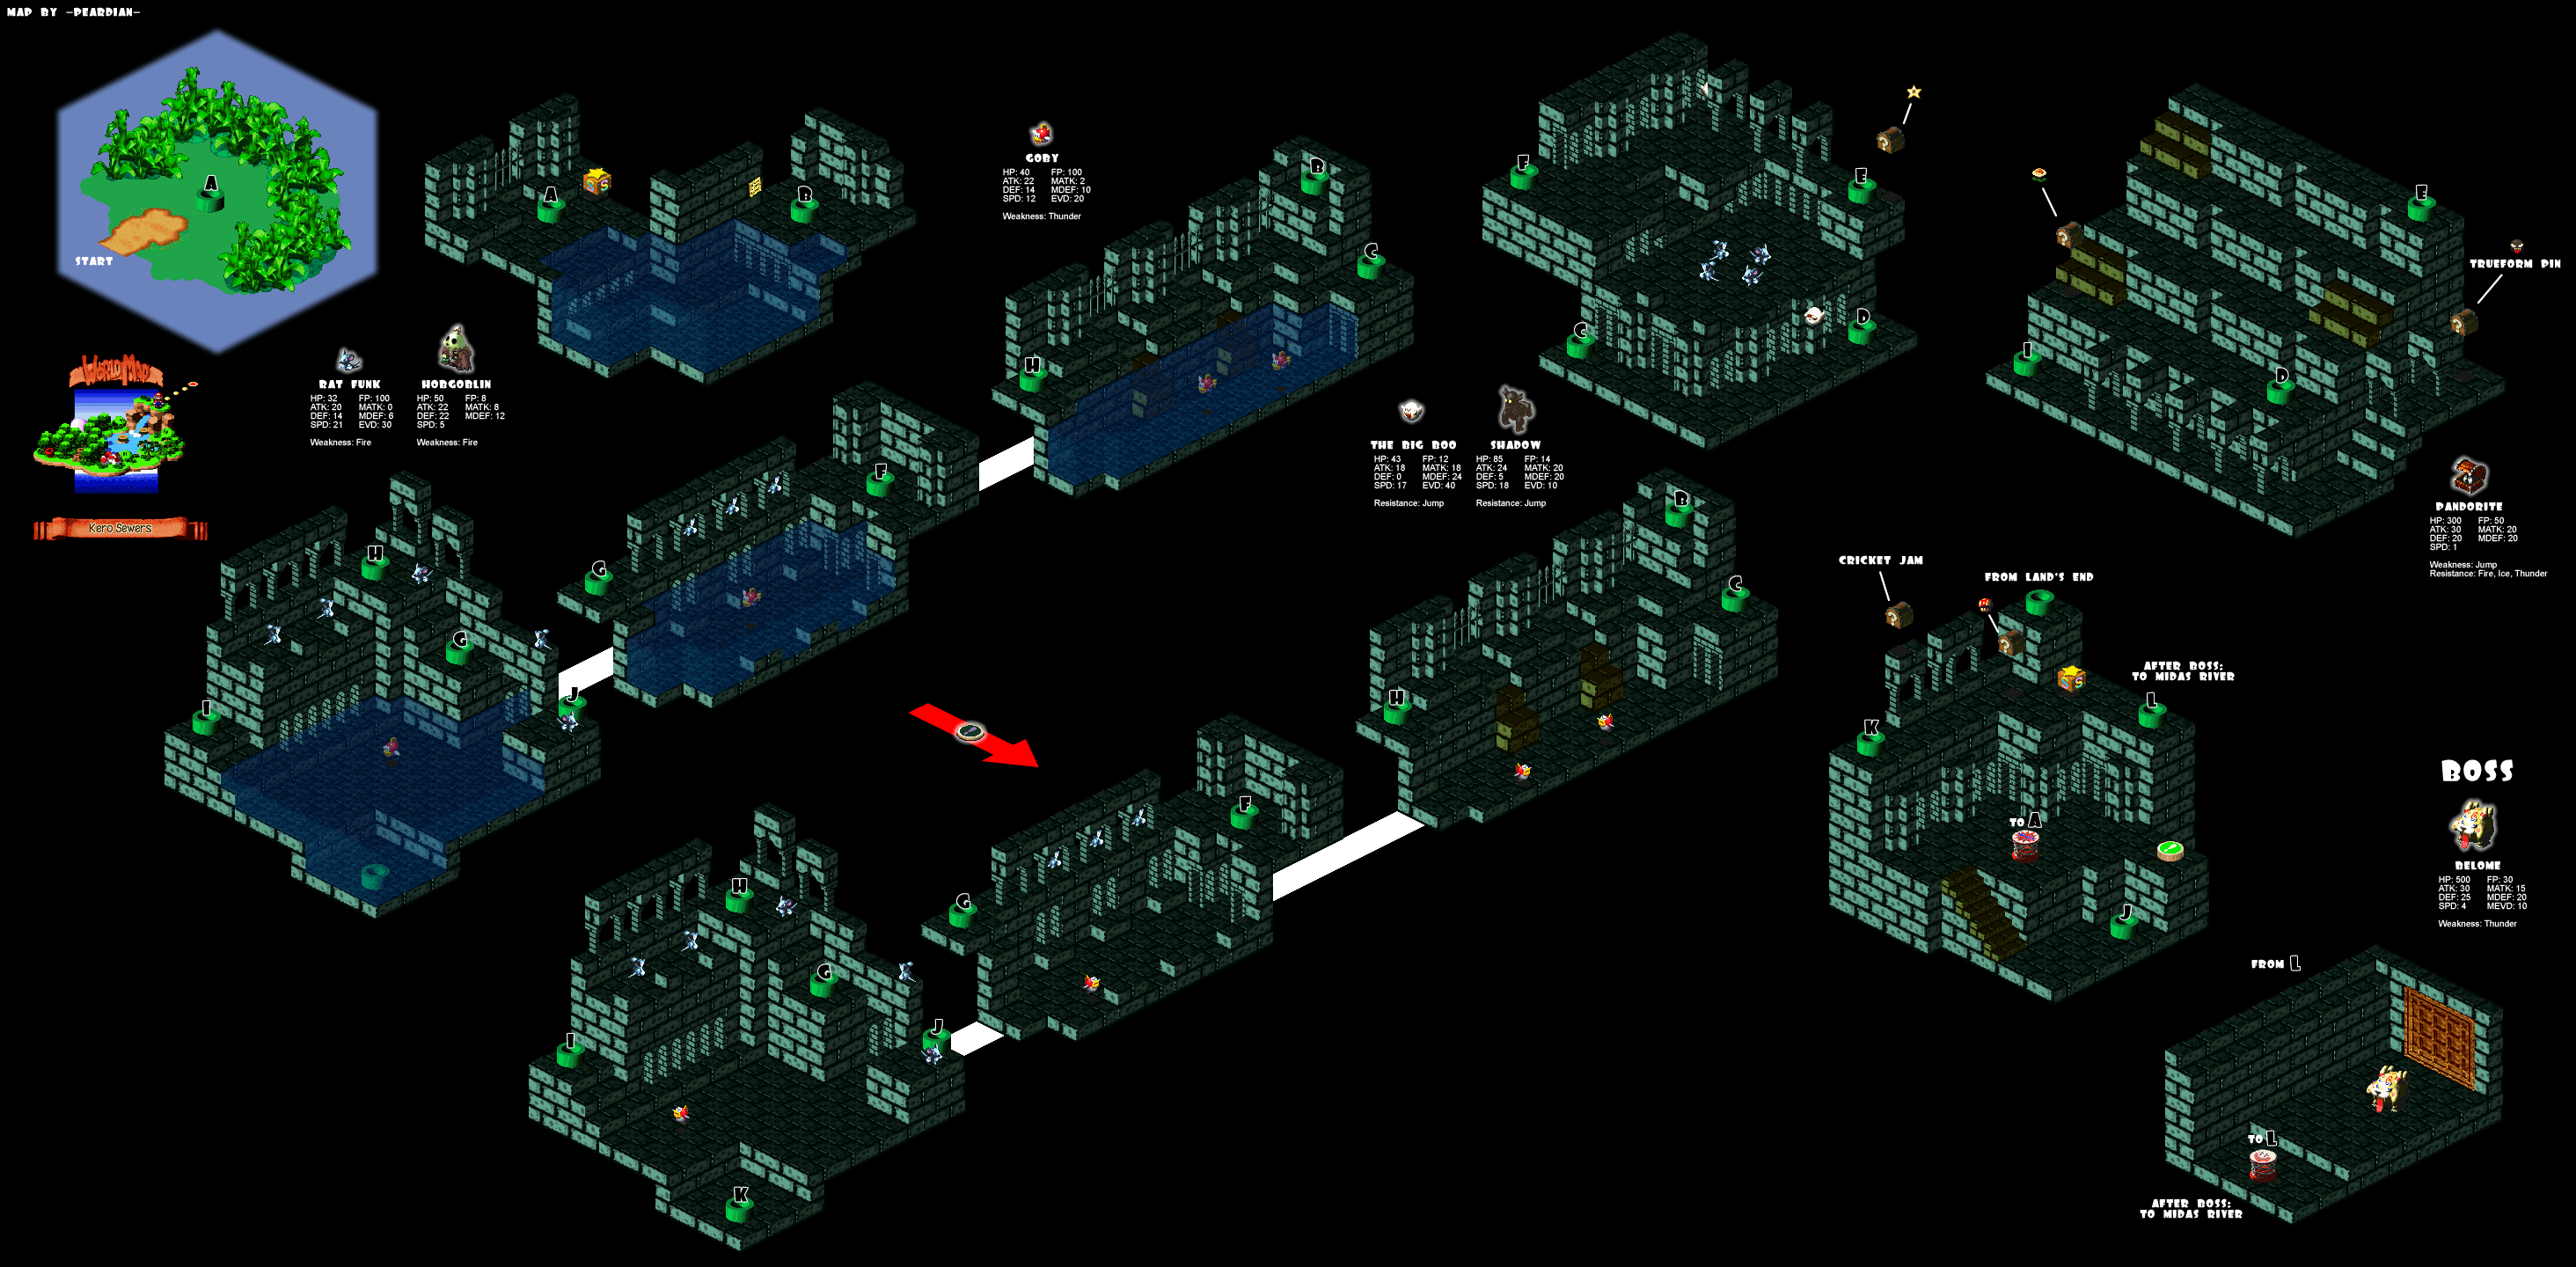 440 KB
When you drop down the pipe you'll find a save point at the bottom. Be sure to save your game. Swim through the water to the other side and descend into the next pipe. You'll see another sewer pipe immediately on your right here. Go down that one. When you pop up, run around the corner and down the next pipe. There's an area below you where you can drop down, do so and go right to find a floating chest. When you jump and hit this chest, it will trigger a battle. It shouldn't be too difficult to win this battle, for doing so not only does the monster drop a Flower Jar but you also get a 'Trueform Pin' afterward.
Now you want to get back up to the second level again, you can take the long way around through the pipes, but here's the much easier way. Go down a little from the chest you just fought to reach some steps, stand on the second highest steps and jump left, you should end on the second level. From here make your way up. Watch out for rats that pop out between the cracks. On your left, at the bottom of the stairs, is a chest containing 'Flower.' Jump up to the top and go down the pipe. On your right here is a star. As usual, you should use it wisely. What I would recommend doing is jumping down to take out the four rats, then jump right, taking out the ghost on your way to the pipe.
In the next area, just run up again like you did before knocking out as many rats as possible as they pop out of those cracks. You'll end up right beside the star box again when you go down the pipe at the top. Run left and go down the pipe on the left side. Now stick left in this area too. You'll need to pass three rats (don't jump down into the water) to reach the next pipe. When you pop up, note the rat standing completely still on your right. Jump over him and go down the pipe behind. This will lead you to a room with a number of ghosts and a big button. Return through the pipe you just came from and jump down where there used to be water. You'll find a pipe at the bottom. Jump and hit the treasure chest in this room to fully heal yourself and then be sure to use the save point before dropping down.
Boss: Belome
Belome is a huge dog creature with an appetite as big as he is! For attacks, he's got a basic licking attack where he hits you with his tongue. This one is fairly easy to block. You'll want to be sure you equip the Trueform Pin you got from defeating the treasure chest enemy. Belome's Scarecrow Funk attack will actually turn you into a scarecrow! Only the Trueform Pin will protect you against this.
While in scarecrow form you are unable to attack normally or use items, however, your ability to use special attacks is not hindered, so just keep using those in scarecrow form. The status ailment will wear off in a few turns. The last attack he has, he will actually eat one of your party members! Nothing will protect you against this attack. The person isn't technically dead, they're just gone from the battle for a while so you'll need to take on Belome with only one person. Eventually he will spit the other person back out if you hit him enough, or if you defeat him, of course.
After the battle, you'll find yourself falling down the waterfall.
Midas River
Items
- Flower
- Flower
- NokNok Shell
Map
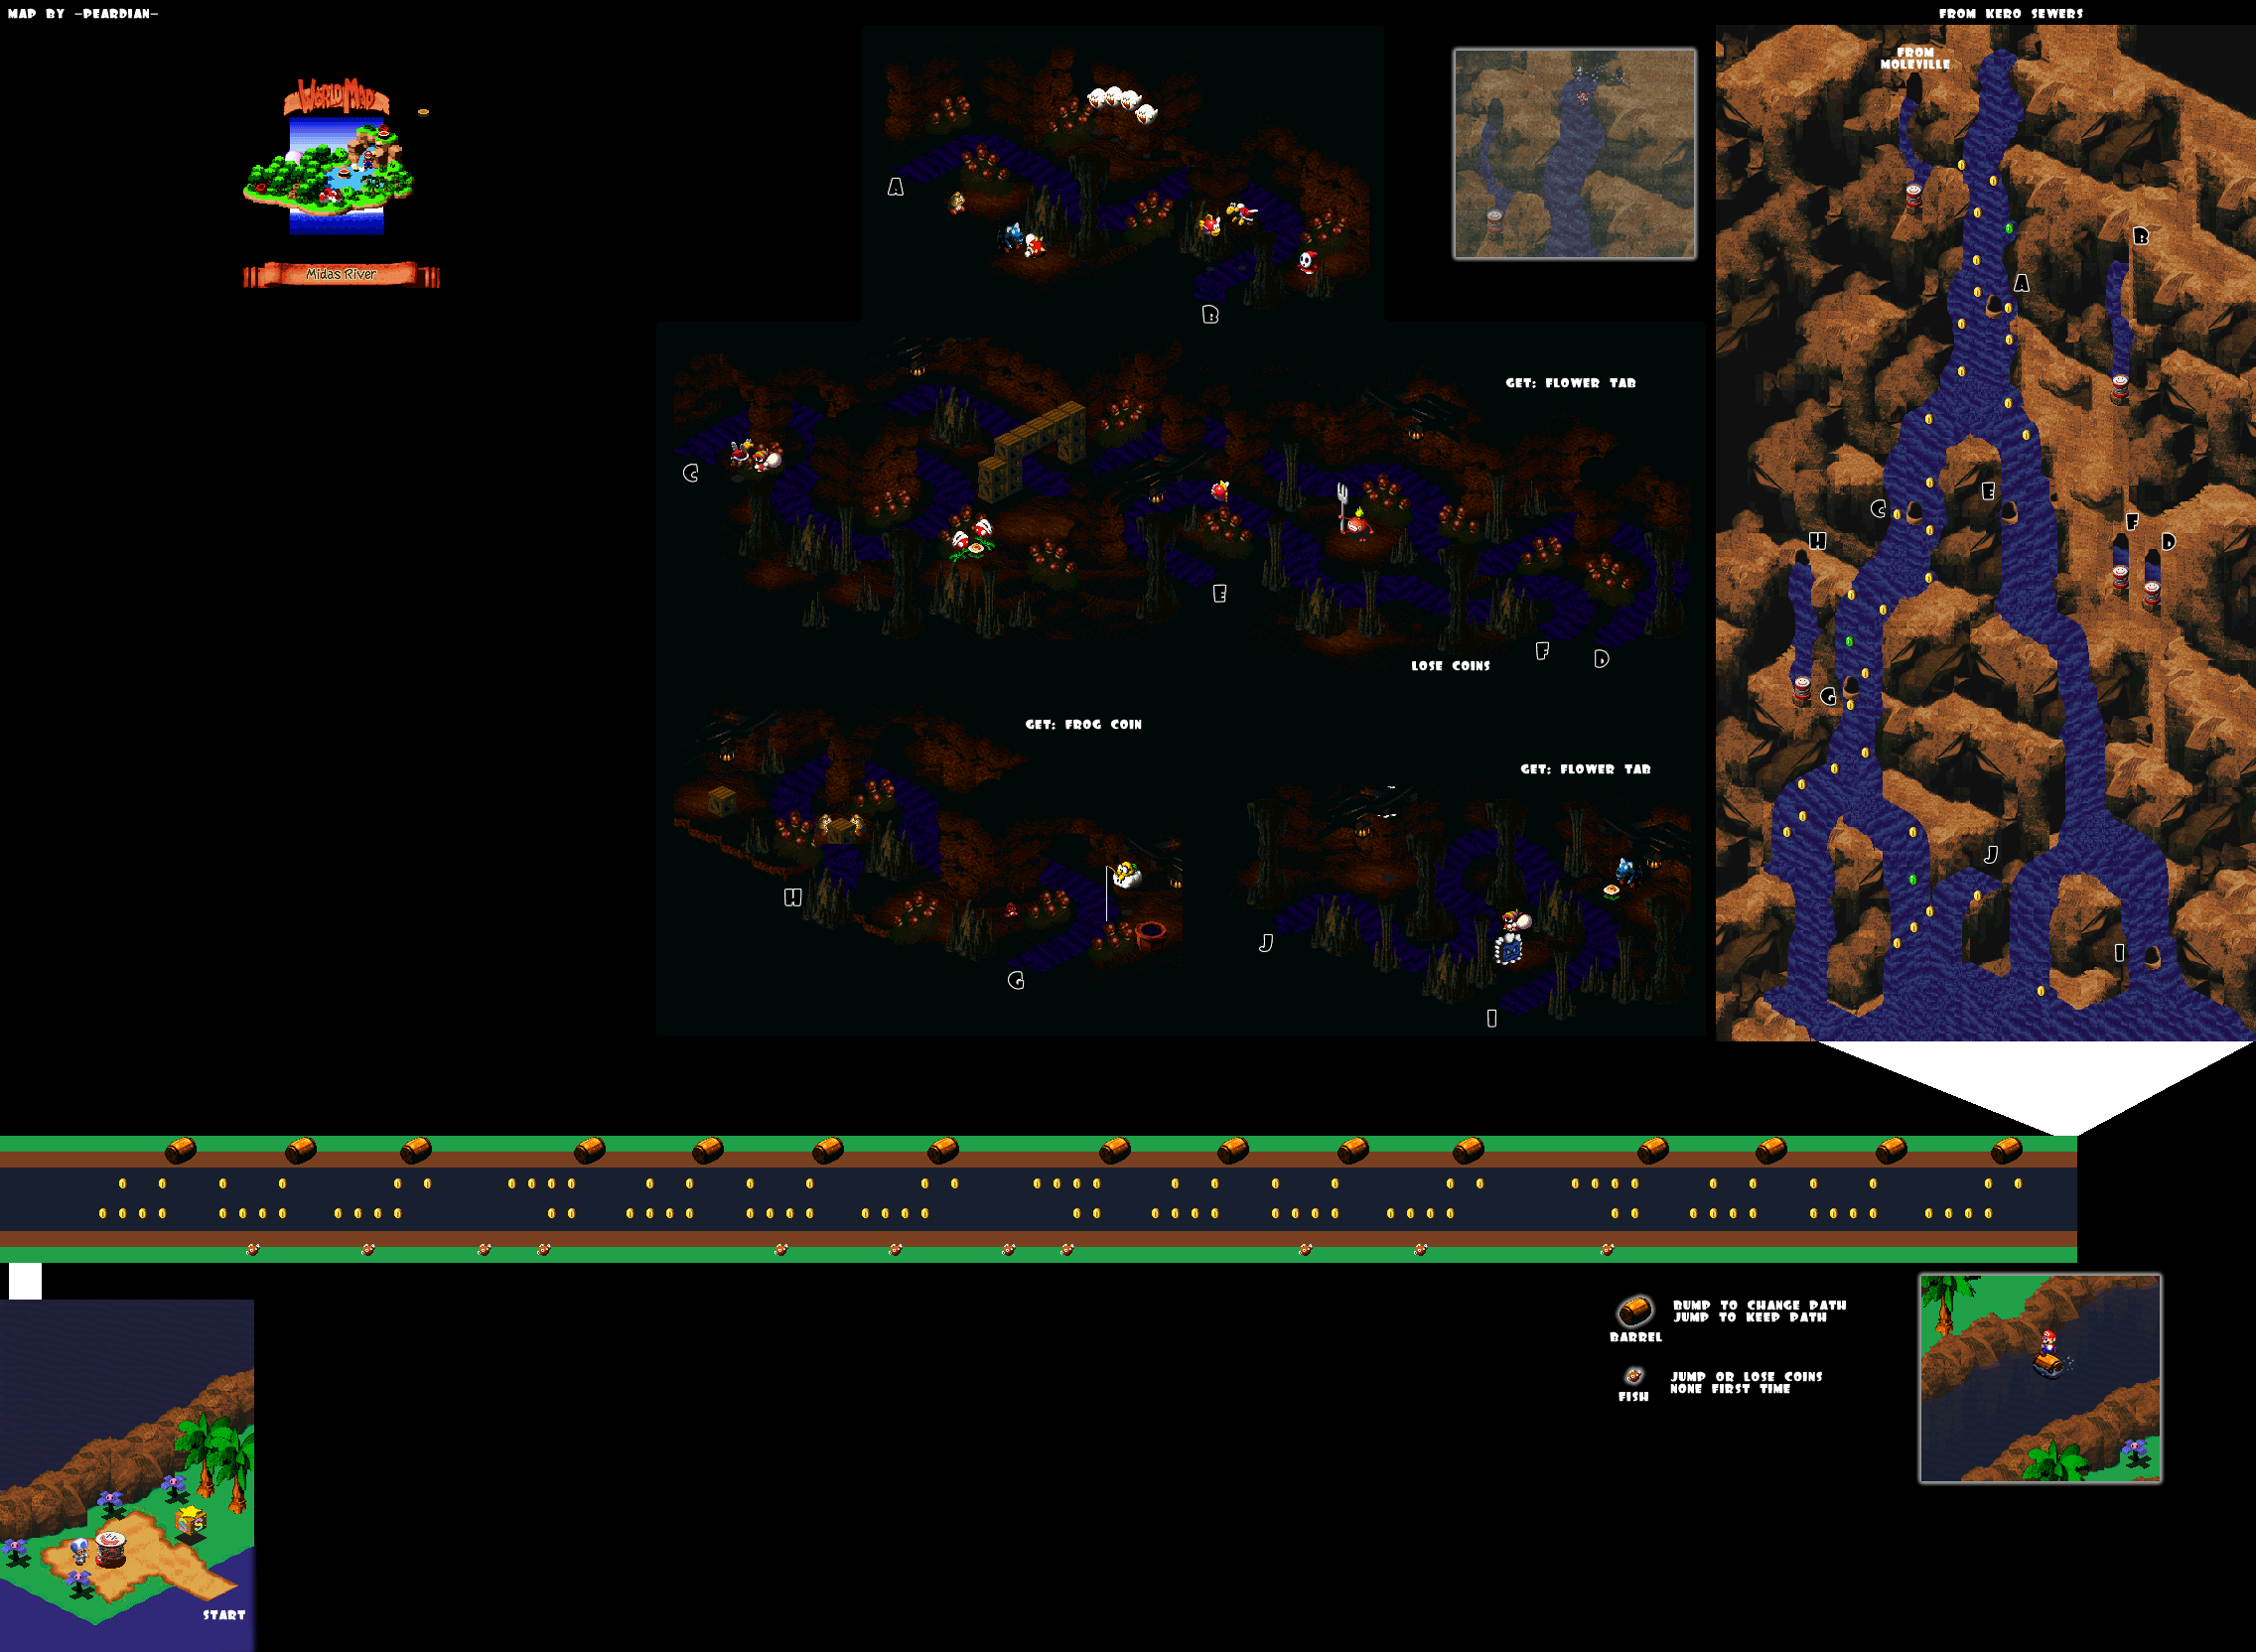 453 KB
Toad appears and offers to give you a tutorial if you want, but it isn't necessary. Your goal is to use the jump button to swim upward a little at a time as you rapidly fall downward. This little upward stroke will allow you to navigate through the water and get as many coins as possible. Be sure to aim yourself for the green ones as they are the most important. After the first four coins and a green coin, you'll reach a cave. Ignore this cave as nothing happens if you go into it. Continue to collect coins as you progress down. Then when you come to a fork, take the left path and grab the green coin.
Now you need to make a decision. If you wish to get as many flowers as possible, go into this cave. If you wish to get as many green coins as possible, skip this cave. If you went through the cave, a 'Flower' will drop on your head at the end. When you come to the next fork make a right and go into the cave to get a second 'Flower.' Now, if you skipped the cave because you wanted more green coins, you'll get another one quickly and then reach a cave, go into this cave for another green coin and when it spits you out, make a right at the fork to pick up your fourth green coin. For the record, getting the flowers is the better idea.
Following the waterfall event comes the barrel jumping event. Basically you just need to decide whether to stay on or get off and you don't have a lot of time to decide. If you can follow a walkthrough while doing this, I'll tell you exactly what you need to do in order for each barrel that appears: Don't jump, jump, jump, don't jump, don't jump, jump, jump, don't jump (fish attack!), don't jump, jump, jump, don't jump, don't jump, jump, jump... and this leads you to the end. When you land you can exchange 60 Coins for one Frog Coin (the green coins you have been picking up.) He also gives you a 'NokNok Shell' for free, a new, more powerful weapon for Mario.
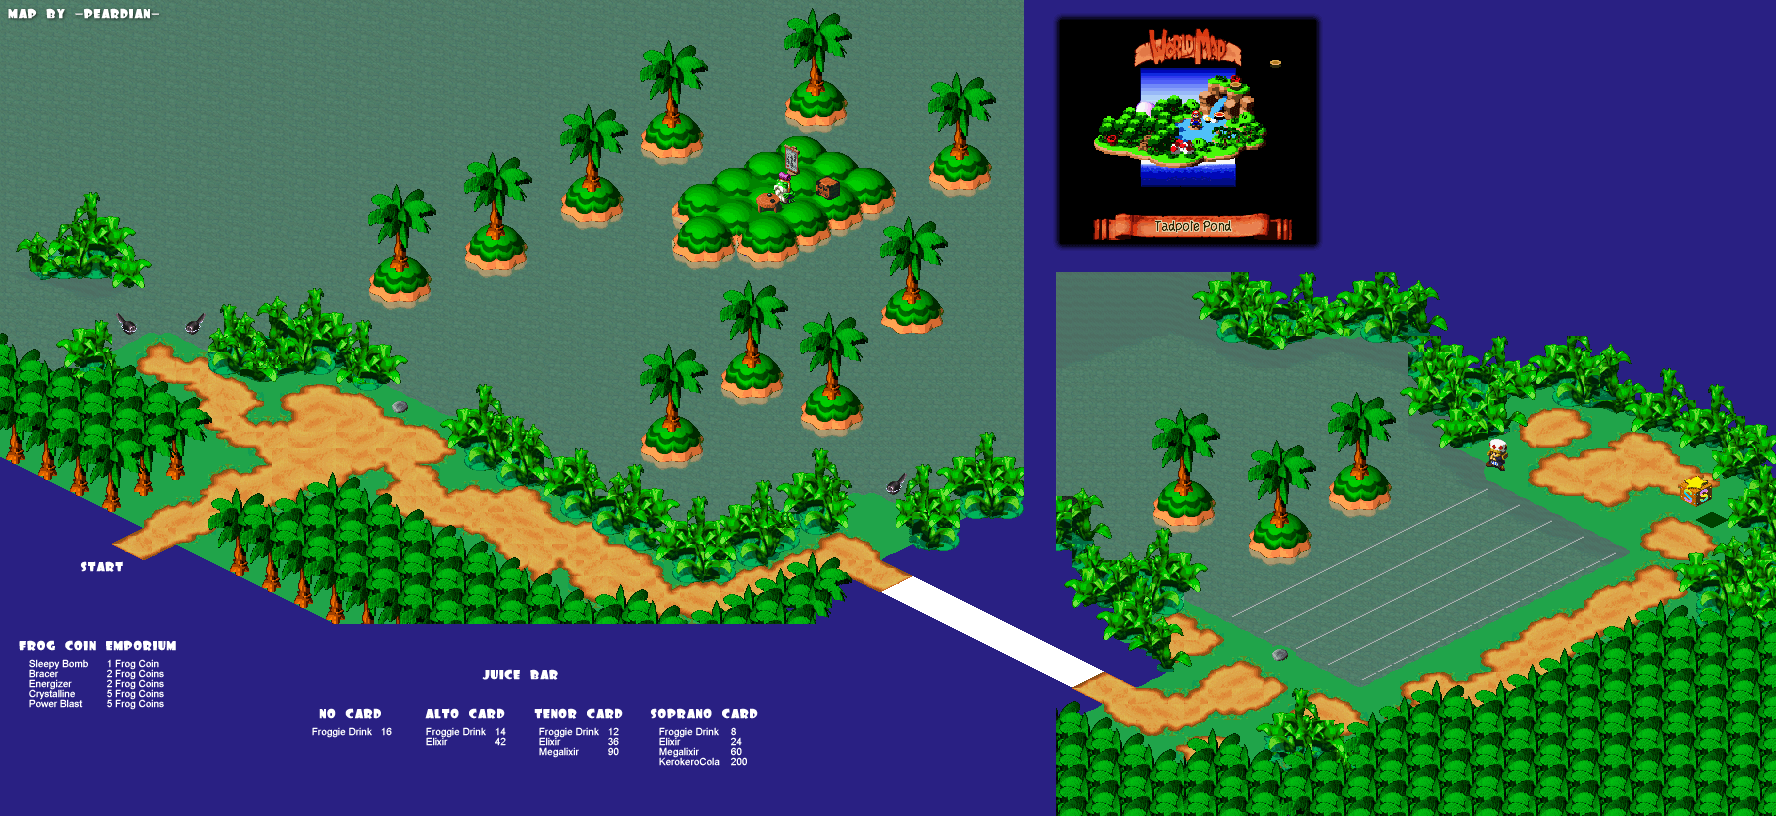
Tadpole Pond
Items
- FroggieStick
Map
 166 KB
Head forward and step onto the single round stone near the water to trigger a scene. When the tadpoles gather together, jump across them to reach the island. Speak to Frogfucius for a long scene and then afterward talk to him again. If you got the Crisket Pie, he'll give you the 'FroggieStick.'
Card Member Shop
- Sleepy Bomb 1 Frog Coin
Frog Coin Emporium
- Sleepy Bomb 1 Frog Coin
- Bracer 2 Frog Coins
- Energizer 2 Frog Coins
- Crystalline 5 Frog Coins
- Power Blast 5 Frog Coins
Before leaving you'll want to check out the two shops on the left, when you approach the water above the entrance two tadpoles will appear, one has a normal shop which you can purchase from based on a limited inventory since you aren't a card member (yet) and the other is a Frog Coin shop where you can spend your Frog Coins. With this little adventure out of the way, it's time to sit back and make a nice relaxing visit to Rose Town.
Rose Way
Items
- Flower
- Frog Coin
Map
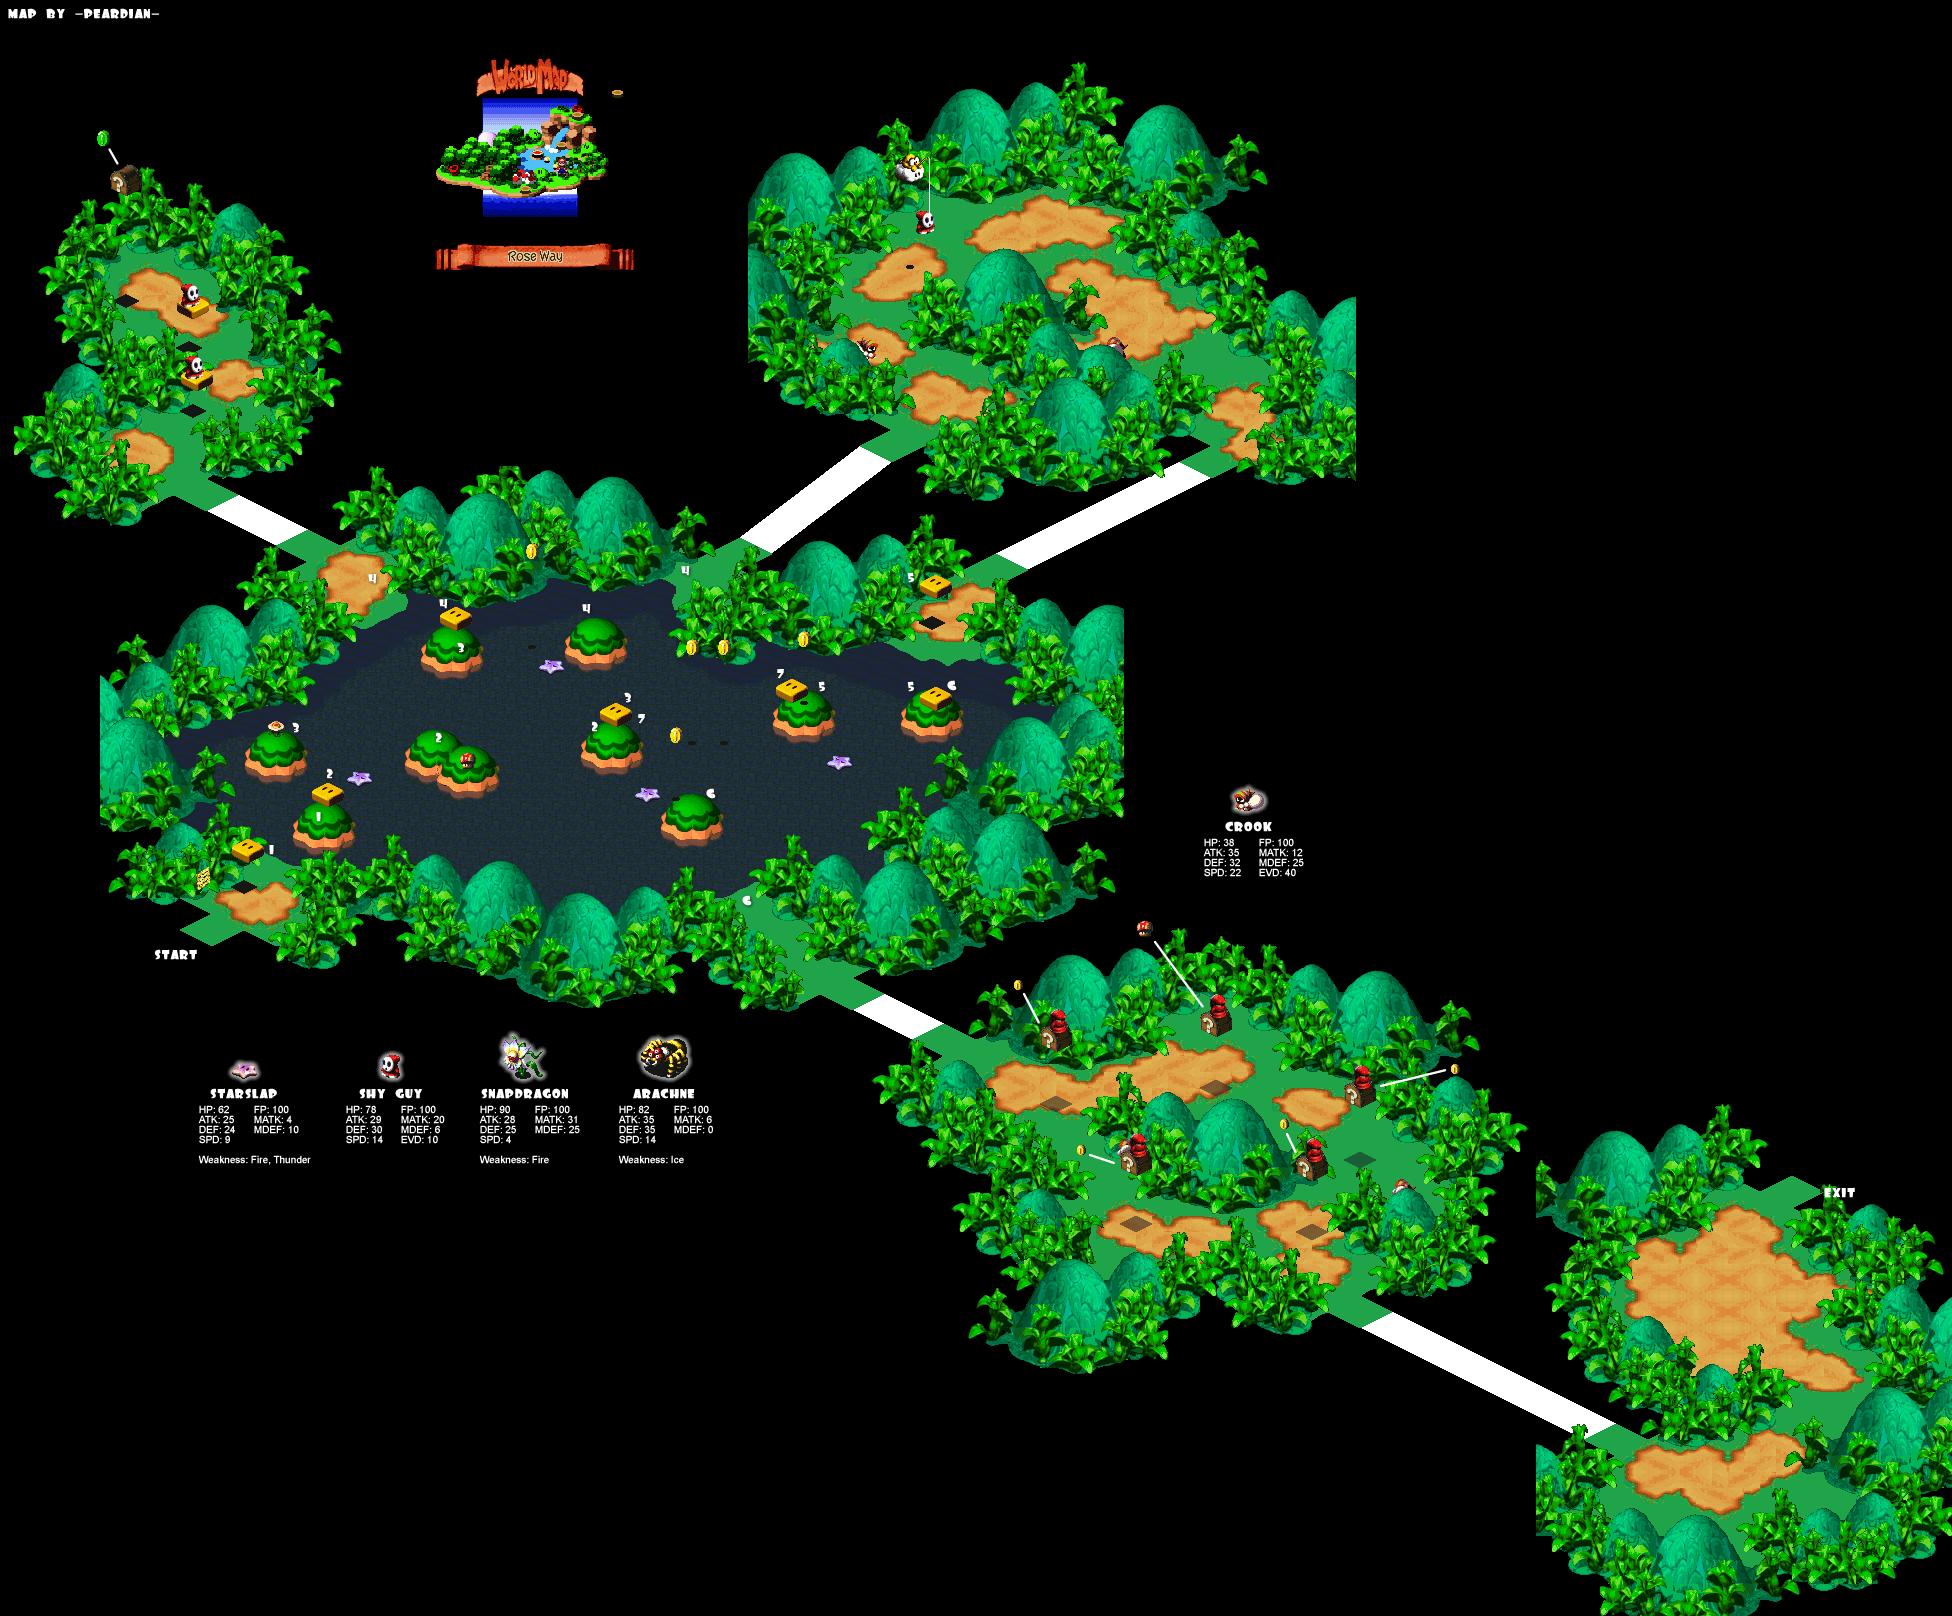 372 KB
Jump onto the yellow platform and ride it across. Jump onto the next one and then ride that one to yet another platform, past the healing mushroom. When this one glides over to the left don't switch, stay on it and it will bring you down to get the 'Flower.' Get onto the other one and leave this area via the exit on the left, you'll find two Shy Guys on moving yellow platforms here. Defeat both of them to make things simpler. Unfortunately, you can't get onto the second one from the ground, so you need to jump on the one closer to the entrance, and then onto the second one from there. When you land on the second one, wait till it gets to the other side and jump slightly to the right. Use the shadow of the chest to judge where to jump. The chest contains 'Frog Coin.'
Leave this little area and ride the platform across to the upper exit this time. There's an enemy holding Shy Guys on a fishing line in this area. Defeating about four of them will cause the guy on the cloud to throw down a full healing mushroom before he runs off. Continue to ride the platforms in the next area to the lower right exit. If you jump up to hit this multi-coin chest, you'll knock the Shy Guy down and he'll probably attack you. Same idea applies to all chests in this area except for the one at the top which contains a full healing mushroom. Watch the scene in the next area and then continue onward toward Rose Town.
Rose Town
Items
- Frog Coin
- Flower
- Frog Coin
Map
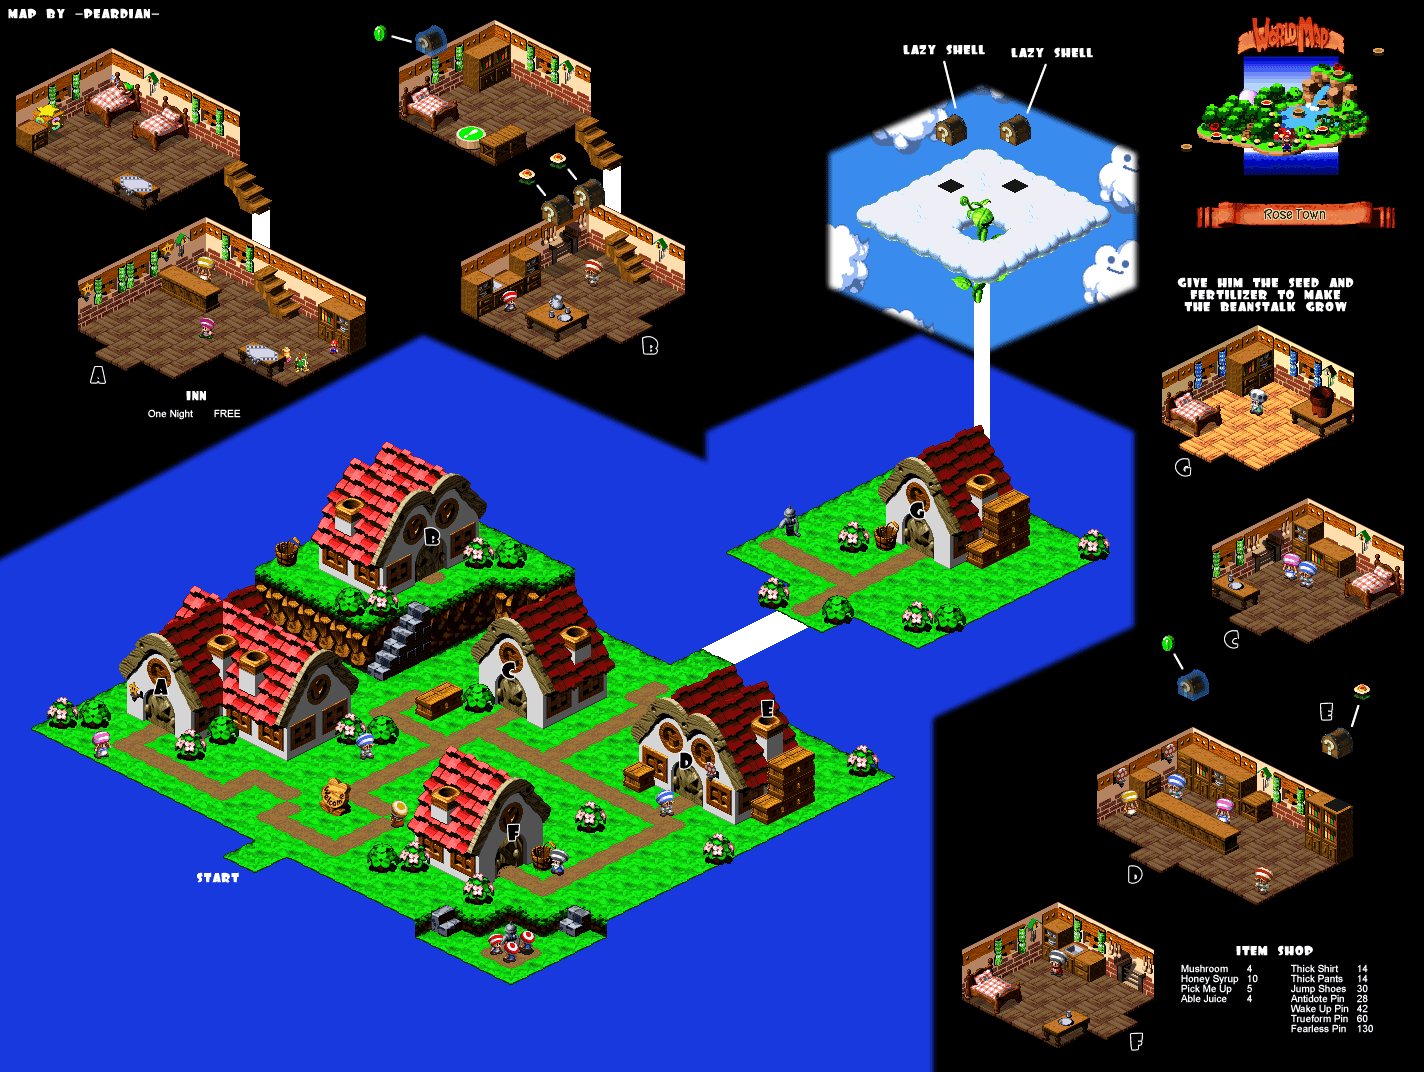 155 KB
Head to the Item Shop and upgrade your armor. While you're in here, jump on the shelf at the back left and jump into the air in the corner to reveal an invisible chest containing a 'Frog Coin.' Now leave the weapon shop and jump up on the crates on the right, you can get onto the roof from there, use the chimney like a pipe to drop down into the Item Shop beside the chest and jump up to get the 'Flower.'
Item Shop
- Mushroom 4 Coins
- Honey Syrup 10 Coins
- Pick Me Up 5 Coins
- Able Juice 4 Coins
Item Shop
- Thick Shirt 14 Coins
- Thick Pants 14 Coins
- Jump Shoes 30 Coins
- Antidote Pin 28 Coins
- Wake Up Pin 42 Coins
- Trueform Pin 60 Coins
- Fearless Pin 130 Coins
Head to the upper left house in town. The man there is locked out, but you can access his house o- Item Shop by jumping on his head and up into his house. Ignore the chests for now and jump on the button upstairs. Leave the house and tell the man his chests are still okay. He'll give you a tip. When you enter the forest go left, left, straight, right - in that order.
Now you can go back inside and get the coins from those chests. Head up stairs and jump on the bed to reveal a hidden treasure chest containing 'Frog Coin.' With all this out of the way, it's time to go into the inn and watch the scene. After the scene has ended, in the morning if you've done everything you need to in this town, then you need to leave Rose Town and head for the Forest Maze.
Forest Maze
Items
- Mushroom
Map
 651 KB
Right when you enter the maze, you can find a 'Mushroom' on the ground above you. There are tons of these throughout the forest, so the rest of them won't be mentioned. Run up and use the tree stump like a pipe. At the bottom you can grab the first Mushroom but the second one pops up into an enemy. Run to the end of this area and use the bounce spring to get back up to the forest again. In the next area, you'll find a number of trunks you can go down, go down the one at the top and touch the sleeping caterpillar to cause an earthquake and create a path leading up from all the stumps. If for some reason you don't find the sleeping caterpillar in the top one, you'll have to go and check all the other ones.
Descend down the tree stump down the path and make your way along underground until you reach another spring. You'll find a save point here and the next screen is the first screen that relates to what the guy in Rose Town was talking about, remember? Left, Left, straight, right- in that order. Exit: from edwai, if you do indeed follow these directions at any point, you should come across a number of chests. Afterward, you need to locate Geno and then follow him wherever he is going for the next few screens and then you'll suddenly come to one where Geno just isn't there. At this point do the left, left, straight, right combination. If you do it successfully, after the right, you'll find Geno again. Follow him for a couple more screens until he disappears. At this point, go right just once, and you'll find him again. Now you can follow him to the end of the maze to trigger a scene.
Boss: Bowyer
The battle against Bowyer is an interesting one to say the least, and it's certainly going to be the most difficult battle you've faced so far. Bowyer has four basic attacks, one of which really isn't an attack, but let's look at those first. Starting with his weakest attack, which is a blockable arrow from his bow that does moderate to low damage to a single character. His next attack is Bolt, which does heavy damage to a single character, usually in the 25-25 range. His most powerful attack by far is the Static E which deals mid teen damage to Mario and Mallow while doing about 25 damage to Geno. The fact that this attack hits your entire party is what makes it so dangerous.
Finally, we have the fourth attack, which is what makes the battle interesting. Bowyer will drop three buttons onto the field which correspond with the SNES controller buttons. When he shoots an arrow and locks a button, it means the attacks or abilities that correspond to that button cannot be used. For example, if Bowyer locks the A button then you cannot attack. If he locks the X button, then you cannot use items. He'll switch which button is locked every few turns. Unfortunately, locking a button doesn't usually count as a turn for him, so you'll often find a button lock followed up by a nasty Static E spell.
In terms of damage, for Mario, by far the most effective is the Super Jump. Hopefully you've been practicing because this will really knock him. Mallow's attack is weak and his Thunderbolt is even worse, meaning he should be dedicated to using HP Rain for the entire battle, which is good because the boss' attacks are quite powerful. Geno's Geno Beam is just about as strong as a Timed hit normal attack, possibly even weaker, so Geno should just use physical attacks for the whole battle. Stick with this and you'll be fine.
With that the boss has been defeated and geno has joined your party. Rose Town is saved but there are new areas on your map and no real reason to go back there besides visiting with the citizens and grooving to the awesome uplifting music. When you're ready, then head on over to the Pipe Vault.
Pipe Vault
Items
- Flower
Map
 106 KB
This place is completely optional, but it's good to go through so you don't have to do it later. Descend into the pipe to reach the underground area and start jumping across the pillars. If you land in the fire, it will bounce you back, but you won't take any damage. Continue along the path to the next area, watch out for the stomping block. If you touch it, you won't fight a battle, but you need to jump before it hits the ground, otherwise the shock will send you rolling down the stairs. Go down the pipe on the other side, the second one, not the first one, as it has an enemy in it.
Continue to jump over all these pipes to reach a section where you need to jump from pillar to pillar to avoid the Goombas. Be careful of enemies in the red pipes. They aren't afraid to come up even if you're standing right beside them. After this, you'll find another type of enemy, the small biting plants. If these touch you, it won't trigger a fight either. You'll just lose some Coins, so avoid them. After this, you'll drop into an area with a moving yellow platform. Be sure to hit the chest above you containing a 'Flower.'
Map
 89.2 KB
Along the moving platform that goes above the little money grabbers there's another chest that has multiple coins. Be careful not to fall when you hit it. This is the end of the Pipe Vault. Outside is a save point and then a path leading down to Yo'ster Isle. There's nothing you can do at Yo'ster Isle, besides meet Yoshi. You can ride him if you jump on his back.
Now you can access it easily on the world map. Your next destination is Moleville.
Moleville
Items
- Flower Tab (x3)
- Bambino Bomb
- Frog Coin
- Flower
- Lucky Jewel
- Fireworks
- Shiny Stone
Map
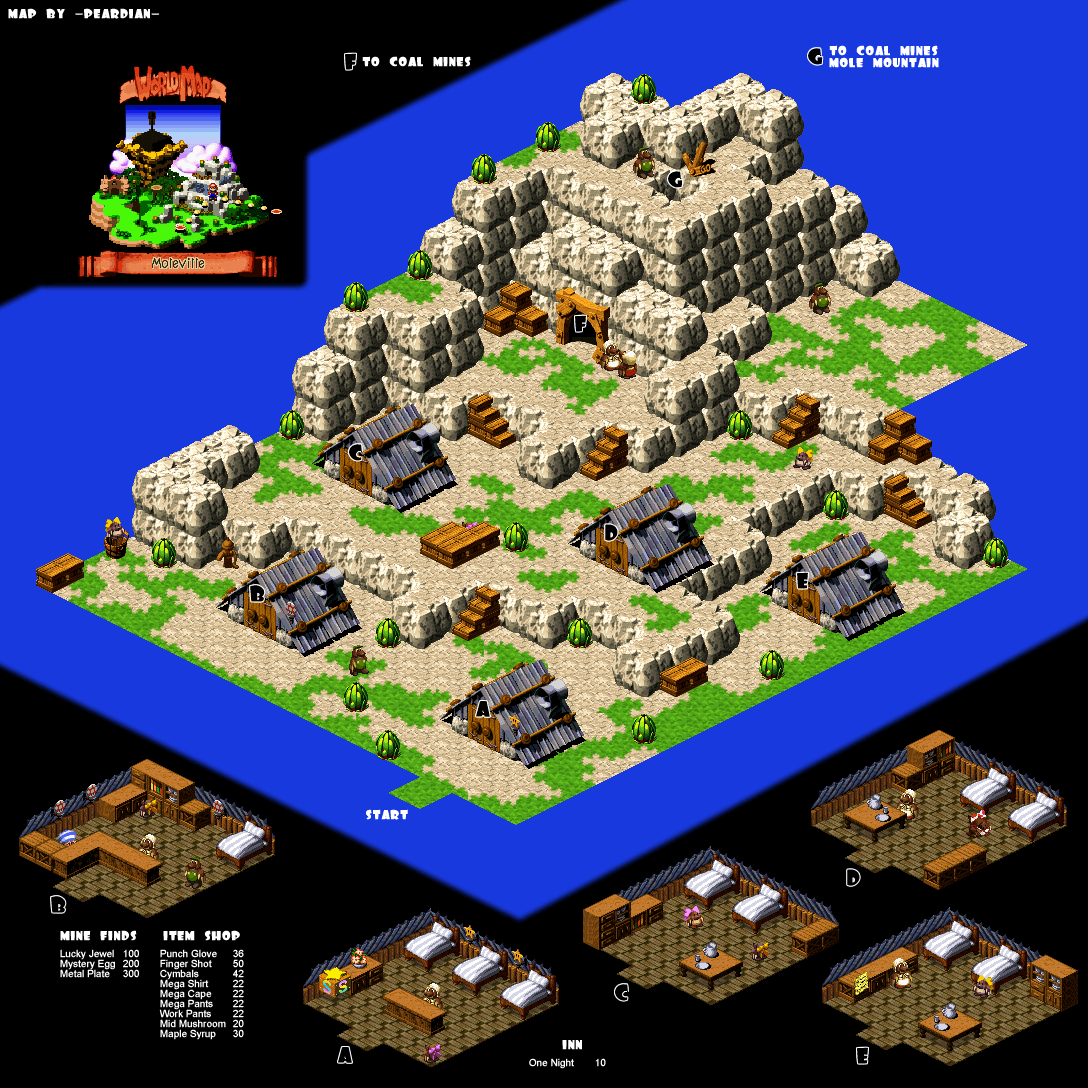 132 KB
Head into Moleville and the first thing you should do is visit the item shop. They've got great new weapons and armor for all your characters as well as some upgraded and more powerful mushrooms.
Item Shop
- Punch Glove 36 Coins
- Finger Shot 50 Coins
- Cymbals 42 Coins
- Mega Shirt 22 Coins
- Mega Cape 22 Coins
- Mega Pants 22 Coins
- Work Pants 22 Coins
- Mid Mushroom 20 Coins
- Maple Syrup 30 Coins
Head for the entrance of the mine to trigger a scene, then go inside. You can use the moles' shoulders to get up to the next level. Jump up into the mines and start heading right. When you fight, a guy wandering around drops down and continues up through the door. In the next room, you'll see a smiley spring, jump on top of it and something rather unfortunate occurs, but don't worry, it's supposed to.
Map
 428 KB
When you wake up, head right for another quick scene, then go into the next room and follow Croco down. A couple of rooms from here, you'll find the first bandit hiding behind a box before the exit path, run up behind him and fight. You won't get any Coins, but he'll give you a 'Flower Tab.' In the next room behind the large spring bouncer you used before is the second crook, defeat him to get a 'Flowe Tab.'
Next, head right and you'll find the last crook hiding behind a box in the last room, defeat him for the final 'Flower Tab.' Now return to the room with the trampoline and stand right at the doorway. Croco will rush through every once in a while and if you're blocking the door he has nowhere to go. You do have to be moving, however, to trigger the fight. Since you'll know he's coming from the left side, get ready to move left and intercept him. If you pretend like you're trying to talking to him in the process with the talk button, it might make it easier to get into the fight.
Boss: Croco
Croco is similar to the same Croco you fought back in Bandit's Way. He's just leveled up accordingly. His normal attack now was his more powerful attack before, which is when he reaches into his bag and pulls out a bomb to throw at you. This goes on while you fight him until he loses approximately half his HP, at which time a message comes up and then he rams you. When Croco rams you, something flies out. This something turns out to be all your items. You must fight the rest of the battle without items.
Croco's attack pattern also changes after this. He begins to use an attack called Chomp in which he reaches into his bag and throws a random enemy at you, this attack is actually quite powerful dealing more than 20 damage each time which might not sounds like too much but remember you can't use mushrooms. Mallow's HP Rain really comes in handy at this point, as it is your only means of healing. For attacks Geno's beam isn't as powerful as his physical, and even Mario's Super Jump doesn't quite cut it against the power of his Timed Hits so both of them should just stick with that while Mallow uses his power of healing to keep the two of them (and himself) in the game.
For defeating Croco, you not only get your equipment back but also a 'Bambino Bomb' as well. Proceed up and left as much as possible. You'll eventually reach a mole man standing in front of a solid wall. Speak to him and give him the Bambino Bomb. After you blast through, head through the lower door and run up the tracks toward the top. When you try to go through this door, you'll be knocked back by a Shy Guy on a cart. When he runs off, there's a 'Frog Coin' to pick up. Now jump up to the upper level. The chest here contains a star so make sure you're prepared to use it well when you get it.
I would recommend making a mad dash up to the right, a couple rooms from here there's a big collection of four bombs squished together and it's quite possible to reach them with the star, make sure to check out that route before trying though. If you actually did do this, make sure you turn around and go back one room and get the chest containing a ton of Coins. There's a save point in the next room and beside it a chest with a full healing mushroom inside. Before going any further, stand on the two piled up boxes on the left and jump down to the lower right to try to hit that chest floating high in the air. It contains a 'Flower.' You'll find the boss in the next room, in order to trigger the battle you need to come up behind him so he doesn't see you.
Boss: Punchinello

Punchinello is a mean and nast weird looking clown man who has far too much fun with his bombs. He's got a few basic attacks. The first two are like any others. He's got his physical finger poke, which you can defend against. It doesn't deal too much damage (usually 0 damage actually if defended well.) His next attack is far more annoying, he uses the Sand Storm attack which not only does damage to your entire party but leaves them in a weakened state as well, if I'm not mistaken it's the Fearless Pin that can protect you from this ailment.
Now, the other thing Punchinello will do is drop four little bombs on the ground and then command them to go kamikaze on you. These things kill themselves so often that there is absolutely no reason to attack them yourself. Keep focusing on Punchinello. When he has taken enough damage, about one third of his HP he'll destroy all the bombs himself and drop four normal sized ones which deal more damage when they explode. This goes on for a while until he loses about two-thirds of his HP, which is when he drops three enormous bombs that do massive damage when they hit you. This is your cue to go on an all out offensive.
As for attacking the boss, if Geno has learned the Geno Boost by now, you can use that to up the damage done by him and Mario. Press the Y button just as the spell ends to get a boost to defense as well as offense. Mallow can focus on healing like he normally does. However, if his magic is strong enough, the Thunderbolt can usually wipe out every single one of the mini bombs in a single cast, which may set him back a turn or so. Once the bigger ones come around, Thunderbolt loses pretty much all use. Mario's physical attack after a Geno Boost will really clean up in this fight. As long as there are no big surprises and you can stay healed, then you're set.
Map
 1.34 MB
When the boss is defeated, pick up the star and head into the back. There's a mine cart here. Help the little girl onto it and get ready to ride. This minigame can actually be quite a lot of fun. What you do is press X to jump your mine cart, A to put on the brakes and X for a super boost as long as you have at least one mushroom remaining. There are gaps in the track where you'll have to jump, and also tight turns where you'll have to brake even if you're going at normal speed. Hold left or right to turn left or right respectively at a fork. There are two different kinds of areas: 3D areas like the first, and sidescrolling areas like the second. The controls remain the same for both.
When you make it out of the mines, speak with the girl's parents and then leave the house for a scene. After this, it's not quite time to leave Moleville. There are a couple of things you can do. You can jump up top of the mines and drop down to the trolley if you wish to ride it again. Next, you can check out the points store they're opened in the upper left house. Third, head into the Item Shop. There's a new guy behind the counter who will sell you a 'Lucky Jewel' for a mere 100 Coins. Lastly, head into the upper left house. You can purchase some 'Fireworks' for 500 Coins.
Once you have the Fireworks, head outside and speak to the little girl beside the boxes nearby and offer to trade her the Fireworks for a 'Shiny Stone.' You won't find a use for this stone until the end of the game, but it is required in order to fight the most powerful optional boss, so if that sounds appealing you may as well pick it up now. It's time to make tracks for Booster Pass.
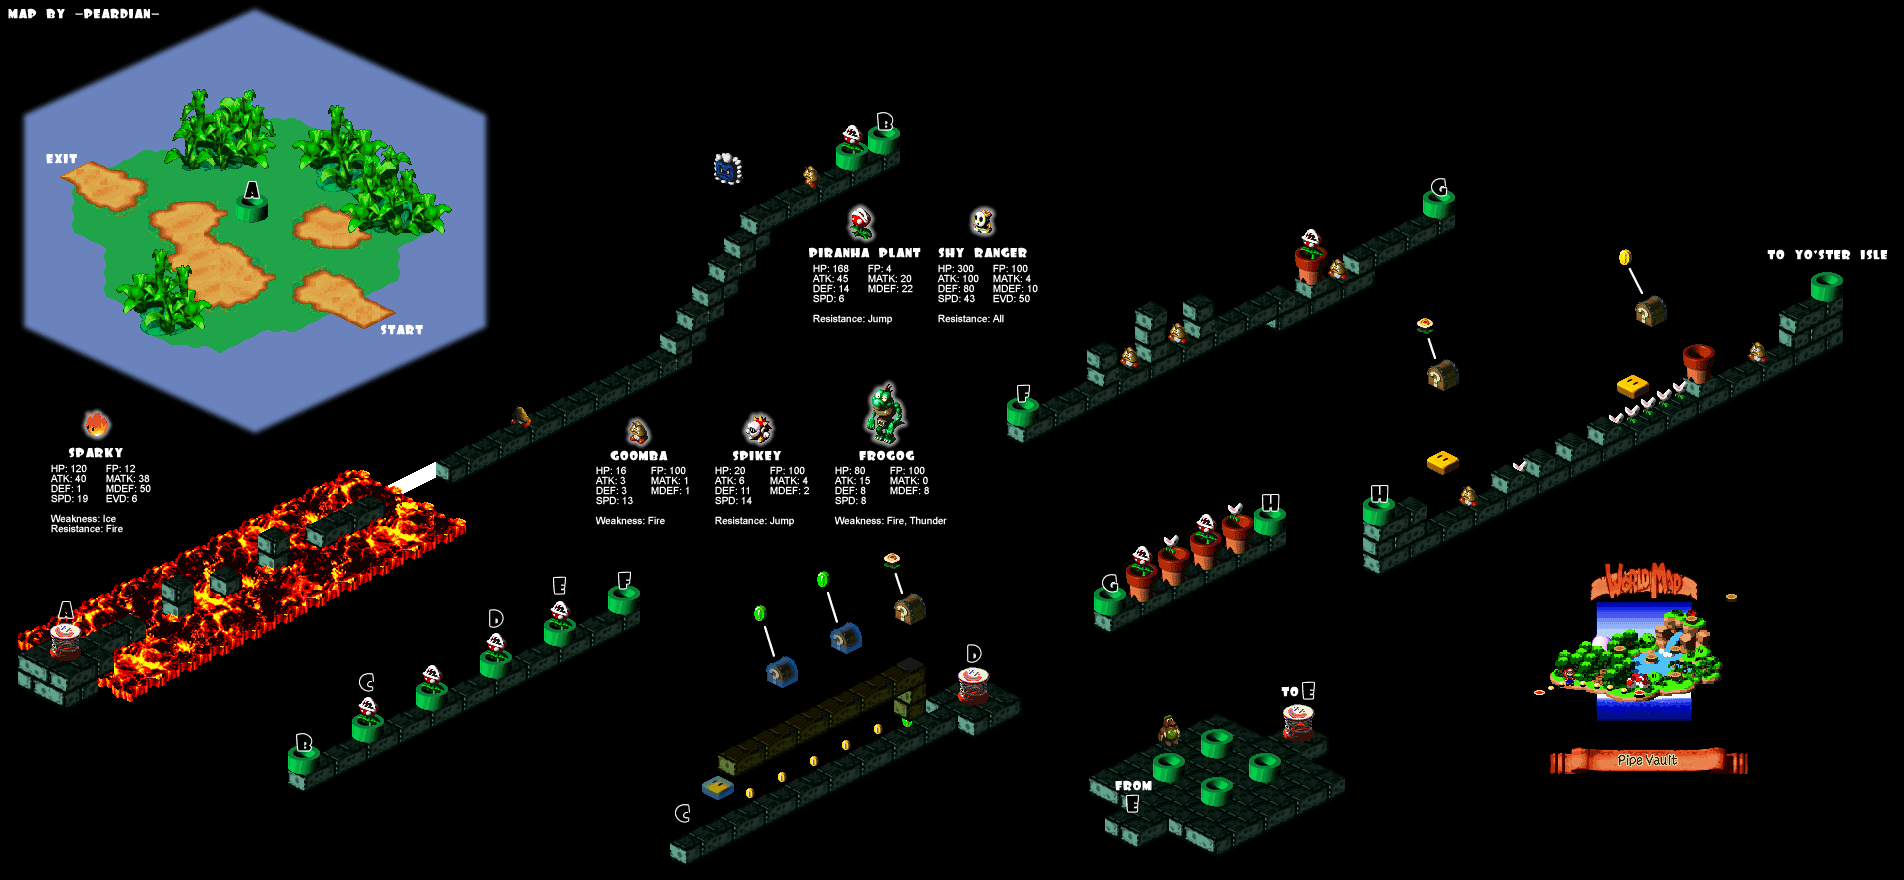
Booster Pass
Items
- Flower
- Flower
Map
 145 KB
When you start run over to the left side and jump on top of the far left plant, while standing on this if you jump you'll reveal a hidden treasure chest containing a 'Flower.' You'll find the exit to this area if you jump up the right side and head up. Be careful of some of the other shrubs in this area, many of them. If you touch them, it will trigger a battle with a monster hidden inside.
Here's what to do on the next screen: head right rather than jumping up the rocks. At the back right corner you'll find a 'Flower.' (Just because it's enormous doesn't mean it gives you anything more than one though.) Now on your left should be kind of a little nook. Go in there and jump. There's an invisible button here that will automatically destroy all the spiked enemies and give you Coins for each one. Now you're able to freely jump up and exit Booster Pass, then head for Booster Tower.
Booster Tower
Items
- Flower Tab
- Masher
- Elder Key
- Chomp
- Frog Coin (x5)
- Room Key
- Zoon Shoes
- Goodie Bag
- Amulet
Map
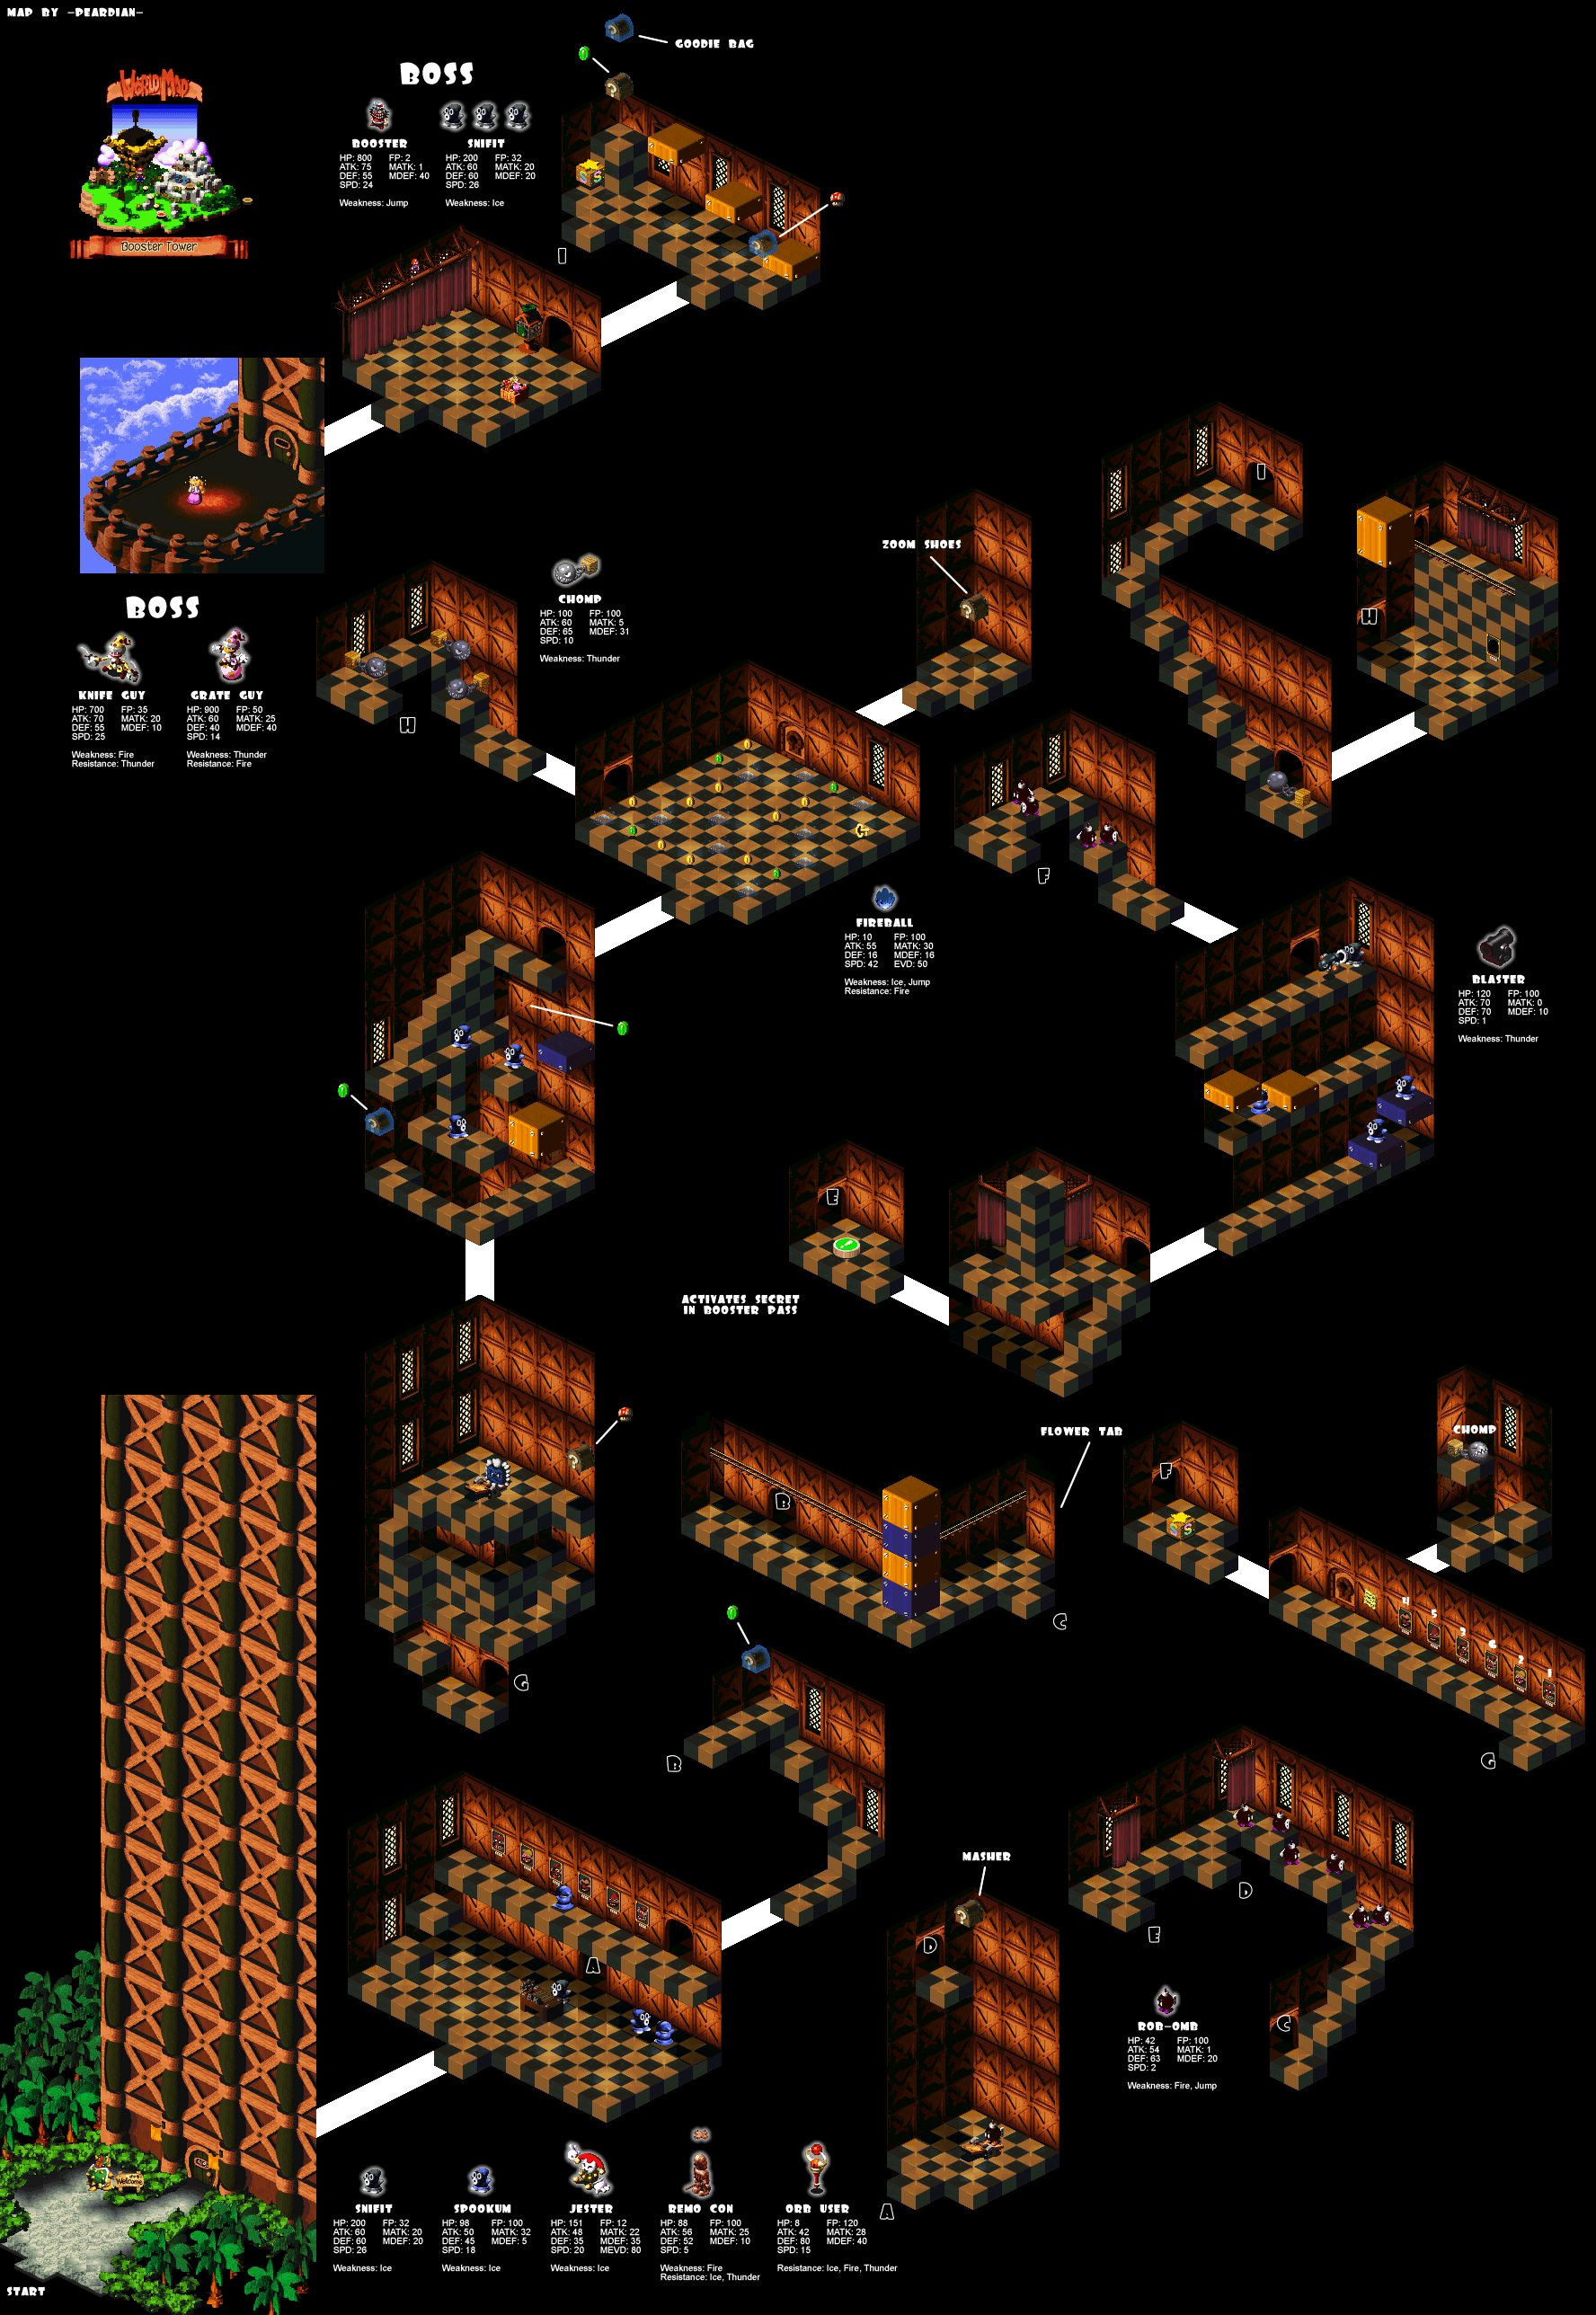 392 KB
Approach the castle for a scene, then try to go through the door. When you can leave the area for yet another scene and presto! The door is open. You now have the ability to switch allies. You'll probably want to drop either Mallow or Geno from your party. Enter the tower and start climbing up the platforms on the left side. Make your way up the tower until there's a quick scene with Booster on the train. If you try to follow Booster up and left where the track goes, you'll be stopped by one of the Snifits and forced to fight a battle. On the other hand, if you follow the train tracks in the other direction, you will find a 'Flower Tab.'
Up the next area past the bombs. You'll come to two paths leading. down, take the first one. You will notice there's a treasure chest floating in the air, but you can't reach it. Below you is a see-saw with a weight (a bomb) on the other side, you need to use your ability to judge distance to jump down and land on the see-saw, if you miss you'll have to run all the way up and try again. I'll help you as much as possible. Here's how you can pretty much to it every time. Notice the tiled ground. You are standing on four tiles. First of all, you want to stand on the lowest tile, the yellow tile. From here you want diagonally down-right exactly two tiles. The easiest way to judge this is to jump diagonally down-right and right when you get underneath the treasure box in mid-air simply let go of all buttons. It's easier to underestimate the distance than overestimate, but it's still possible to jump too far.
Like I said, let go of everything right when you're under the chest in mid-air, and you can't miss. For doing this you get a 'Masher,' a new, more powerful weapon for Mario. Return to the area where you went down and jumped. This time, take the second downward path. Press the large button in this room. In the next room, if you want to change your costume temporarily, check behind the curtains for a little surprise. Once that's over, leave this room via the upper door and continue up through the next couple of rooms and use the save point. The next hall has a puzzle.
You must examine these in the correct order. Each time you miss one, you are forced into a battle. The order is as follows, from left to right: the last one, the second last one, the third one, the first one, the second one, and the only one that's left. Now Booster spits out the 'Elder Key.' Use it to open the door with the large lock on it and jump toward the chomper. After a quick scene, you get the 'Chomp,' a new weapon for Bowser. Leave this room and keep climbing up. When you come to a see-saw with a large stomper on it simply jump on the empty side and wait for it to launch you up one level.
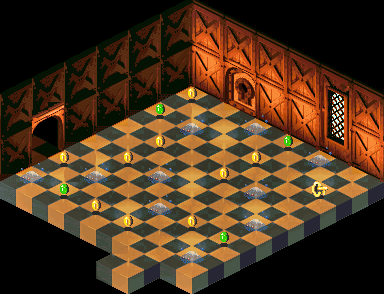 The room with the coins
Navigate this area up to the next room where you'll find a number of Coins on the ground, but don't start running. The floor is trapped with enemy battles. Do the following: jump up to get the coin, then right to it get another one, and go right again to find the 'Frog Coin.' Jump back to the first coin you got (or where it was) and jump left twice to get another 'Frog Coin.' Ignore the door beside you and the coin in front of it. Jump diagonally up-right to get the two coins above you. Now jump right to grab the bottom coin of those three and then right again to get the 'Room Key.' Jump diagonally up-left then up-right to grab the coin and 'Frog Coin.' From here you should be able to make it to the door. Open the door with the key and hit the chest to find 'Zoom Shoes.'
Now leave this room and jump to the 'Frog Coin' on the left and from there to the door, if all went well, you should have avoided all battles. Continue up to another room where you meet Booster again, when he throws the bombs down, simply run into that little area at the upper right until they explode. A couple rooms up from here you'll find a save point and some platforms to jump across and reach a 'Frog Coin.' Now jump back across those platforms and from the last one try to jump ON TOP OF the other chest you already opened. While standing on it, if you jump you'll reveal a hidden chest containing 'Goodie Bag.'
When you're ready and you've saved your game, proceed into the next room. There's a little mini-game to play here after the scene. The Snifits will start opening the curtains and you need to run back and forth to avoid detection. First one, then two, then three of them. There aren't a lot of tips I can give that will help. What really matters are your reflexes, though I can tell you one thing. The very last thing the three Snifits do is run around randomly. At this point, run underneath the Mario doll. This is the one that will remain shut. If you can do this correctly without being caught, you'll be rewarded with an 'Amulet.' When you have control again you may want to go back and save because when you go out on the balcony.
Boss: Knife Guy & Grate Guy
Definitely the hardest boss you've fought too far. Knife guy has 700 HP while Grate Guy has 900, so it seems only logical to take our Knife Guy first. Whoever you do choose to focus on, at least make sure you focus on someone. Spreading out the damage won't help you at all. Both of them have normal attacks with somewhat odd timing on the defense, which makes them kind of hard to block. Knife Guy will use an attack that puts you to sleep while Grate Guy will use the Echofinder, which disables all special skills.
After they've taken some damage, they will combine forms. Sort of. They're still considered two separate enemies. They're just standing one on top of the other. This does, however, cause them to start using the real power attacks. Grate Guy uses Meteor Blast, this can do upwards of 25 damage to the entire party and is often followed by Knife guy's Blizzard, which does anywhere between 10 and 15 damage to the entire party. Hopefully, he'll use Crystal since it only hits one person. Once Knife Guy dies though Grate Guy will really lay off the Meteor Storm, in fact I think he may only be able to use it in the combined form.
When attacking, Bowser's Chomp does significant damage to both of them while Mario's Masher works great against Grate Guy but not so great against Knife Guy. For Knife Guy, have Mario use his Super Jump attack which will really work well. If you're using Geno for this fight, have him cast the Geno Boost on Bowser and then use Mid Mushrooms accordingly. If you've got Mallow in your party, every single one of his turns should be comprised of using HP Rain to keep your party alive. The battle really does become significantly easier once there's only one of them left.
Booster Hill
Items
- Flowers (lots of 'em!)
The entire area of Booster Hill is just a minigame. Here's how it works. There are three Snifits behind you, barrels coming down the slope and Booster with the Princess on his back. You can put down the controller and watch as you complete this area automatically but there's a reason not to do that, each time you get far enough up so that you come into contact with the princess, she gives you a Flower and knocks you back a bit. This means you could in theory get a hell of a great deal of Flowers here and likely will. Being hit by barrels knocks you backward. However, jumping and landing on top of a barrel will give you a huge boost forward, so your goal is to bounce off all the barrels and get as many Flowers from the princess as you can.
After a while, the Snifits start running faster up the hill and while they can knock you back, you can also jump on their heads to get a speed boost. Once you reach the top, it tells you how many Flowers you got. I managed to get sixteen Flowers, but then again I'm using an emulator so I've got a save state, if you get that many Flowers (or more) on the console version then you are certainly a better man (or woman) than I. At the top of the hill you'll find the pleasant town of Marrymore.
Note, before doing anything in Marrymore, you may remember that you pressed a large button in Booster Tower and it told you to go back to Booster Hill. Well, return there and check the left side of the first screen for a large opening in the wall. Jump across to find three chests containing KerokeroCola, a Frog Coin and finally a Flower. Back to Marrymore!
Marrymore
Map
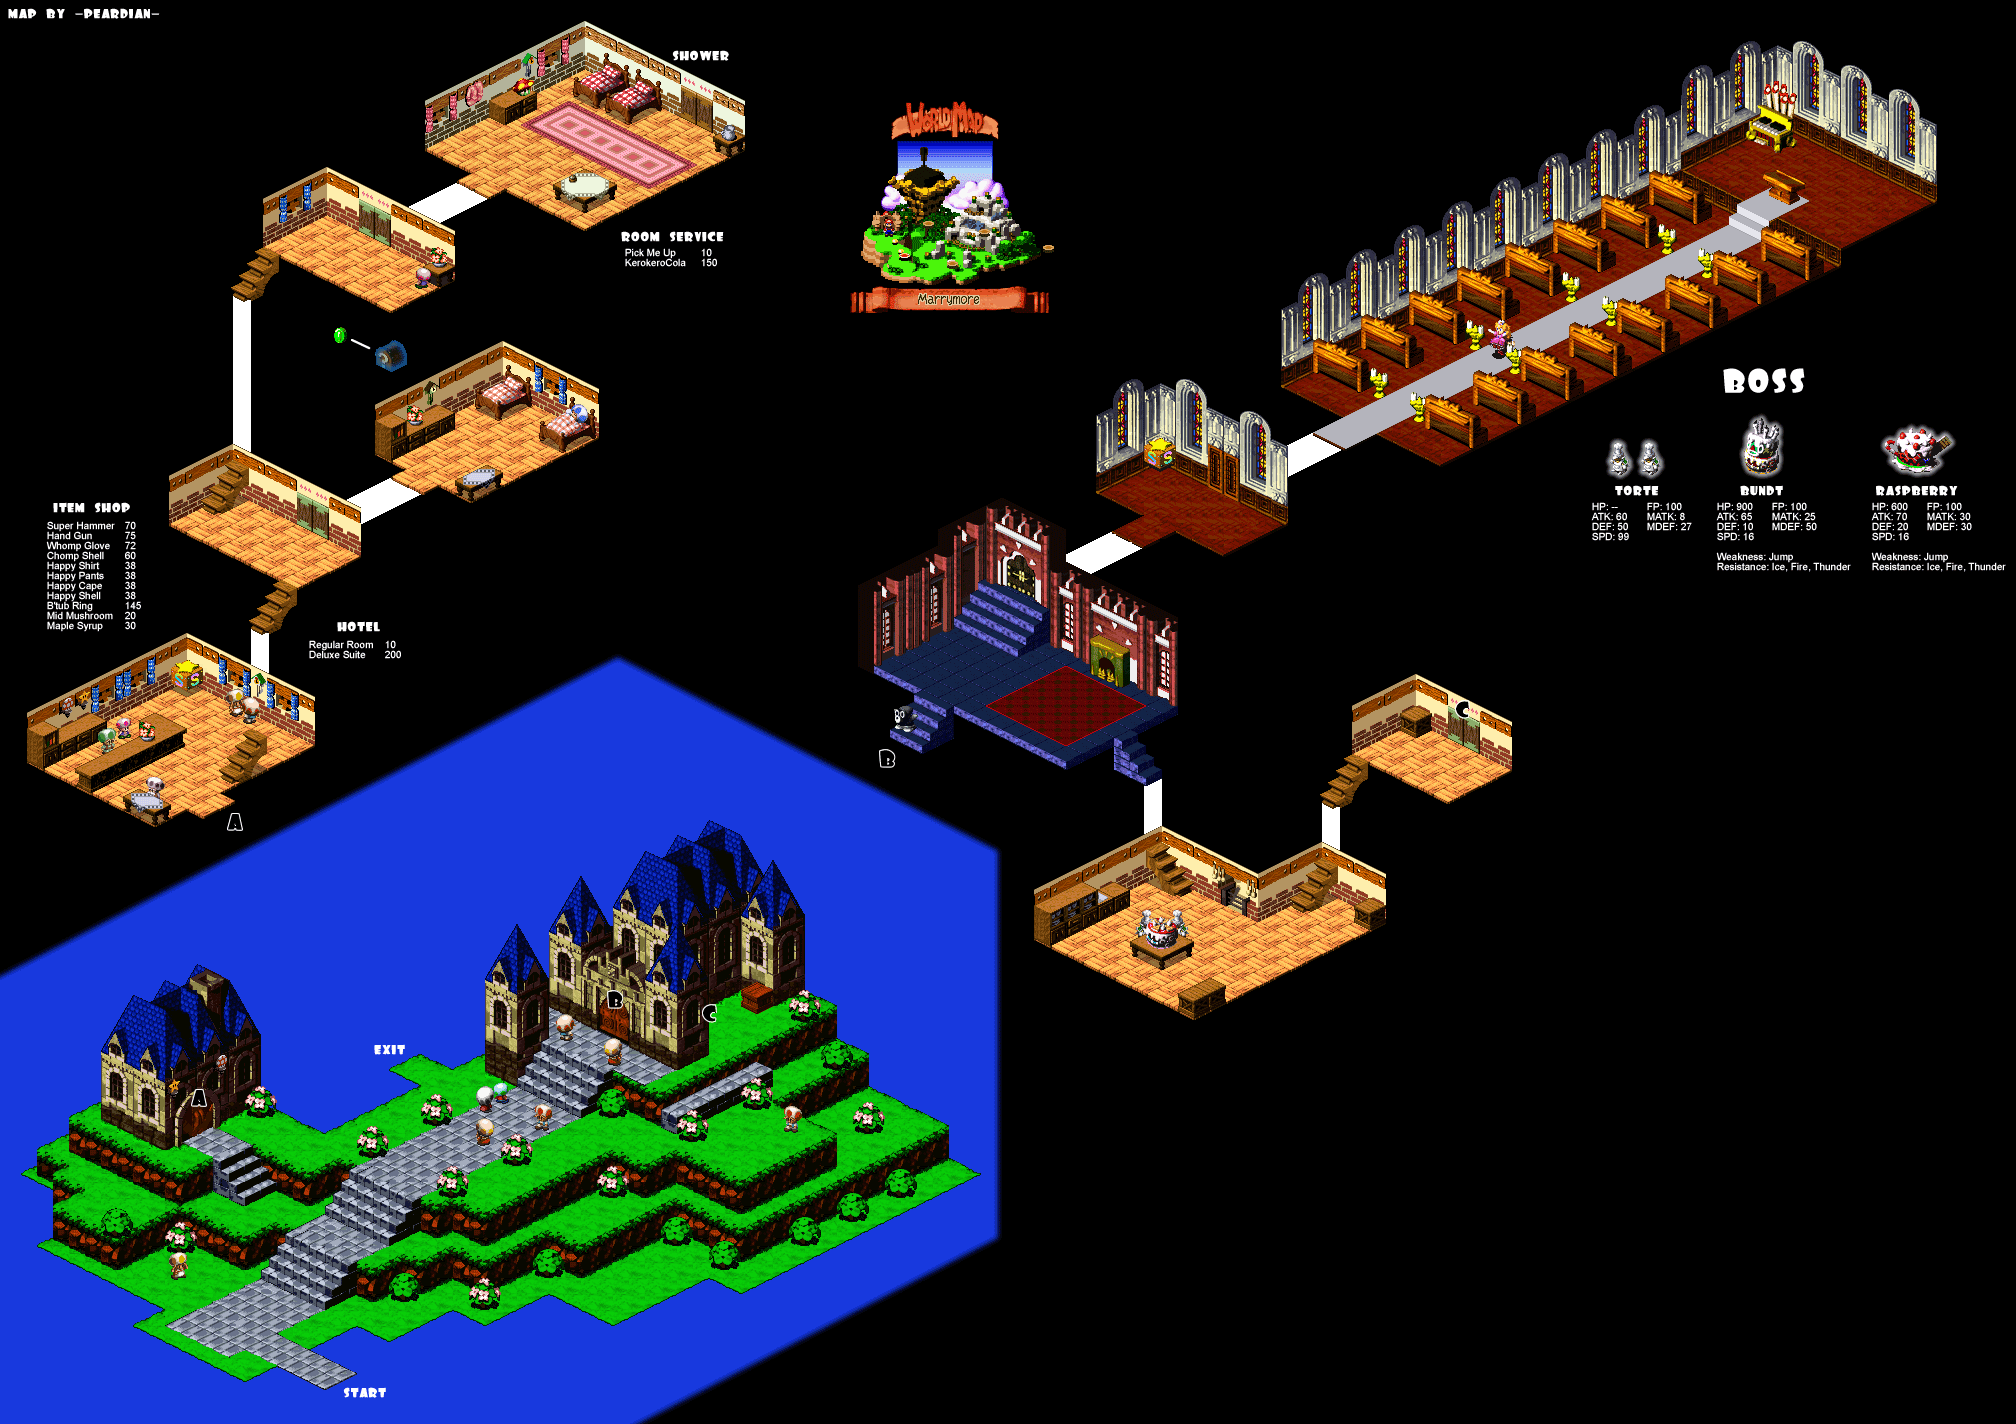 216 KB
Check out the inn and shop, they have a really nice expensive suite there. Once you've checked that place out, head to the front door of the church and speak to the people there. When Raz & Rani is thrown out, you'll need to find some way to get in. Go around and behind the right side. There is a hidden door leading into the back of the church. Go down into the kitchen, then up again. When the Snifit asks for your help in breaking down the door, you need to run alongside him and hit the door at the same time.
Item Shop
- Super Hammer 70 Coins
- Hand Gun 75 Coins
- Whomp Glove 72 Coins
- Chomp Shell 60 Coins
- Happy Shirt 38 Coins
- Happy Pants 38 Coins
- Happy Cape 38 Coins
- Happy Shell 38 Coins
- B'tub Ring 145 Coins
- Mid Mushroom 20 Coins
- Maple Syrup 30 Coins
When you make it through, save your game, then try to get through this door. Bowser will come out and do the same thing the Snifit was doing. When you finally get into the main room, there's a new little task for you to take part in. You need to quickly speak to each one of the Snifits to get the various pieces of wedding gear, then after that you'll have to find the crown yourself. The crown is located on top of Booster's head. Jump up and get it then speak to him. You'll get a different scene depending on how fast you manage to do this. Once you complete that, there's a scene and...
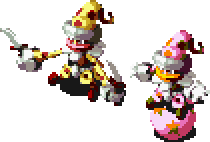
Boss: Bundt
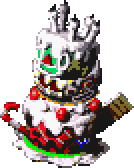
The fight starts off with you actually facing off against the two chefs, but since you are unable to damage them, your main target becomes the cake in the background. The more you hit this cake, the more it will begin to move and after 900 damage it will move so much that the chefs are scared off and the real battle begins. This form of the cake does not even have HP, it's based on the number of hits. Each hit you do will snuff out one of the candles, and each of the cake's turns it will restore either one or two of them.
With a three-man party this won't be too hard. However, don't underestimate the cake. The cake has a normal attack that is extremely difficult to defend against because it happens lightning fast. The next three attacks are absolutely brutal. The weakest of the three is Blizzard, which does moderate damage to your entire party. In the middle is the Sand Storm which probably does less damage than the Blizzard, but is far worse due to the fact that it inflicts an ailment on you to weaken all of your physical attacks.
Lastly, and bar far, the most powerful is the boss' Drain Beam, which really rips away at your party's HP totals with nearly 30 damage to everyone. That's not even the boss' most powerful attack. Lastly, we have the Diamond Saw, which is only manageable because it only hits one person. The diamond blades will hit one character for a very large amount of damage, so much so that if you want to avoid losing anyone in this battle, you're going to have to make sure they stay healed at almost all times during the fight.
Like I said before, your attack pattern for the first part of the boss doesn't really matter much since it's mostly based on the number of hits. For the second part of the boss, however, Mario, equipped with the Masher, Amulet and under the influence of a Geno Boost, can easily deal over 200 damage with a single Timed Hit. Considering the boss only has 600 life in this form, it should end soon.
Now it's time to return to the Mushroom Kingdom. When you leave Marrymore that will happen automatically and scene occurs when you arrive at the castle. After meeting with the chancellor, leave the kingdom and head for Tadpole Pond. Speak with Frogfucius, who tells you that a large star has been spotted up on Star Hill. That becomes your next destination, just past Marrymore.
Note: Some people get stuck here. To trigger the event where Frogfucius tells you about the large star he spotted, you need to have given him the 'Cricket Pie'. If you didn't do this, make sure to collect the pie from the shopkeeper in the Mushroom Kingdom.
Star Hill
Map
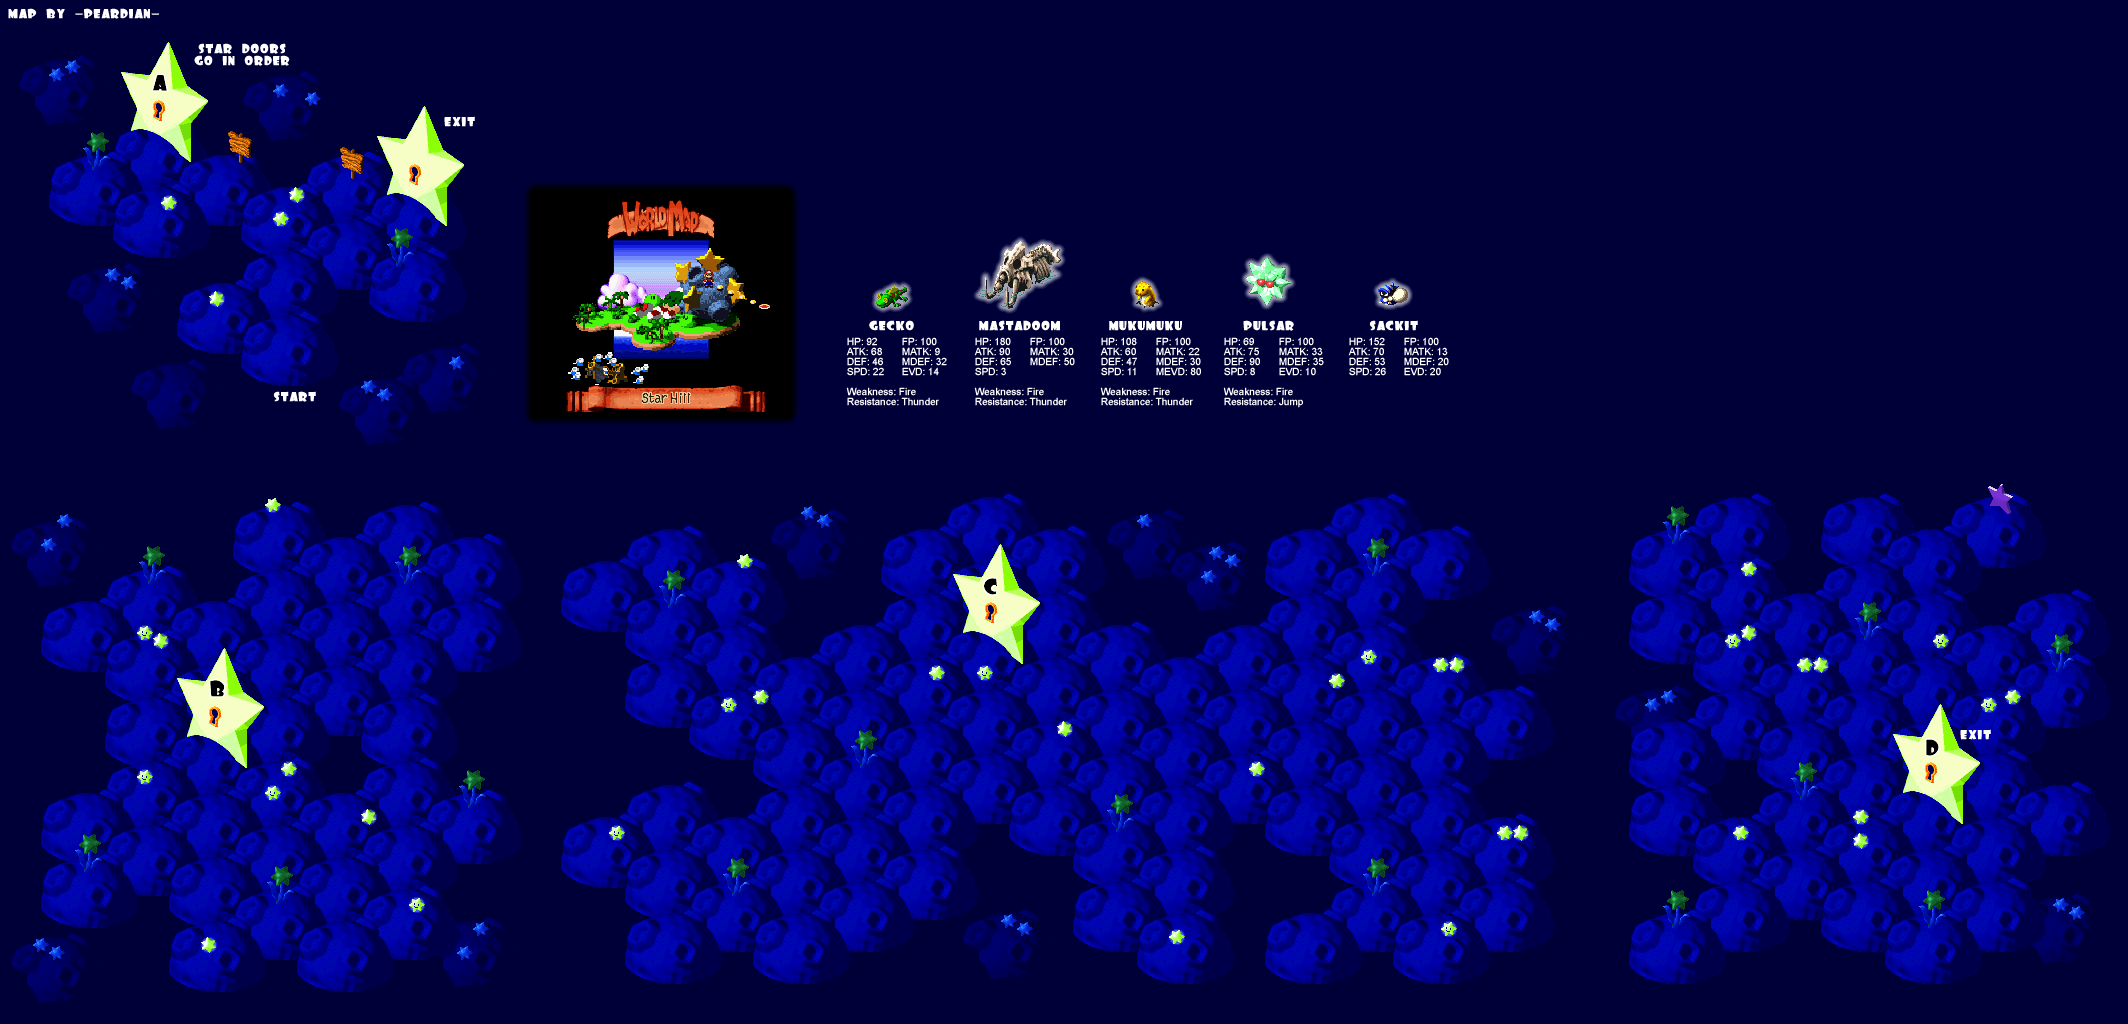 192 KB
Star hill is an interesting place indeed, examining the flowers will open the gates to other parts of the hill. Examine the flower on the left and go through that gate. You'll find a flower right in front of you on the other side of the gate, then another one on your left. Check the top left corner for a third and then head right for a fourth. The final one is in the lower right corner.
You may have noticed a bunch of stars on the ground with smiley faces on them. Examine these stars to read some people's wishes. Nothing really comes of it but they can be quite entertaining. A couple of them actually trigger scenes with your party. Proceed through the now open gate to the next area.
Head down and left to find the first flower and then up and left from there for the second. Along the lower part of this area, you'll find one in the middle and one at the lower right as well. Check the upper right corner for the fifth one that opens the gate. In this next area, there's one on your left and another in the lower left corner. Check the lower middle, upper right and then a little left of that one. Somewhere around this point, you should spot the star at the top, enjoy the only star in the game you get to pick up without fighting a boss. Finally, examine the flower at the upper left corner to open up the gate and take you right out of Star Hill and to Seaside Town.
Seaside Town
Map
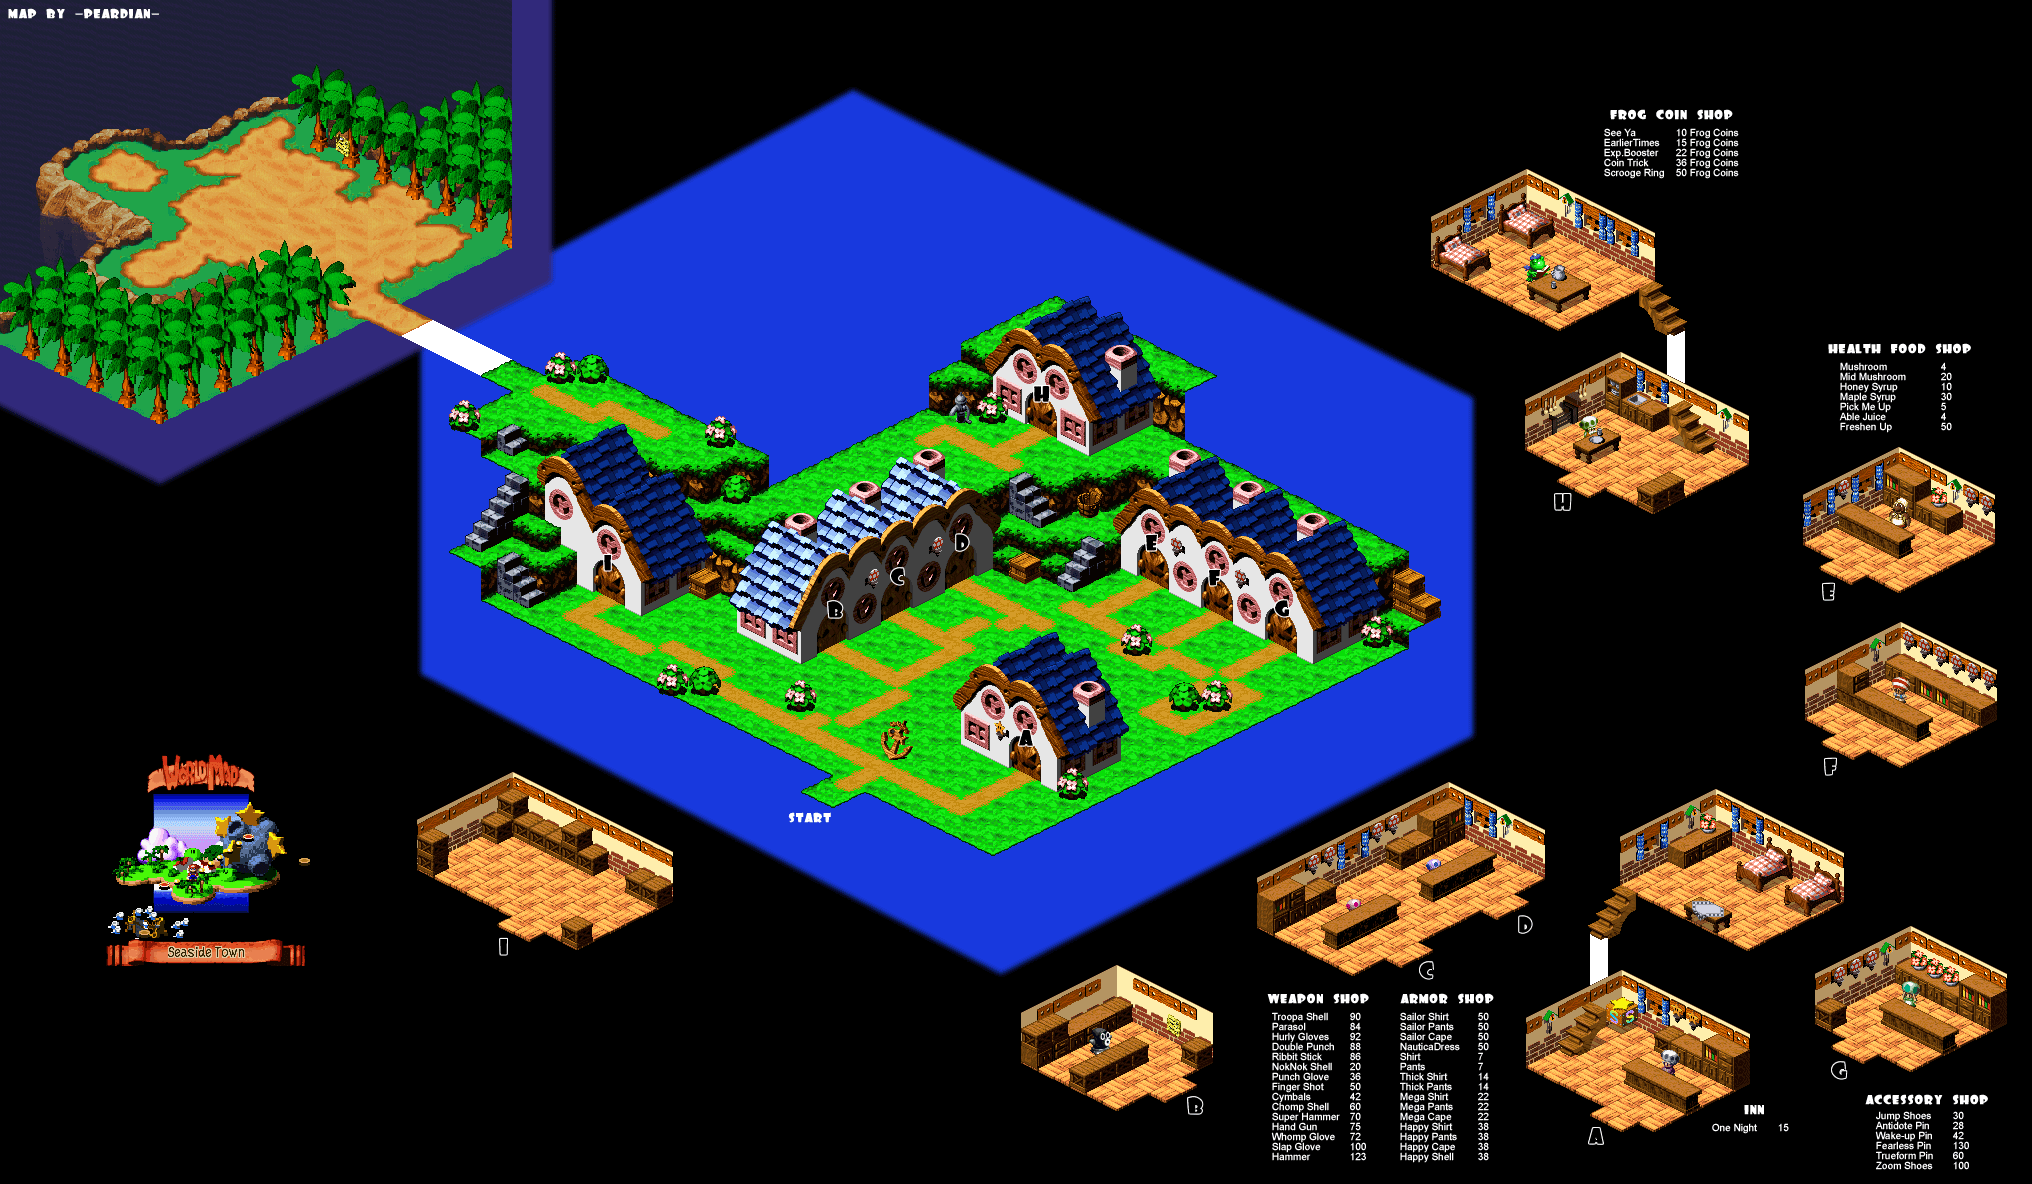 203 KB
Item Shop
- See Ya 10 Frog Coins
- EarlierTimes 15 Frog Coins
- Exp. Booster 22 Frog Coins
- Coin Trick 36 Frog Coins
- Scrooge Ring 50 Frog Coins
The only thing you really need to do here is go into the town and head to the house in the upper corner. This is the Elder's house and when you speak with him, he'll ask you to go and retrieve the star for him. Before leaving and doing so head upstairs and speak to the large frog which just happens to be sitting there, he has opened up a Frog Coin shop and sells some of the best accessories in the game, but it's doubtful that you can afford any of them at this point. When you leave Seaside Town, you'll find that a new area is open after talking to the Elder head for the Sea.
Sea
Items
- Max Mushroom
- Flower
- Frog Coin
Map
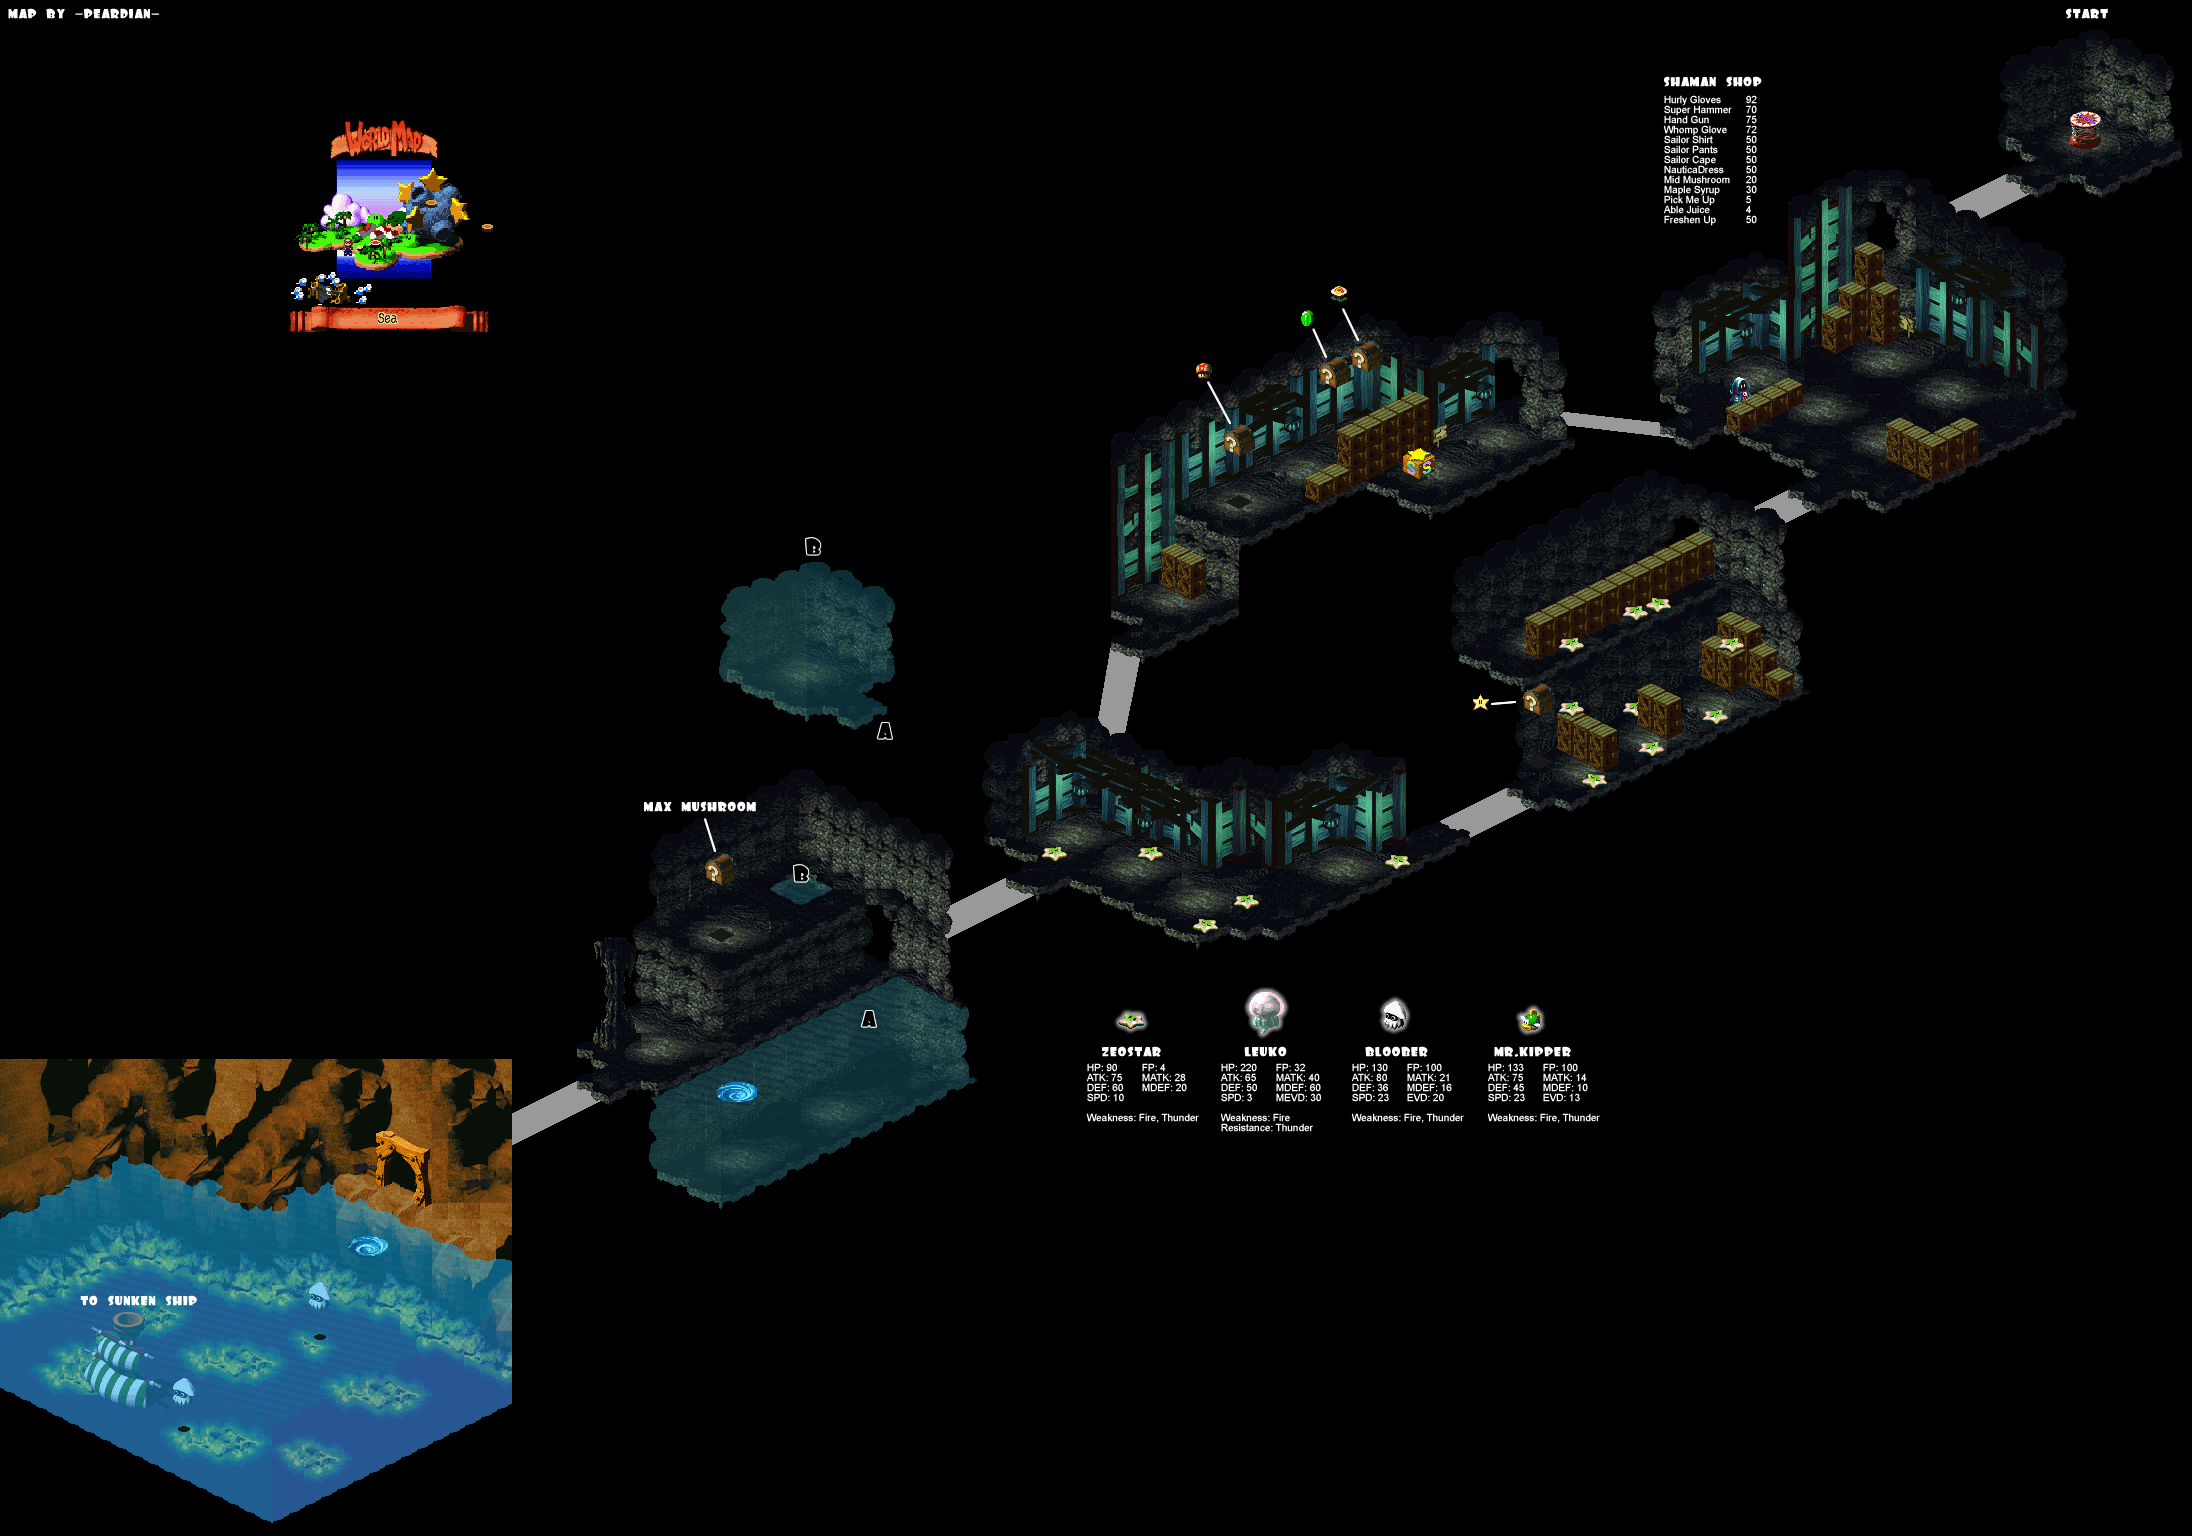 270 KB
Just down from the room you start in there's a cloaked figure. It could be mistaken for an enemy, but he actually runs a fairly decent shop. Through the lower door you'll find something rather appealing. Notice all the enemies in this area, well it just so happens that in that chest it is a star. Go nuts! This should lead you just about to an area with a large body of water (still inside the cave).
Jump right and into the pool, then swim into the whirlpool so it brings you to the bottom. Head to the door on the upper right side and jump out to find a chest with a 'Max Mushroom' inside. Turn around and go back toward the shopkeeper but this time via the left route, you'll find three chests, one heals you fully and the other two contain a 'Flower' and a 'Frog Coin.' Make your way down and left to reach an outdoor area. Have one of the whirlpools suck you down from the bottom and from there jump up on top of the pipe that leads down to the ship.
Sunken Ship
Items
- Flower
- Royal Syrup
- Mushroom
- KerokeroCola
- Frog Coin (x6)
- Safety Badge
- Safety Ring
Map
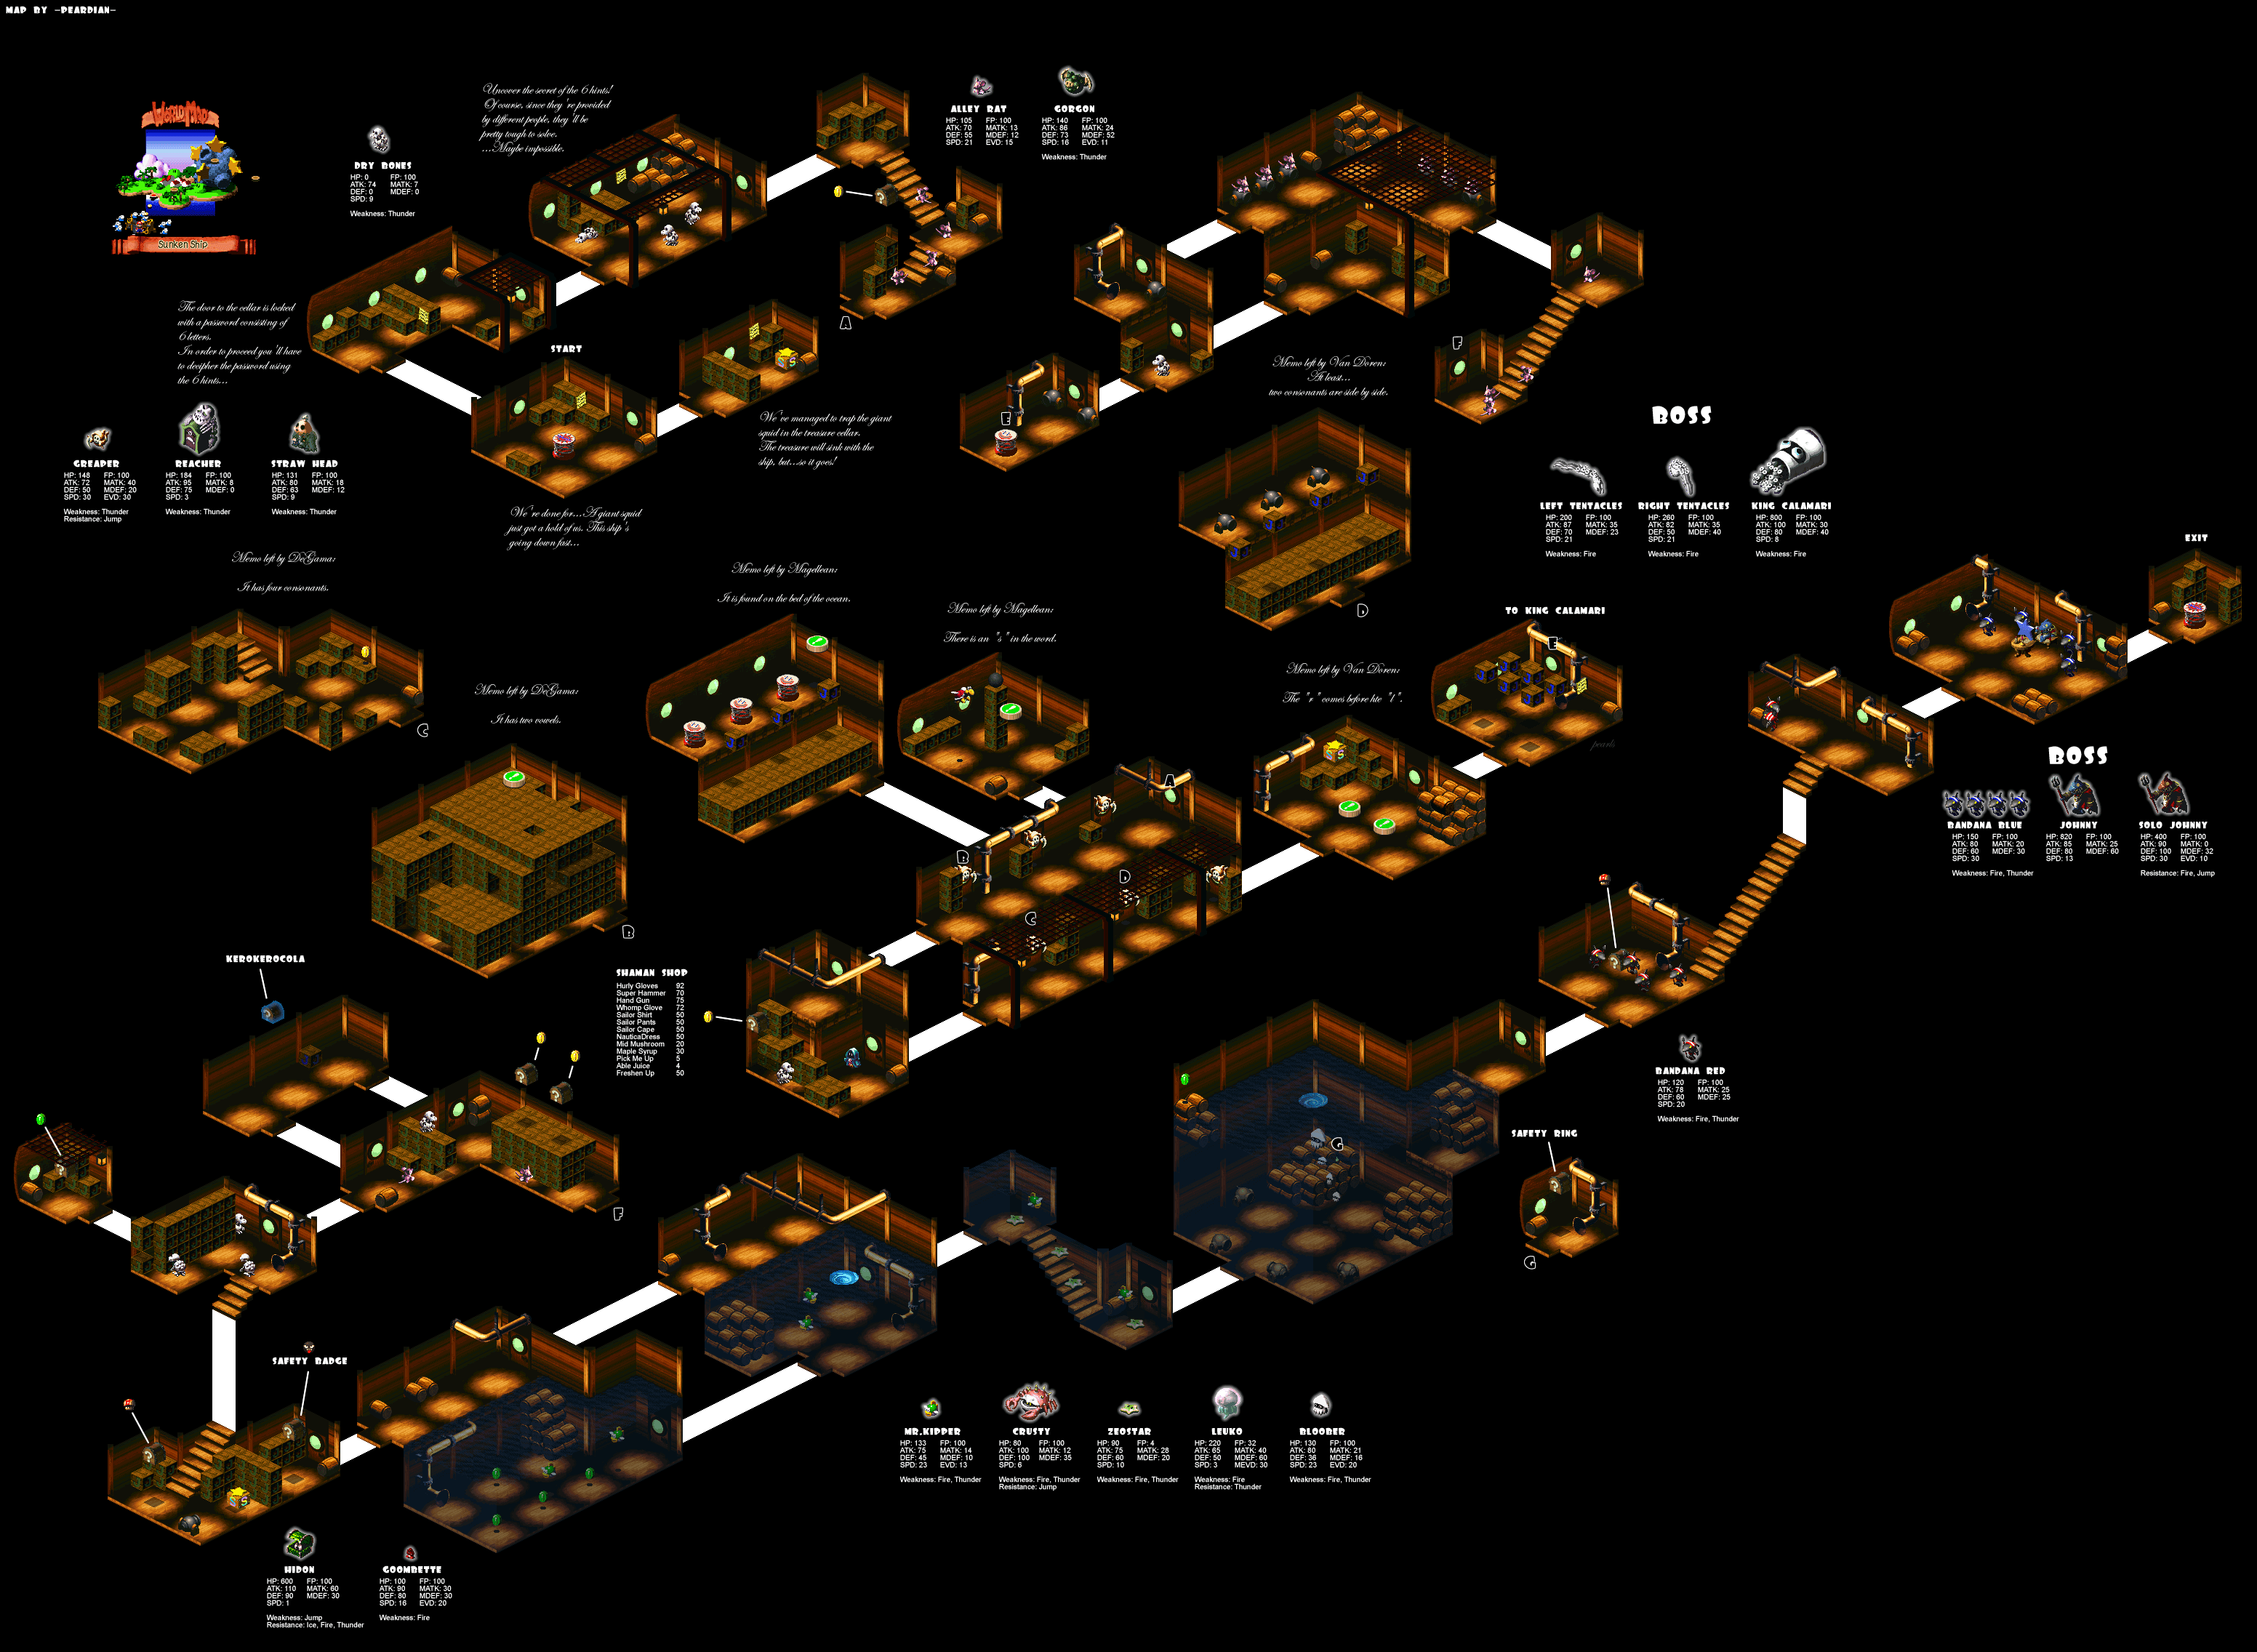 579 KB
When you land, the room on your right has a save point in it, that's good to use. Head left through the next couple of rooms to a large staircase with a bunch of rats on it. Descend this staircase and keep hitting the chest at the bottom for a bunch of Coins. The next room has a number of doors blocked by enemies but it's actually quite easy to sneak in behind them without touching them. Enter the first room. The troopa that is flying around in this area flies above your head and stays that way. In order to knock the heavy ball down onto the button, you need to run to the top of the room and position yourself on the opposite side so the troopa knocks it down in that direction. When it is hit, you get a full healing mushroom and a clue “There is an "s" in the word.”
The puzzle in the next room has you hitting three switches in order to stop three springs. For the far left, one hit it when the spring is close to the right, same with the middle and for the far right switch, hit it when the spring is close to the middle. A 'Flower' drops and a clue that says “It is found on the bed of the ocean.”
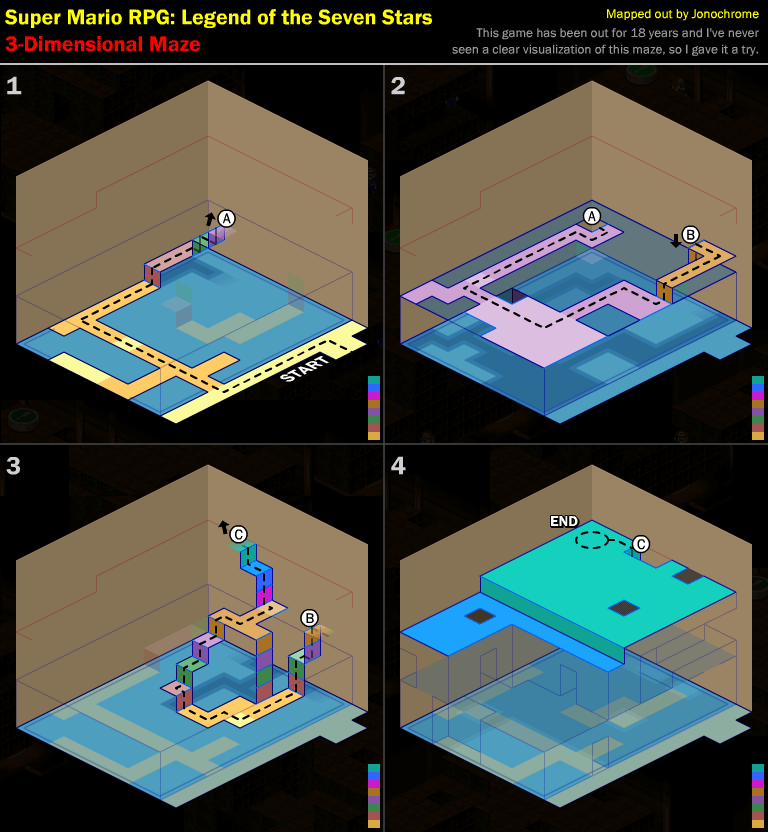 How to navigate the
three-dimensional maze
For the next room, you'll have to navigate a three-dimensional maze. It's rather difficult. If you get stuck, you can press the menu button to give up. At the top you get a 'Royal Syrup' and a clue: “It has two vowels.”
Item Shop
- Hurly Gloves 92 Coins
- Super Hammer 70 Coins
- Hand Gun 75 Coins
- Whomp Glove 72 Coins
- Sailor Shirt 50 Coins
- Sailor Pants 50 Coins
- Sailor Cape 50 Coins
- NauticaDress 50 Coins
- Mid Mushroom 20 Coins
- Maple Syrup 30 Coins
- Pick Me Up 5 Coins
- Able Juice 4 Coins
- Freshen Up 50 Coins
Continue down and in the next room battle the bone monster so you can reach the chest at the back containing a bunch of Coins. In case you haven't figured out how to defeat those bone monsters yet, simply cast a magic spell and they'll be toast. The guy here runs the same shop as he did back in the sea.
There are three more puzzle rooms coming up. The first is a trail of coins. You must pick up every coin after they appear but before they disappear. You must also avoid getting the moving coin or it will stop the trail. Pick up all of them and you will get the money value along with another clue that says “There are four consonants.” For the fifth puzzle, you have to hit the low switch on the right, which will make the cannon fire. Now knock the cannonball up to the second switch, then keep doing that all the way to the end. For this you get a 'Mushroom' and the clue “At least... two consonants are side by side.”
For the final puzzle in the save point room, jump on the barrels on the right side and knock one of them down. Keep jumping on it to roll it onto the switch, then jump on the other one yourself. There's a full healing mushroom that falls and the final clue “The "r" comes before the "l".” Save your game and head through the door. When you stand in the shadow of each one, it will tell you which letter it's on. It also tells you which key letter it is, so you know the order to go on. For those who wish to try to figure it out themselves, they should not read any further than this sentence (I remember figuring it out myself when I was like ten years old... c'mon... you can do it.) Anyway, the correct answer is “Pearls.” Be prepared to fight a boss.
Boss: King Calamari
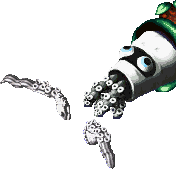
For the first part of this fight, you will simply be fighting three tentacles. The tentacles have two hundred HP a piece and have two attacks. The first is a blockable physical attack that does a decent amount of damage to single character and actually does get dangerous since you'll be feeling it about three times per turn. The second attack is when the tentacles actually grab a character and take them out of the battle. Fortunately, they are rarely gone more than a turn or two, even so it doesn't take more than that to kill a tentacle, anyway. Have Mallow use his magic if he's in your party, everyone else should just attack.
Following this is the exact same battle a second time against another three tentacles. In the third part of the battle, you actually face the owner of all those tentacles (along with another two tentacles as well.) The boss has some nasty attacks, his physical will do more than 40 damage to almost any member of your party. The boss also has a nasty habit of inflicting some status ailments on your party, which is made worse since people kidnapped by tentacles are already weakened.
One thing, however, that this boss comes up short in, is group attacks. Pretty much everything only targets a single member, which will make things a lot easier for Mallow to use HP Rain or for anyone else to use items and such. Damage wise, the boss has some pretty good physical defense, so you may want to consider other alternatives. Mario's Super Flame is actually quite effective here. Use that a few times for a guaranteed win here.
When you're dropped down, go into the next room and jump up to the higher door. You need to get past these cannons to reach the door on the other side, but if you're hit by a cannon ball, it will knock you down below and you'll have to try again. Sure, you can jump across the top of them, but that would mean fighting a bunch of rats. Head down the stairs to the next room. You'll find yourself looking at two chests floating above you, but you can't jump up that high. Run around to the other side, stand on the barrels near the door and jump from there. The two chests contain a bunch of Coins.
Go through the door to find your mirror self. It's actually quite easy to get by him. The trick is that he doesn't know how to do a running jump. If you hit the jump button while moving your image won't jump, so you can get over his head. Before you go though, stand exactly in the middle between the two exits along the wall on the same side as the exits and jump to reveal a chest. You'll need to jump on the image's head to get this one containing a 'KerokeroCola.'
Continue through the lower door and into the next room. The bone enemy is guarding a hidden path behind the boxes leading to a door. There's a small room here and a single chest with a 'Frog Coin' inside. Go down the stairs and get the full healing mushroom from the chest. Jump up the boxes and onto the other side after saving your game, this chest here is evil and will attack you! This chest is actually harder than most bosses, but there's a trick. Use Mario's Super Jump and you should be able to deal more than 300 damage with a good twelve jumps or so. For defeating the monster, you get a 'Safety Badge.'
Head two rooms up and use the whirlpool in the water. Go down from here to find a nice four 'Frog Coin's on the ground underwater. Return to the previous room and go up. Descend the stairs here and at the bottom in the large area with the squid swimming around, head to the upper left corner behind all the barrels, there is a hidden door. Through it you will find a 'Safety Rin' in the chest. Jump up the right side but before going in this door swim across the top of the water to the left and grab the 'Frog Coin.' Head through the upper right door and defeat the four enemies that attack you, then heal yourself with the mushroom in the chest. There's a bunch more of them to fight at the top of the stairs as well. Then there's the boss.
Boss: Johnny
For the first part of the battle, you'll be fighting against Johnny and four Bandana Blues. If you've got Mallow in your party, you can really clean up with his basic Thunderbolt spell here, otherwise just pick them off one by one (yes, it is worth it to pick them off.) None of them, including Johnny, really use anything besides single character physical attacks so those people who are good with defend button timing should find this battle much easier than those who aren't.
Once you've dealt enough damage, Johnny will use the Get Tough ability and the next battle will actually be quite hard. Johnny doesn't have much health, but his physical defense at this point is absolutely incredible and some of his attacks are deadly. Most everything will probably deal less than ten damage but then he'll use his Diamond Saw, which deals almost 40.
Special attacks are almost as useless as normal attacks, if you're really good with Super Jump it'll probably work better than a normal attack, but unless you can get more than 15 hits, each time you might as well just cycle between attack, attack, Mid Mushroom, attack, attack, Mid Mushroom over and over again. It gets boring, but you'll win for sure.
Once you're got the fifth star, you can use the trampoline in the room at the back to bounce you back onto the world map again. Your next destination is Seaside Town. Hopefully you're prepared for yet another boss fight.
Return to Seaside Town
Items
- Shed Key
- Flower Jar
Map
203 KB
Upon entering Seaside Town, you'll be forced to hand over the star. Don't bother declining, it will just loop the choice.
If you're ready to take on the boss, then head left. There's a path leading out.
Boss: Yaridovich
Devastating. That's a good word to describe some of this boss's attacks. Why don't we start off with what is by far the most dangerous of all the attacks, the Water Blast. The Water Blast will completely wipe your party if you aren't adequately prepared. A huge blast of water (go figure) hits your party for upwards of 50 damage per person. It's going to take some serious manpower to recover from these. With each turn just hope the boss uses one of his other single-party hit attacks, since that's what all the rest are.
Willow Wisp will hit a single member for more damage than the Water Blast, but at least it's just a single person. The Flame Stone will hit a single person for about the same damage as Water Blast. The last two attacks are Pierce, in which he uses his head to spear you, and a glowing orb attack. Both of these can be defended against which is good since un-defended they can deal with more than 100 damage in a single hit.
Lastly, we look at his unique attack, the Mirage Attack. With this attack, the boss will split into two forms. One of these is the real boss while the other is fake. You can tell the difference quickly. The real boss has far more physical defense than the fake one. Hence, while it might be appealing to do 170 damage per hit, you're probably aiming at the fake boss and you should redirect your attack. Eventually they will join once again and then it's just a matter of hitting the boss until he goes down.
Despite a strong physical resistance, his magic resistance is even higher. Spell's like Mallow Shocker work decently, but forget Super Jump and Super Flame. They're quite useless. Remember to use Geno Boost if you have that available, just hit physically and keep healing.
When the boss has been defeated, grab the 'Shed Key' and use it to unlock the door of the large house in Seaside Town and let the people out. The Elder will reward you with a 'Flower Jar.' Now you're free to explore the town and check out the shops. Your primary task is to speak with the Elder, which opens a path on the world map to Land's End. Make that your next destination.
Weapon Shop
- Troopa Shell 90 Coins
- Parasol 84 Coins
- Hurly Gloves 92 Coins
- Double Punch 88 Coins
- Ribbit Stick 86 Coins
- NokNok Shell 20 Coins
- Punch Glove 36 Coins
- Finger Shot 50 Coins
- Cymbals 42 Coins
- Chomp Shell 60 Coins
- Super Hammer 70 Coins
- Hand Gun 75 Coins
- Whomp Glove 72 Coins
- Slap Glove 100 Coins
- Hammer 123 Coins
Armor Shop
- Sailor Shirt 50 Coins
- Sailor Pants 50 Coins
- Sailor Cape 50 Coins
- NauticaDress 50 Coins
- Shirt 7 Coins
- Pants 7 Coins
- Thick Shirt 14 Coins
- Thick Pants 14 Coins
- Mega Shirt 22 Coins
- Mega Pants 22 Coins
- Mega Cape 22 Coins
- Happy Shirt 38 Coins
- Happy Pants 38 Coins
- Happy Cape 38 Coins
- Happy Shell 38 Coins
Health Food
- Mushroom 4 Coins
- Mid Mushroom 20 Coins
- Honey Syrup 10 Coins
- Maple Syrup 30 Coins
- Pick Me Up 5 Coins
- Able Juice 4 Coins
- Freshen Up 50 Coins
Accessory Shop
- Jump Shoes 30 Coins
- Antidote Pin 28 Coins
- Wake Up Pin 42 Coins
- Fearless Pin 130 Coins
- Trueform Pin 60 Coins
- Zoom Shoes 100 Coins
Land's End
Items
- Red Essence
- Kerokerocola
- Frog Coin (x4)
- Max Mushroom
Map
 705 KB
Jump into the cannon at the beginning and use it to fire yourself up onto the platform. The cannon on the next screen has to fire you quite far. In order to maximize your distance, hit the jump button while the cannon is moving from the mid position to the position you're aiming for, as is it was flinging you along with firing you. Upon landing in the hole, you'll knock three enemies out. Jump out of the hole back in the direction of the cannon and jump. This should reveal a hidden yellow platform.
Hop down and get back into the cannon to fire yourself up onto this platform. When you get onto it, the platform will move and allow you to jump and hit a chest containing 'Frog Coin.' Continue into the next area. You need to jump across here with all the enemies flying at you. If you fall, then the only way to get back is to go down to the bottom and use the cannon that you find there.
On the next screen you'll find a spinning flower. Ignore it for now and head right. There's a path connecting to an area where you'll find a large hole in the side of the wall. A puff of smoke pops out of this every once in a while. Jump when this smoke puff appears and it will drop you down into a cave. After the first lizard there's a chest above you containing 'Frog Coin.'
Follow the linear path through past a barrel you knock down and get the full healing mushroom before you jump onto the trampoline. The trampoline brings you back to the Kero Sewers. Be careful not to fall! Jump across those arches on the left and hit the chest to get 'Cricket Jam.'
Now return all the way back to that one part in Land's End where you went past the spinning flower. This time use it to jump up. If you wish to challenge the Sky Bridge, you can speak to the man here. Jumping across the bridge normally you can't fall, but for the course you can. The best possible prize you can win is four Frog Coins by doing the expert course and doubling your winnings every time.
Continue on from the other side of the bridge and save your game when you land beside the two whirlsands. To get through this area, take the exit on the right. One of the whirl sands has an enemy in it. You need to defeat this enemy and then immediately jump into the whirls sand he was occupying before it spins around and you lose it. Do this about three times until you see an exit path at the top leading to a large cliff.
Speak to the rat and leave again. Fight the enemy in the whirls sand and and go through to reach a save point in a cave. Right below you is a chest containing a star. You can really go nuts with this one. After jumping down the large hole into a pit of lizards, your star has probably run out by now.
Above you, hidden behind the crates, is a shadowy figure who will sell you another star for 400 Coins which is most definitely worth it. Go in an up and down kind of S pattern and you should be able to get all of them without too much trouble. Continue on into the Belome Temple.
Belome Temple
Items
- Temple Key
- Frog Coin (x11)
- Flower (x4)
- Royal Syrup
- Max Mushroom
- Fire Bomb
Map
 204 KB
The man on the trampoline will allow you to use it and return to the world map if you wish, for a mere 100 Coins. Get the chest in the next room and give the man 50 Coins to have your fortune told. After jumping to hit the three faces, use the brick platform to get up higher and keep going until you reach another of these faces, picking up all the treasure chests along the way. Jump in the face and wait for the fortune “Mmm I'm so hungry, I wish I had something to eat” then ride the elevator down. If this isn't the fortune you get, leave the room and try again. Now ride the elevator to the bottom.
Boss: Belome
Time to fight another familiar face. Belome has gotten a lot nastier, with a few more tricks up his sleeve. Let's start with his basic attacks. He only really seems to have two of them, but they can get a bit ugly. The tongue attack isn't really a problem. Time it right and you can usually defend against the majority of the damage.
The second is the much uglier of the two. The Aurora Flash does pretty minimal damage to your entire party, but it also puts them to sleep. At least one person, if not your entire party, should be equipped with the Wake Up Pin to prevent this ailment.
Lastly, we have Belome's unique ability. No longer does he eat one of your characters and remove them from the battle. Instead he eats them temporarily and then produces a clone of whichever character he just ate! The clones have roughly somewhere between 100 and 200 HP. They also have mostly enemy attacks, not the attacks they have while in your party. Mallow, for example, will do little else besides Static E. Focus all your attacks on Belome and ignore the clones!
The battle does not end when Belome is gone. You still need to eliminate the clones as well, but if you kill them first, you risk Belome just making more and more of them. Physical attacks are as effective as always. Mario's Super Jump will actually put quite a dent in this boss, so I recommend that ability.
Use the large button to open the path to the tube leading to Monstro Town! When you arrive, ignore everything for the moment and head into the door right below that key up on the ledge above. Speak to the blue stomping thing a total of seven times and leave the house. This should have knocked the key down. Pick up it to get the 'Temple Key' and use the trampoline to return to Belome's Temple.
Head back to where you got the second fortune and jump at it until it reads “Sorry, I'm not accepting visitors past my bedtime.” Ride the ladder down and give the key to the guardian. You're now free to pick up the stash of eight 'Frog Coin,' four 'Flower,' 'Royal Syrup,' 'Max Mushroom,' 'Fire Bomb.' Now it's time to return to Monstro Town again.
Monstro Town
Items
- Frog Coin
Map
 133 KB
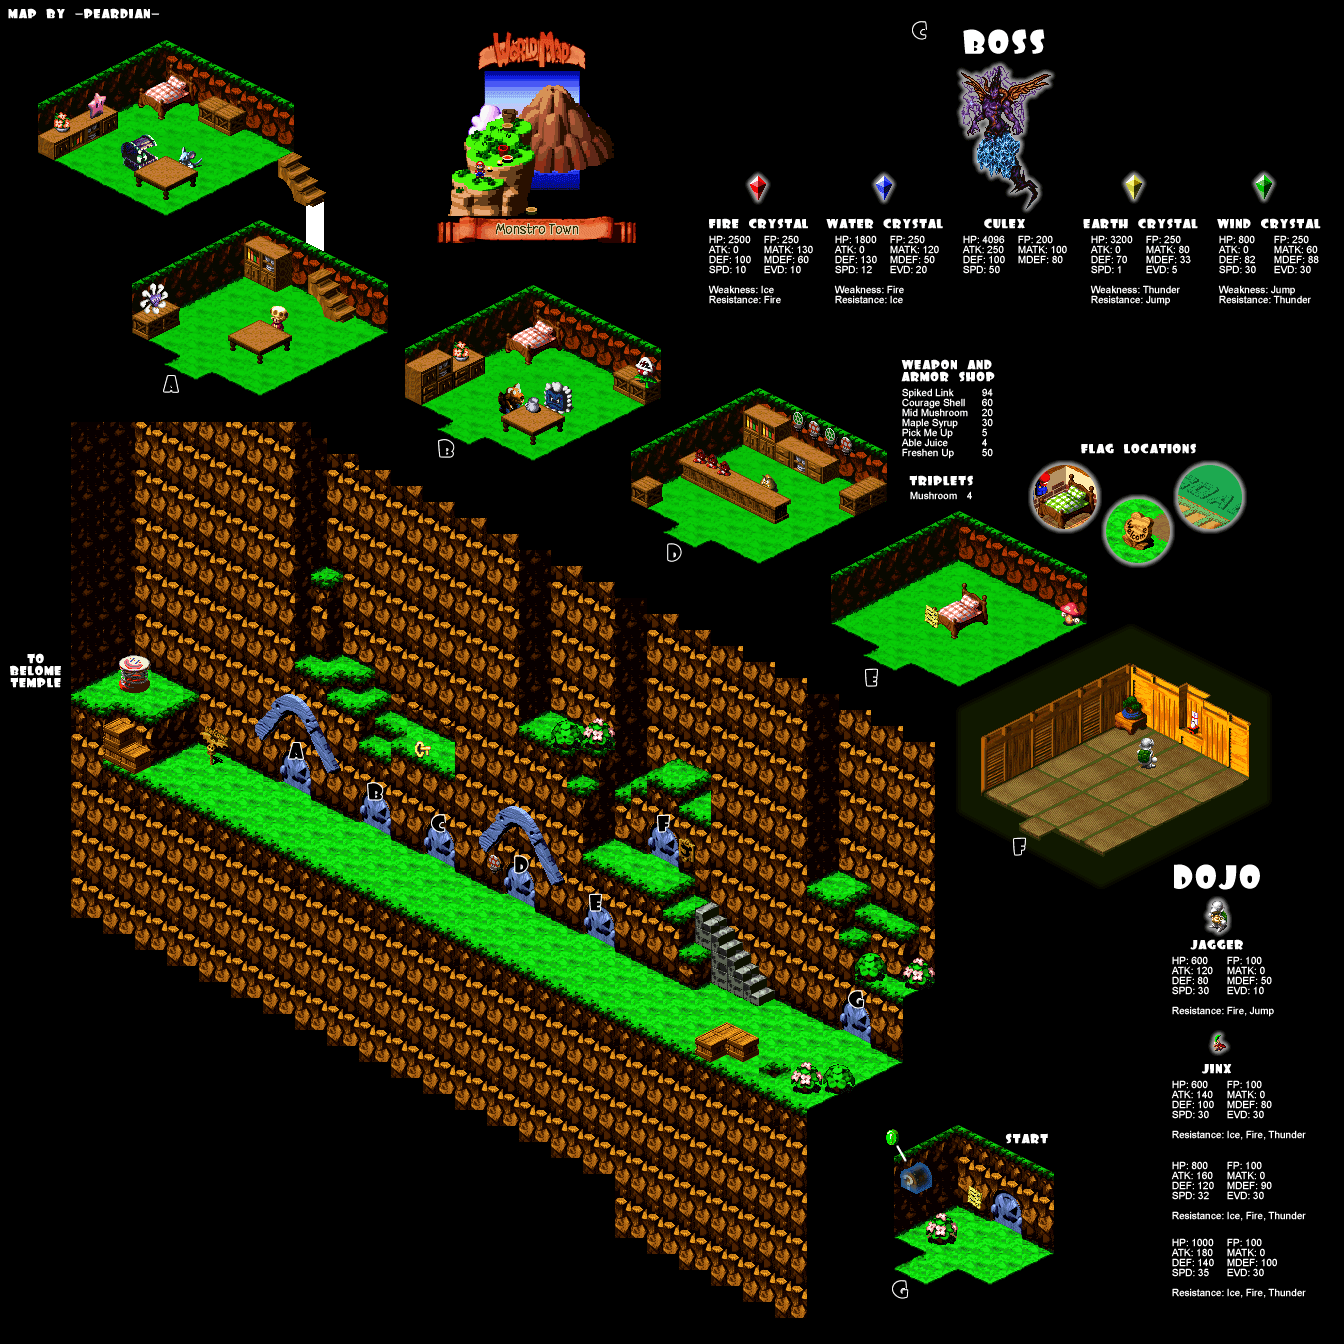
Start by going into the first house you pass and speaking to the person in here. Head upstairs and examine the star, then go and speak to them again. Once you've encountered the Troopas, your new destination becomes that large wall you came to back in Land's End, but while you're here, you might as well check everything out. The hardest optional boss, Culex, in the game is now available. There's a sealed door here, about the third one down. If you got the Shiny Stone back in Moleville you can open it. Inside you'll meet Culex. If you can beat this boss at this point in the game, there's something seriously wrong. Don't even try; you can come back later.
Item Shop
- Spiked Link 94 Coins
- CourageShell 60 Coins
- Mid Mushroom 20 Coins
- Maple Syrup 30 Coins
- Pick Me Up 5 Coins
- Able Juice 4 Coins
- Freshen Up 50 Coins
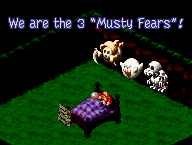
On the bottom of town in that hole is a save point if you need to use it. Check out the shop and then enter the house beside it. If you sleep in this bed, it will trigger an optional sidequest, The Three Musty Fears.
Take the furthest right door that leads to the exit of town, but without actually leaving in the little room behind the bush on the left jump to hit an invisible chest containing 'Frog Coin.' Now it's time to visit the Dojo which is at the top of the stairs, speak to the shelled warrior to do battle with him, the fight isn't particularly hard. After the battle, however, the master shows up and challenges you. Accept his challenge and prepare to fight.
Boss: Jinx (Round 1)
Jinx is a somewhat difficult enemy. His attacks basically revolve around the self titled Jinx attack and the Triple Kick. These attacks are fairly powerful, but the Jinx attack can be defended against as long as you hit the defend button just as you hit the ground. Jinx doesn't have any full party attacks, so you'll be able to heal your party one at a time. With only 600 HP you would think this fight would fly by, but Jinx has the most defense out of any enemy you've fought so far, and you'll be hard pressed to find a way to get past it.
Boss: Jinx (Round 2)
After defeating him once Jinx gets angry and challenges you again, this time around his defense is increased a bit and his HP is incresed to 800 but those are the least of your worries. You're going to want the Safety Ring equipped because of his new attack, Silver Bullet, which will instantaneously kill a party member without even any damage. He also has a new attack called Quicksilver, which doesn't do that much more damage than the others, but is pretty much impossible to defend against. When you have done more than 500 damage or so, Jinx will use Valor Up and his defense power will double, you'll need strong attacks to win this one.
Boss: Jinx (Round 3)
The final fight in this series where Jinx puts his reputation on the line is almost impossible to win at this point in the game. He's got 1000 HP and defense so high that your attack damage will range from about one to four. That's about it. Attacks like quicksilver now deal between 150 and 200 damage while his new attacks, Bombs Away was seen to do more than 400 damage in a single hit at one point. Fighting this guy now is like a license for a Game Over, but don't worry, you can come back again.
With all that taken care of, leave Monstro Town and return to Land's End. If you remember how to get to that part with the whirl sands and after going through about three of them, you'll reach the enormous wall. (It's actually probably faster to go back through the Belome Temple.) Use the backs of the Troopas to scale the large wall and reach the top, where you'll find yourself back on the world map once again.
Again, you can try the The Three Musty Fears and Culex side quests. I cover them below. Otherwise, head into Bean Valley next.
Side Quest: The Three Musty Fears
Items
- Dry Bones' Flag
- Greaper Flag
- Big Boo Flag
- Ghost MedalFrog Coin
To begin this side quest, you'll have to head to Monstro Town. In the house on the far right (not up the stairs) there is a bed you can sleep in if you turn out the light. During the night, you'll be visited by three spirits. Each of them will be hiding a flag around the world. You need to find them all.
- The first clue is “I hid my flag behind a wooden flower.”
- The second clue is “My flag's under a green bed.”
- The last is “You'll never guess my spot! It's between O and A.”
 The Three Musty Fears
Why don't we start with a green bed... hmm... head back to Mario's Pad, turns out that Mario himself has a green bed. Examine it to find 'Dry Bones' Flag.'
The next is behind a wooden flower. That's easy - head to Rose Town. There's a big wooden flower at the entrance which hides a 'Greaper Flag.'
Last, we have the difficult one, which isn't so difficult at all if your brain is ticking. Of course, it's not easier either. The answer is that it's at Yo'ster Isle. If this isn't helpful enough, remember the word GOAL has a large O and an A in it. Search between these letters to find 'Big Boo Flag.'
Return to Monstro Town and sleep in the bed again, during the night the ghosts will come visit you and in the morning you're wearing a 'Ghost Medal.'
Side Quest: Culex
To trigger the battle with Culex you must find the mole in his house in Moleville who will sell you FIreworks for 500 coins. Then outside his house, trade the Fireworks to a little girl for a Shiny Stone. In Monstro Town, use the Shiny Stone on the sealed door to find Culex.
This is a tough battle! Don't expect to be able to beat him at this point in the game. You need to come back later when you're stronger. At a minimum you'll want to wait until you reach level 20 with your three chosen combatants. This is about the level where you can feasibly take on Smithy and the final boss. Culex is harder to beat than Smithy.
Boss: Culex
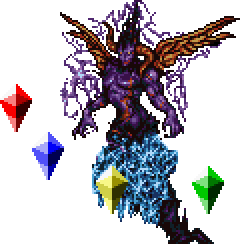
Culex is the hardest boss is Super Mario RPG no doubt, largely because of the little crystal helpers he has with him. Each crystal carries an element with it, meaning that using items like Fire Bomb and Ice Bomb forever aren't going to work since they'll always be keeping at least one crystal alive. Each crystal will use spells and abilities based on its own element. The blue crystal will use spells like Water Blast, which is a pretty powerful spell in itself.
Imagine powerful magic like this being used five times per turn. Ideally, you should come into this battle at level 30 for your entire party (although it's certainly not a requirement.) Your party should ideally consist of Mario, Toadstool, and either Bowser or Geno for the last character. Get as many Rock Candies as you can. They will really help shift the balance of power in this fight and have all the best equipment you have. The two Lazy Shells are an absolute must. Culex will not go down easy, you have to be patient.
Bean Valley
Items
- Flower (x4)
- Frog Coin (x2)
- Seed
- Rare Scarf
Map
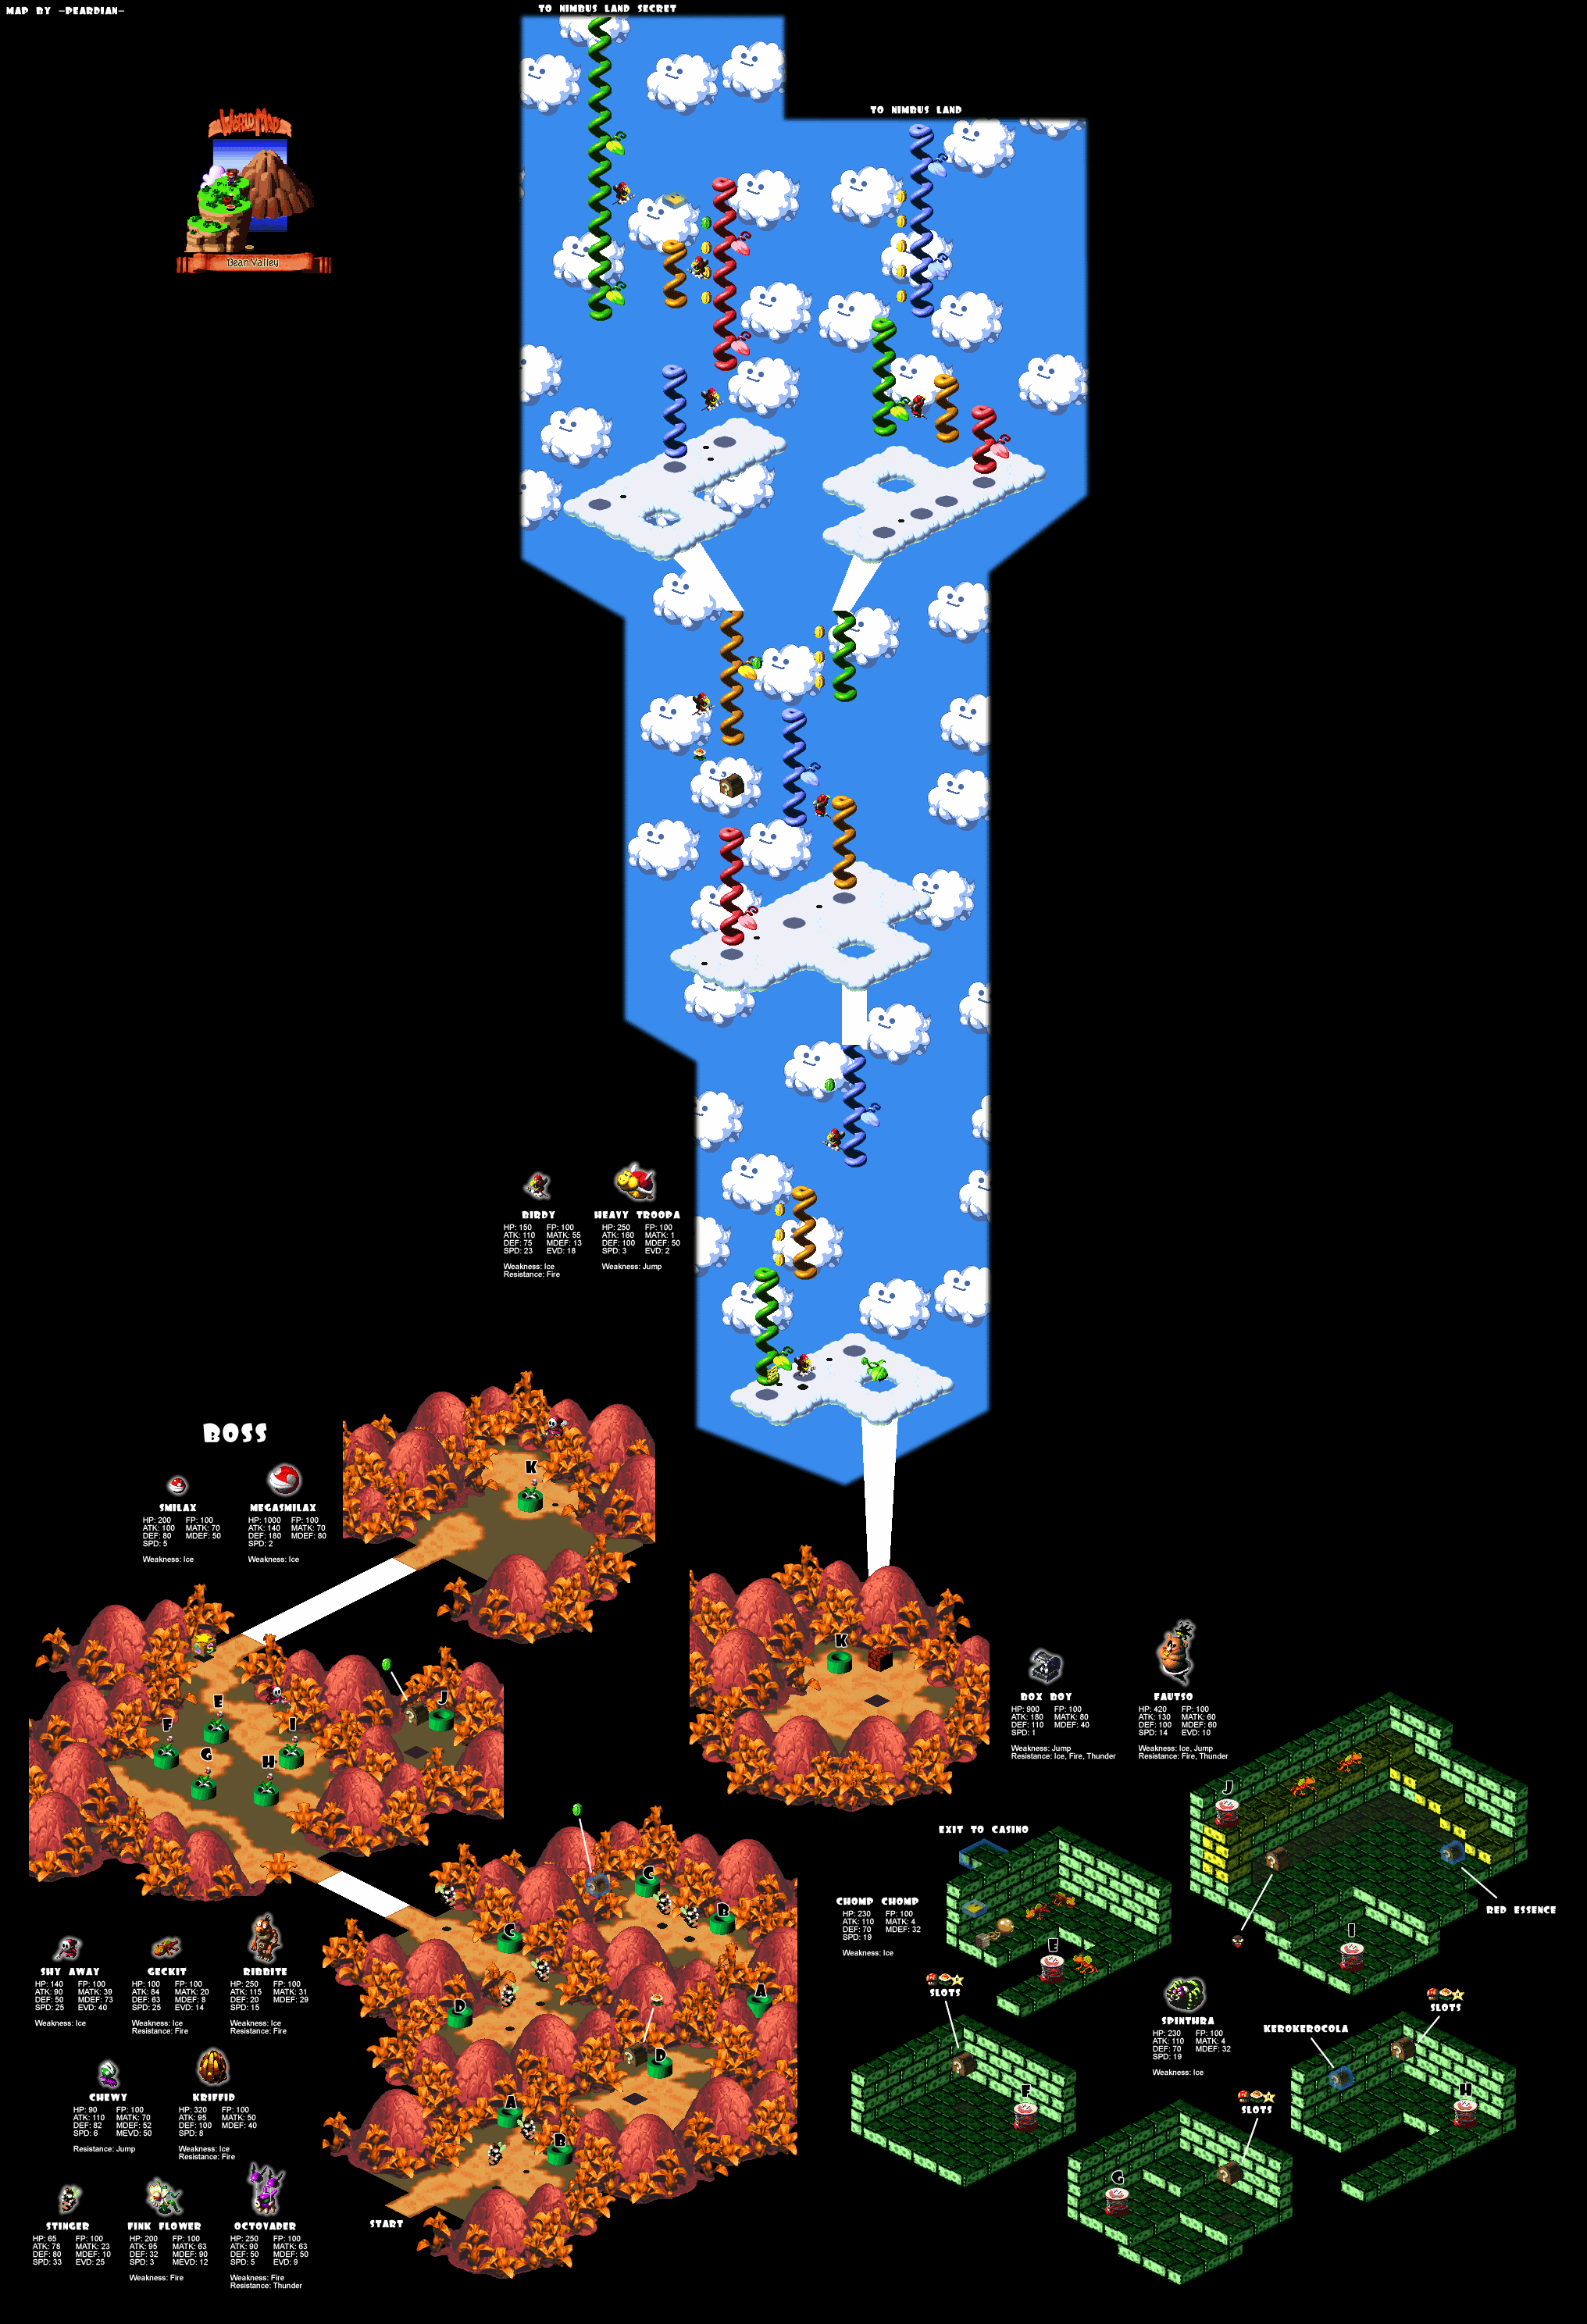 473 KB
Enter Bear Valley and drop down the pipe on the right. When you pop up, go down the pipe above you, then head down and through the pipe below. This will lead you to a chest containing a 'Flower.' Return to the previous screen and follow the path up. You'll find a total of five flowers here. Wait for them to be watered in order to attack. This will open up the tube entrance they're sitting on.
The far left one has a chest below with a kind of slot machine game, which is what they pretty much all have. The upper right one leads to a chest with an enemy inside that gives you no reward. Then, a trampoline at the top of the stairs takes you to a 'Frog Coin.' The upper left chest just drops you down to enemies. Save your game, then follow the path up. When you jump at this flower, be ready to fight a boss!
Boss: Megasmilax

This fight starts out easy enough against a simple 200 HP plant monster that can barely harm you. Simply use a couple of physical attacks to take this thing out. Afterward, the Shy Away comes in and does his watering to spawn two of the enemies you just fought. Two easy enemies don't make for a difficult fight, so once again take them out with ease. The same applies for the three of them.
Mallow's Snowy spell is quite effective at wiping the floor with these enemies. On the fourth run, the Shy Away adds some nutrients and creates one rather large flower. Megasmilax has quite a few abilities. His smaller form did not. First of all, the normal attack is quite powerful. Megasmilax also has the ability to use Flame Wall, but it's not his most powerful attack. The only thing that really makes Megasmilax dangerous at all is the Petal Blast which hits all of your party members for quite a bit of damage and turns them into Mushrooms.
As Mushrooms, they will gradually recover, but they won't be able to act while in this state. For this reason, the Trueform Pin is essential for this fight. Actually it's good for two reasons. Megasmilax also has the ability to use Scarecrow Dust so it will protect against that too. Most of the attacks that have been effective up to this point should work in this battle, so just keep at it.
After the Shy Away runs away, grab the package it drops to find a 'Seed.' Proceed through the tube and jump up to hit that brick floating in the air to sprout a beanstalk from it. Hit the block once more to climb it. Begin climbing the vines here and grabbing all the Coins along the way. When you reach a yellow and red vine, take the red vine to reach a 'Flower' and jump from there to the middle one.
Climb up and jump from the middle one left to the yellow one. Head up from here. Jump from the blue to the red to the yellow, and now you need to jump from the yellow to the green. It's extremely hard and near impossible but doable. If you can't do it, there's an alternate path if you head back down and go right. If you can do it you're rewarded with two chests, one contains a 'Frog Coin' and the other contains 'Rare Scarf.'
Further down is a couple of 'Flower's and it'll drop you beside a trampoline which jumps you up to where you would have landed if you took the sissy route... which you didn't. Jump on the second smiley face trampoline and it will bring you up to Nibus Land, home of the marshmallow people.
Nimbus Land
Items
- Feather
- Flower (x3)
- Frog Coin
- Castle Key 1
- Castle Key 2
- Fertilizer
- Lazy Shell (x2)
Map
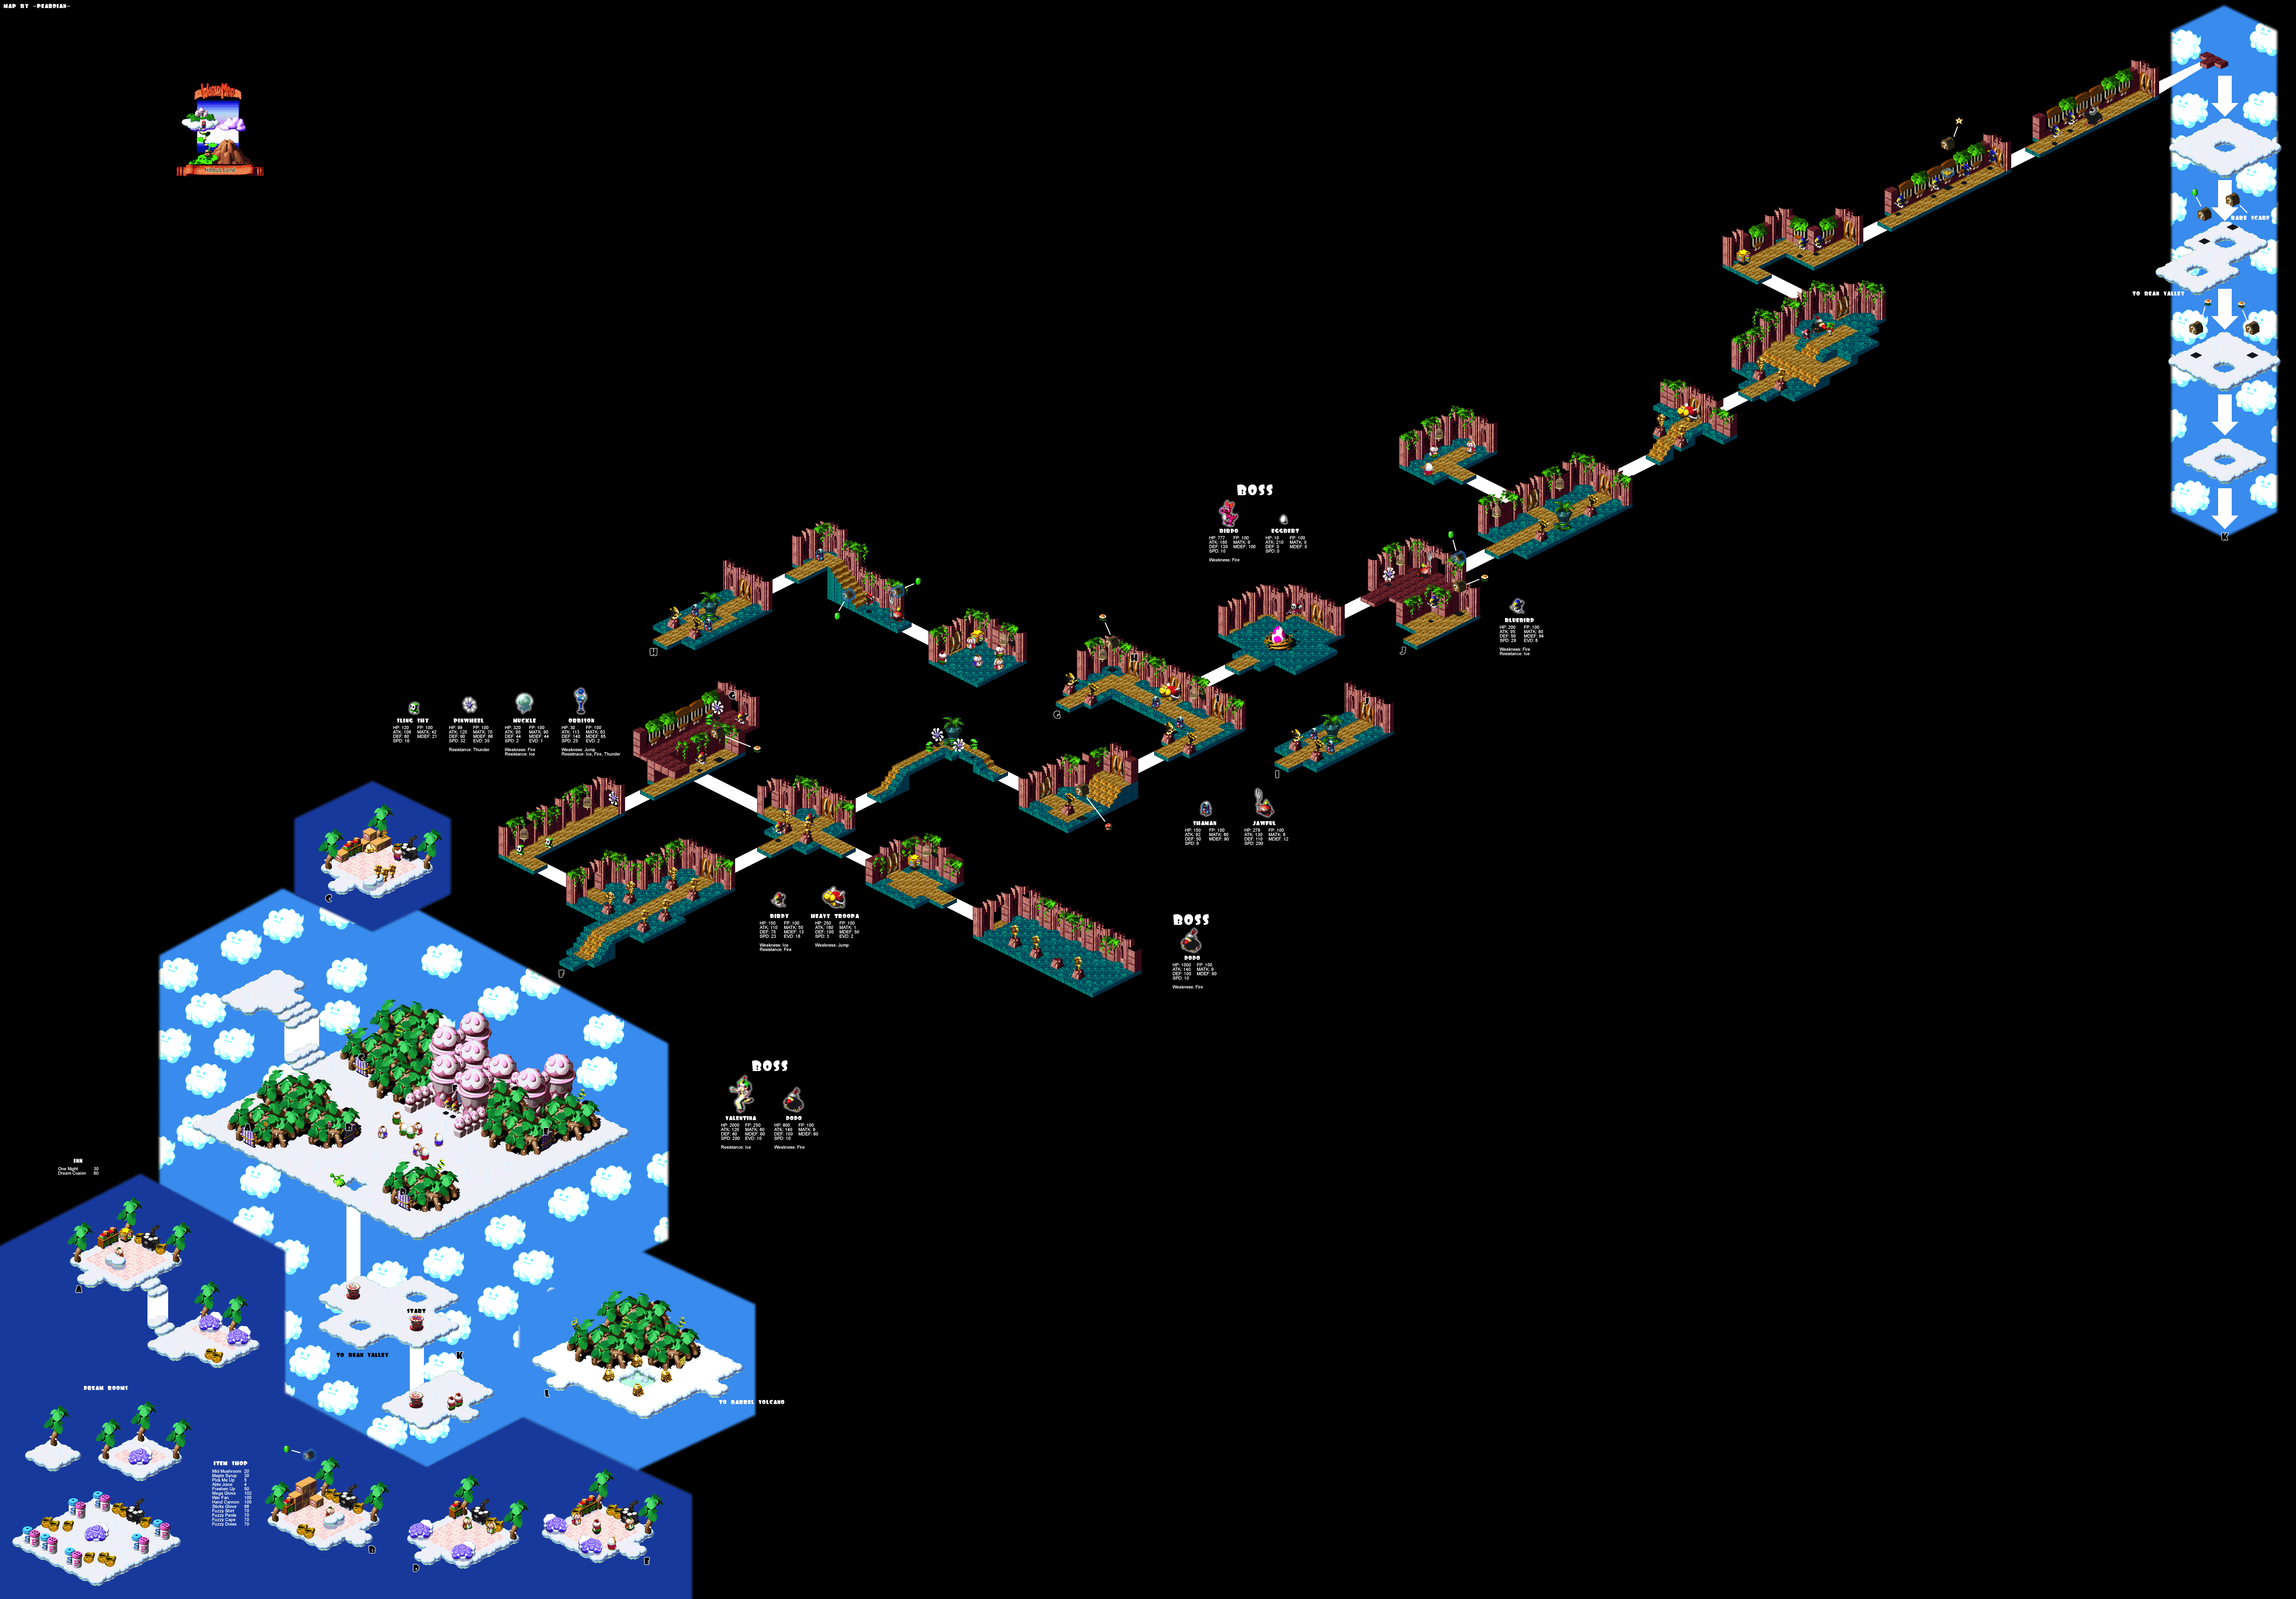 740 KB
After arriving at Nimbus Land and checking out the shops, head to the house at the top of town. Inside you'll find a golden statue which looks just like Mallow. Examine it to trigger another scene. When you're ready to continue, tell the statue maker you're ready and he'll bring you into the castle. When you have control again, leave the statue room and save your game. When you try to go through the door, you'll be forced back onto your pedestal.
Item Shop
- Mid Mushroom 20 Coins
- Maple Syrup 30 Coins
- Pick Me Up 5 Coins
- Able Juice 4 Coins
- Freshen Up 50 Coins
- Mega Glove 102 Coins
- War Fan 100 Coins
- Hand Cannon 105 Coins
- Sticky Glove 98 Coins
- Fuzzy Shirt 70 Coins
- Fuzzy Pants 70 Coins
- Fuzzy Cape 70 Coins
- Fuzzy Dress 70 Coins
And then, Dodo comes into the room and starts pecking at the statues. When he moves his head back, he's about to peck. If he's standing in front of you, this is your cue to jump. Don't jump too early though or he will see you! You get two chances so you can be caught once. Getting through the whole thing successfully gets you a 'Feather' in the next room. After the enemies run off, take the upper left path out of here.
Drop down and get the chest containing 'Flower.' From here, follow the path out to the front hall of the castle and up again to get back where you started. Once again, go through the upper left door but don't drop down this time. When you reach the next screen, get the chest at the top containing 'Flower' then head through the door on the right to find another 'Flower' in a chest. Leave here and return to the hall with three doors.
A large Troopa is guarding one of the doors. Take the lower right exit going down and get the full healing mushroom from the chest. Back up once again take the far left door going up. Two rooms from here, you'll find a little vegetable man using his fork. Exactly where his fork penetrates the wall there is an invisible path leading into the blackness, there if you jump you'll find a hidden chest containing 'Frog Coin.'
Enter the room beside you and speak with the man across from the save point, he'll give you the 'Castle Key 1.' With the key in hand return to the hall with three doors and use it on the door being guarded by the big fat Troopa. Examine the egg in the middle of the room and agree to play... by "play" of course it means "fight."
Boss: Birdo
At the beginning of this battle, you only need to knock off the shell, which has a very minimal 500 HP. A few simple physical attacks should take care of that with ease. When the shell has been eliminated, the real boss appears. Birdo only has 777 HP, but the problem is that he has more defense than the shell that surrounded him, if that's even possible.
Anyway, he's only got two attacks. Both of them hit only one person. In fact, they're both pretty much the same attack, just an egg projectile. It does however deal nearly 100 damage so if you've got the patience to devote Mallow to using nothing but HP rain then the other two characters will really be free to do what they want for the rest of the battle, which usually ends up just being attacking normally since most magic and abilities end up dealing nothing more than 0 damage to the boss anyway.
When the fight has ended, you are given the 'Castle Key 2.' Use this key to open the door behind the boss. Watch out for the fan here. It will blow you off the edge if it is spinning violently when you try to get by. Wait for it to slow down then move.
In the next room, examine the door for a quick scene, then continue up past the fat Troopa into the door with the queen. Follow her down the hall at the back, use the save point as you go along. Part way along the second hall you'll see a chest floating in the air. Under it jump to reveal a hidden yellow platform. Now you can use that to hit the chest which contains a star.
In the next hall you'll find Dodo, which triggers a boss fight. However, you can actually use the star to defeat him instantly. Hitting Dodo with the star makes it end automatically, so if you're looking to maximize your payoff you can run back one room and hit those two birds before continuing up, you'll have time before you reach Dodo. Head through the door and drop like a rock. Use the trampoline at the bottom to get back up to Nimbus Land.
Boss: Valentina & Dodo
This fight can be extremely difficult, Dodo takes one member of your party (presumably Mallow) for a one-on-one battle. While Dodo is listed as having over 1000 life for this, you only have to deal just over a couple hundred before he runs away. This is easier said than done. If you want to stay alive, you'll need perfect timing on your defends and hope that he misses every once in a while, which he quite often does.
He'll use a fear inflicting status effect which can be prevented. Also, it wastes his turn each time he uses it so that'll be your chance to attack. Most other times you'll be healing waiting for a good time to strike.
After Dodo has been defeated, you'll have to fight Valentina with the remaining two party members. This is definitely one of the hardest fights in the game. Valentina quite possibly has every attack in the book. She's got a weak physical attack you can just hope she uses, and is quite fond of the Crystal attack, which is her second weakest. The rest are spells like Water Blast, Blizzard, Solidify and such that deal massive damage to your entire party. Those are her mid-level attacks.
The worst are the following three, Light Beam, Aurora Flash and Petal Blast, each of them comes with their own set of status ailments and massive damage as well. To survive these, you'll have to have prepared beforehand with some really good accessories and stuff like that.
Soon enough, Dodo and the character he took away will join the battle, making it a full on fight to drain the remainder of both their HP totals. She really is insanely hard. You might find yourself forced to use items like Fire Bomb and Rock Candy if you can't win, it's an unfortunate truth. One thing to note, however, and this is a good example, is that often if you can't win there's no substitute for good old-fashioned leveling up.
Watch the scene after the boss is defeated and prepares to depart for the volcano. Leave the castle and return to town.
Now, do the following. Run diagonally down and right to the right edge of town. Run along the edge until you find an area where there is no barrier and you can freely run out into the sky. There's a Shy Away there who will give you the 'Fertilizer.'
 Obtaining Mario's strongest weapon
Are you ready to get Mario's best weapon? Leave Nimbus Land via the hole in the left side and use the other trampoline to get onto the world map. Return to Rose Town. At the top of town you'll find a new path leading to the gardener's house. Speak to him and give him both the Seed and the Fertilizer so that he grows a giant beanstalk. Climb the beanstalk to find two chests: one containing the universal armor 'Lazy Shell' and then other containing Mario's weapon, the 'Lazy Shell.'
Also, while you're out here you may want to deliver the Cricket Jam to Frogfucius if you haven't already. It's worth 10 Frog Coins to him. When you're ready to continue with the game, return to Nimbus land and drop down the hole beside the trampoline to reach the hot springs. You can bathe in the springs to restore your health and then drop down the cliff on the right when you're ready to enter into the volcano.
Barrel Volcano
Items
- Flower (x5)
- Frog Coin (x5)
- Flower Jar
Map
 565 KB
When you land in the volcano, head out of the first room and then down. There are a few panels you can hop across in this area leading down to a room with two chests containing a 'Flower' in both of them. Continue up through another couple rooms to find a chest with 'Flower' and another with a bunch of Coins in it. The next room has a star. Be ready for this one before you get it.
You might even want to check out the next room. It should end around a room where you can see a 'Frog Coin' hovering over the lava, jump from the upper left area to reach it. Continue on, jumping across the platforms that are floating over the lava. You might be wondering how to get that 'Frog Coin' up there. Simply head into the next room, then come back and fall in the lava on purpose. It will get you up there.
If you jump up on the unstable platforms, you'll find another couple of 'Frog Coin's. Two rooms are here; in them you'll find another 'Flower' and another 'Frog Coin'. You'll notice a serious pattern going on here. Save your game and continue forward.
From here, it's a pretty linear path until you reach a man standing in a doorway. Enter his shop area, depending on which crates he's standing beside, he operates a different shop.
Item Shop
- Mid Mushroom 20 Coins
- Maple Syrup 30 Coins
- Pick Me Up 5 Coins
- Able Juice 4 Coins
- Freshen Up 50 Coins
Armor Shop
- Fire Shirt 90 Coins
- Fire Pants 90 Coins
- Fire Cape 90 Coins
- Fire Shell 90 Coins
- Fire Dress 90 Coins
You can check out some interesting F-Zero and Starfox memorabilia on the right side if you wish, then leave when you're ready to go. Another save point waits outside, then a bridge section where you must jump across a bunch of unstable platforms. On the other side you finally meet up with the boss.
Boss: Czar Dragon
The Czar Dragon has a number of different attacks, and many of them can be quite powerful. First of all, his physical attack is quite difficult to defend against. The boss is also able to cast the Flame Wall spell, which can deal anywhere from 30 to 70 damage to your entire party. He mostly focuses on these two spells, except when it's using its other remaining ability.
He can dip down into the magma and pull up four little dots that help in the battle. Basically all these things are good for are going kamikaze on your party. If I were you, I would destroy them before this can happen.
Mallow's Snowy spell is ideal for the job but I'm also partial to Mario's Ultra Jump, one of the few uses it has in the entire game. Since I had just acquired the two Lazy Shells, I was able to put both of them to good use in this battle. Mario's physical attack at times was able to deal up to 256 damage with a single hit. Mallow was equipped with the Lazy Shell armor and the Rare Scarf.
His defense was so high that not a single attack in the entire fight could deal more than 1 damage, which pretty much guarantees a win. He was mostly the healer, however, using HP Rain and items as necessary.
Once the boss has been defeated, a second form appears. This is the undead form. Unlike in a Final Fantasy game, you cannot use a Pick Me Up for an instant win, but you can, however, use any extra Pure Water items you have in your inventory on this boss for some decent damage. Many new attacks are used here, like the powerful Storm attack. The boss also uses Boulder, which hits every member of your party. Blast is a highly damaging attack, however, it only hits one person, so it isn't too bad. Scream will inflict a status ailment on one person unless they have protection from it (or it misses.)
Fortunately, while this boss does have a decent amount of HP, his defense it far lower than the previous boss. In fact, hits that we're dealing 50 damage before will now deal almost 200. Continue with physical attacks to eventually end this fight.
You'll find the star in the next room, go to pick it up and then watch the scene. Chase them up and up and up... and up! When you reach the top and hop out of the volcano, you had better be ready for yet another fight.
Boss: Axem Rangers
Time to take on the power rangers here. There are five of them and you need to decide which ones to target. Here's the way it should go down. You need to defeat Axem Pink first. Not only does she have the least HP out of all of them, with only 400, but she has the ability to heal as well. Bad combination, destroy her.
Next, we need to eliminate Axem Green. His HP total isn't too high, and he's the magic user of the group, so this will really reduce the damage that your party takes. Of the remaining ones, Axem Red is the most dangerous, but he also has the most HP, so target one of the other two, preferably Black. It really doesn't matter from this point.
If you have any Rock Candy items in your inventory, this is probably the second best time in the game to use them (the best would be the fight against Culex, the optional boss) but you can still get quite a few of them, a big bonus if you get a freebie from it, and just two Rock Candies will deal 400 damage to all enemies, automatically eliminating pink and leaving the rest ready to fall almost instantaneously.
Use party targeting magic and pretty much anything that hits more than one for best overall results here. The faster and more offensive you are at the start, the better off at the end.
When you actually do manage to defeat all the Axem Rangers, the fight still isn't over. Red jumps into his Megazord and then you need to defeat that thing which has 999 HP before the battle is really over. This boss only has two attacks, and one of them isn't even an attack. The boss simply wants a turn recharging. Then on the next turn it uses Breaker Beam which can do up to 140 damage to every member in your party. It's devastating.
You're going to want someone with the Lazy Shell and Rare Scarf, for Mallow who still had this equipped. The Breaker Beam dealt one damage. He was then able to use Pick Me Ups and help attack while the boss was recharging. You're going to have to hit hard here. There's only so long you can survive against an onslaught of this magnitude.
Back on the world map again, you need to return to Nimbus Castle. On the way to the throne room right outside the door, head into the room that was locked where the king was being held while you were chasing Valentina. The man who gave you the key will now give you a 'Flower Jar.'
After speaking to the king, take the exit at the back of the throne room. You'll notice the chest that previously contained a star now contains a 'Flower.' Your destination is back outside in Nimbus Land again. At the upper left there is a small set of steps leading to the air bus. It will take you to Bowser's Keep.
Return to Bowser's Keep
Items
- Fright Bomb
- Royal Syrup (x2)
- Rock Candy (x3)
- Max Mushroom (x2)
- Red Essence
- Flower (x5)
- Fire Bomb (x2)
- Super Slap
- KerokeroCola (x2)
- Pick Me Up (x2)
- Sonic Cymbal
- Star Gun
- Drill Claw
Map
 1.66 MB
Back to where it all started once again. Unfortunately, the enemy difficulty has been stepped up a couple of notches. If you've got Bowser in your party for this section, many of the enemies will run away from battle after seeing his face. Head up until you reach Bowser's throne, which now has a hole in it leading to a path in the back. When you come to a fork, head left past the statue to find a chest with a full healing mushroom inside.
Item Shop
- Mid Mushroom 20 Coins
- Maple Syrup 30 Coins
- Pick Me Up 5 Coins
- Freshen Up 50 Coins
- Fire Shirt 90 Coins
- Fire Pants 90 Coins
- Fire Cape 90 Coins
- Fire Shell 90 Coins
- Fire Dress 90 Coins
In the next room you'll find a save point and Croco again, instead of being your enemy, however, he was nice enough to open up a shop. Pick up whatever you need, be sure to save and then continue on through the door.
There are six doors here and behind each one is a special puzzle. There are two skill doors, two puzzle doors and two battle doors. Behind each one is a challenge.
Battle Course 1 - End Prize: Star Gun
- Fight 1: Gu Goomba (x5)
- Fight 2: Malakoopa (x2), Tub-O-Troopa (x1)
- Fight 3: Orbison (x2), Li'l Boo (x2)
- Fight 4: Sling Shy (x5)
- Fight 5: Chewy (x2), Shy Away (x2)
- Fight 6: Mr. Kipper (x1), Leuko (x2)
- Fight 7: Orbison (x1), Amanita (x2)
- Fight 8: Greaper (x2), Glum Reaper (x1)
- Fight 9: Pyrosphere (x3)
- Fight 10: Lakitu (x3)
- Fight 11: Shaman (x2), Zeostar (x2)
- Fight 12: Shaman (x5)
Battle Course 2 - End Prize: Drill Claw
- Fight 1: Terra Cotta (x4)
- Fight 2: Oerlikon (x2), Star Cruster (x1)
- Fight 3: Sackit (x1), Big Bertha (x2)
- Fight 4: Chow (x2), Forkies (x1)
- Fight 5: Armored Ant (x2), Alley Rat (x1)
- Fight 6: Star Cruster (x1), Bloober (x2)
- Fight 7: Stinger (x4)
- Fight 8: Geckit (x2), Chained Kong (x1)
- Fight 9: Rob-omb (x1), Big Bertha (x2)
- Fight 10: Vomer (x4)
- Fight 11: Magmus (x2), Pulsar (x2)
- Fight 12: Chester (x1), Bahamutt (x1)
Puzzle Course 1 - End Prize: Rock Candy
In the first room of this course, you'll meet Dr. Topper again and you'll see a chest in the air. The chest only has 21 Coins inside, and the object of this game is to make sure that you don't get the 21st Coin. Dr. Topper and Mario take turns taking 1 to 4 Coins from the chest until it becomes empty. There isn't any real information I can give you except this: count the number of coins taken from the chest and NEVER let your turn end on the 16th or 17th Coins because Dr. Topper can easily take 3 or 4 Coins, leaving you with the 21st. After you beat Topper in this game, you'll be brought to the next room.
In the second room, you'll see a bunch of switches on the floor. The object of this game is to make it so that all the switches are depressed. Each switch you jump on triggers the switches on all sides of it and make them go down. Here, I'll show you how to win it easily:
Step on switches 2, 8, 15, and 9 to win this game and go on to the next room.
In this final room of the challenge, there are a bunch of cannonballs in a pattern like the switches in the other room were. Dr. Topper will tell you that you have to kick the cannonballs over each other until there's only 1 left. Each time you kick one over another one, the one you kicked it over disappears. Dr. Topper will remove cannonball #3 for you in the beginning. Here, I'll show you how to finish this game:
- Kick ball #1 right to space #3.
- Kick ball #4 left to space #2.
- Kick ball #11 up to space #3.
- Kick ball #5 right to space #7
- Kick ball #8 left to space #6.
- Kick ball #9 right to space #11.
- Kick ball #15 up to space #7.
- Kick ball #3 down to space #11.
- Kick ball #2 down to space #10.
- Kick ball #16 up to space #8.
- Kick ball #10 right to space #12.
- Kick ball #8 down to space #16
- Kick ball #13 right to space #15.
- Kick ball #16 left to space #14 to leave only one ball remaining and win the game!
Puzzle Course 2 - End Prize: Rock Candy
In this room, you'll meet Dr. Topper and he'll ask you a bunch of trivia questions while you stand on a platform. The platform will move up one space each time you get a right answer, but it'll drop 2 spaces when you get one wrong. Here's the list of questions that Dr. Topper can possibly ask you:
- Q: The boy getting his picture taken at Marrymore can't wait 'til which season?
- A: Skiing
- Q: What technique does Bowser learn at Level 15?
- A: Crusher
- Q: What is the name of the boss at the Sunken Ship?
- A: Johnny
- Q: What is Hinopio in charge of at the middle counter?
- A: The inn
- Q: Who helped you up the cliff at Land's End?
- A: Sky Troopas
- Q: What does the Red Essence do?
- A: Gives you strength
- Q: What does Belome really like to turn people into?
- A: Scarecrows
- Q: What is the 4th selection on the Menu screen?
- A: Equip
- Q: What did Carroboscis turn into?
- A: A carrot
- Q: Who is the leader of the Axem Rangers?
- A: Red
- Q: Which monster does not appear in Booster Tower?
- A: Terrapin
- Q: What color are the curtains in Mario's house?
- A: Blue
- Q: Johnny loves WHICH beverage?...
- A: Currant juice
- Q: What's the full name of the boss at the Sunken Ship?
- A: Jonathan Jones
- Q: What's the password in the Sunken Ship?
- A: Pearls
- Q: What was Toadstool doing when she was kidnapped by Bowser?
- A: She was looking at flowers
- Q: What's the first monster you see in the Pipe Vault?
- A: Sparky
- Q: How many legs does Wiggler have?
- A: 6
- Q: Where was the 1st Star Piece found?
- A: Mushroom Kingdom
- Q: The man getting his picture taken at Marrymore hates what?
- A: Getting his picture taken
- Q: In the Moleville blues, it's said that moles are covered in what?
- A: Soil
- Q: Who is the ultimate enemy in this adventure?
- A: Smithy
- Q: Who is the famous sculptor in Nimbus Land?
- A: Garro
- Q: Booster is what generation?
- A: 7th
- Q: Where was the 3rd Star Piece found?
- A: Moleville
- Q: How long have the couple inside the chapel been waiting for their wedding?
- A: 30 minutes
- Q: What words does Shy Away use when he sings?
- A: La dee dah~
- Q: What color is the end of Dodo's beak?
- A: Red
- Q: The boy at the inn in Mushroom Kingdom was playing with ... What?
- A: Game Boy
- Q: Who is the famous composer at Tadpole Pond?
- A: Toadofsky
- Q: What's the chef's name at Marrymore?
- A: Torte
- Q: What does Birdo come out of?
- A: An eggshell
- Q: How much...does a female beetle cost?
- A: 1 coin
- Q: How many underlings does Croco have?
- A: 3
- Q: What's the name of Jagger's “sensei”?
- A: Jinx
- Q: What was Mallow asked to get for Frogfucius?
- A: Cricket Pie
- Q: Mite is Dyna's...WHAT?
- A: Little brother
- Q: Yaridovich is what?
- A: A boss
- Q: What do Culex, Goomba, and Jinx all have in common?
- A: They live in Monstro Town
In the second room of Puzzle Course 1, Dr. Topper brings you into a room with numerous barrels. He'll then shut off the lights, then turn them on again, adding more barrels to the pile. Then, he'll give you 10 seconds to count how many barrels there are total in that pile. When you get it right, he'll shut off the lights and turn then on again, adding LOTS of barrels to the pile, then he'll give you 20 seconds to count them all and say the answer. When you get that right, you go on to the last part of the course!
In the final room of Puzzle Course 1, you'll see 4 creatures standing alongside a wall. Dr. Topper will tell you that they competed in a triathlon; now he'll ask you to go talk to each of them to hear their stories. Remember their stories, then go see Dr. Topper again; he'll have you talk to each of them in the order they won. Here, I'll tell you what each one said and who's in what place:
- 1st Place: I outrode [name] on my bike, and [name] was never able to pass me.
- 2nd Place: I fell into 4th place during the bike race, but finally ended up in the same place as I did in the swimming event.
- 3rd Place: I placed the same in the swimming and cycling events, but 2 others beat me in the marathon.
- 4th Place: I came in 3rd for swimming.
Action Course 1 - End Prize: Super Slap
In the first room of this course, you'll notice that there seems to be no way to get across the lava. There are hidden paths which only appear when you jump on them, so walk straight ahead onto a hidden path and jump to see where there is ground for a quick second. Keep jumping around to get through this room to the door at the end. Hit the chests in the room to get a 'Royal Syrup', 'Fright Bomb', 'Ice Bomb', and a 'Rock Candy'! Now, go through the door at the end to the next room.
In the second part of this course, there are a bunch of square platforms that move back and forth above the lava. You have to jump onto one, then onto the next one when you get close enough to it. Try and hit all the chests in this room to get a 'Fire Bomb', a 'Max Mushroom', a 'Flower', and a really useful item: the 'Red Essence'! Now, get through this room to the door and go through it to the final room of this course.
In this final part of the course, you have to simply get to the top while avoiding the barrels that come down along the way. Just make your way to the top without getting hit and go through the door next to the Chained Kong to finish the course.
Action Course 2 - End Prize: Sonic Cymbals
In the first room of this course, you'll see a series of platforms moving up and down above the lava. You have to simply jump across them to the other side, so get on the first one to get down by the lava, then go from there. When the last platform is low enough, jump onto it to ride up to a high ledge, then go down and left to the chest. Hit the chest to get a 'Kerokero Cola', then go back and wait for the platform to come back up by you, then ride it back down to the lower part. Now, jump onto the ledge and go through the door to the next room.
In the second part of this course, there's a cannonball on the ground, as well as a couple of Bob-ombs walking around. You have to jump on the cannonball and walk on it so you can reach the chests on the high ledges and the door at the end. First, walk ahead and get the Bob-ombs to follow you, then lure them to the beginning of the room. Then, jump on the cannonball and get across the room while hitting the chests along the way to get 2 'Flower's, a 'Max Mushroom', a 'Pick Me Up', and a 'Rock Candy'. At the end, jump into the door to the final room.
In the last part of this course, there are 2 platforms; when you stand on the first platform, the other one rotates around it. Get across the room by making the platform rotate, then jump onto it to make the other one circle you until you reach the end. Try and hit the numerous chests in the air to get various goodies, including a 'Fire Bomb', 2 'Flower's, 'Royal Syrup', and a 'Pick Me Up'. Then continue to the end and through the door.
Once you make it through four challenges successfully, drop into the next room and save your game. In the next room, you will meet Magikoopa and enter a boss battle against him.
Boss: Magikoopa
This is actually a rather easy boss, especially if you've got all those great new weapons equipped. The two things which make him difficult are a couple of powerful spells like Solidify and Flame Wall, and the ability to summon a large enemy into battle so he can hide. If this occurs, simply defeat the enemy and continue to pound this guy.
The Magikoopa has 1600 HP but when it comes to defense, he's weak as a kitten. Mario's Lazy Shell, Bowser's Drill Claw, and Geno's Star Gun will all hit very hard in this battle. That's exactly what you need to win!
Item Shop
- Mid Mushroom 20 Coins
- Maple Syrup 30 Coins
- Pick Me Up 5 Coins
- Freshen Up 50 Coins
- Hero Shirt 100 Coins
- Prince Pants 100 Coins
- Star Cape 100 Coins
- Heal Shell 100 Coins
- Royal Dress 100 Coins
Magikoopa will regain his memory and decide to help you out. There's an infinite money chest out here now which is nice, because through the left door you'll find Croco again who has some new armor to sell for your characters.
Proceed through the door on the right now and head up. To get through this part easily, simply jump on top of one of the stompers and ride it up, now you can jump across the stone platforms to the door.
In the next room...
Boss: Boomer

Quite a simple boss actually, more like a miniboss. Boomer has some strong magic like storm capable of dealing to 90 damage on one person but the majority of his attacks are physical ones, easy to defend physical attacks that often end up dealing no more than 0 or 1 damage.
Part way through the battle, he changes from red to blue and as far as I can tell, the only difference it makes is that he becomes easier. His defense drops like a rock. If this gives him any new attacks or special powers, I certainly didn't notice any.
Boss: Exor
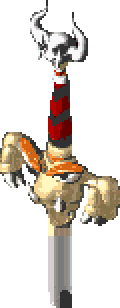
Things are really starting to wrap up now. You're facing off against the evil sword which fell into Bowser's Keep and started this whole mess in the first place. There are four parts to this boss, the Left Eye, Right Eye, the mouth and Exor. Exor cannot be damaged until at least one of the eyes has been eliminated.
You'll probably want to eliminate as many parts as possible since it'll certainly reduce the number of attacks you will be hit by. The eyes and the mouth can attack you, but it's Exor you need to defeat. The eyes will spew eye gunk at you (gross) while the mouth will use more prominent magic attacks. If you're willing to spare the Rock Candy here or other such similar items. They work great here.
Finds ways to damage multiple parts of the boss rather than focusing on one at a time so the other parts aren't just regenerating while you're picking another. Normal attacks work fine like always. You'll certainly need someone dedicated to healing here. If you were to focus on just one part, meaning getting it out of the way whenever possible, I would say the mouth because it's easier to play offensively when you're not constantly being pounded on by powerful magic spells.
Factory
Items
- Flower (x2)
- Royal Syrup
- Max Mushroom
- Rock Candy
Map
 977 KB
It's the final dungeon! But you can still leave whenever you wish, using the trampoline on the left. Head right and use the save point here.
What you'll encounter in the first room is kind of a bolt on a large screw. You need to keep jumping up and down on the bolt to move it across. Hit the large button in the next room to form and path and then continue up. There's a chest here containing 'Ultra Hammer' (not as powerful as the Lazy Shell, unfortunately). Use the trampoline to bounce yourself up, then bounce on the next one to reach the boss.
Boss: Count Down

For a sub-boss, Count Down has some pretty nasty attacks. There are two bells on top (a clue that you should be trying to use multi-targeting attacks) that will hit you with physicals from time to time, but the clock the real danger. One of them will use Dark Star, which is similar to one of Mallow's spells. It hits one person for pretty severe damage.
Other than that, it's when you actually damage the clock you'll see its power. After hitting it a few times, it will respond with “It's such-and-such a time.” Depending on what time it says, the boss will use one of many attacks.
These attacks include the Aurora Flash to put your party to sleep. Sometimes the highly damaging Water Blast is used. Often it will use Mega Recover to heal a fair bit of its own HP. Luckily, its defense isn't too good meaning you can really do some damage with the Lazy Shell in this fight, so do it.
In the next area, watch out on the conveyer belts for clones of bosses you have fought before. Jump up the first conveyer belt to get a full healing mushroom. You'll want to fall down on purpose at least once since there are two chests down there, one that heals you and the other that has a 'Flower' inside.
Continue up to the next screen where you need to try to avoid the arrows. The best way of doing so is by not jumping. Jumping will often get you stuck right in the head by an arrow. Follow the path in the next area and go right at the fork to find a 'Royal Syrup' in the chest.
After riding the floating platform across there's another chest above you. This one has a 'Max Mushroom' inside. Get ready to start running fast. There really is no way to avoid the Bowyer clones here. Follow the path along and up to the next screen where you'll find another save point.
In the next room, take the upper exit and grab the 'Flower' from one of the chests. Return to the previous room and jump on the box in the middle the enemy is bouncing off of. When he lands on your head and you fight him, the box will explode after the battle. Drop down.
Boss: Earth Link
Yet another sub-boss for you to take care of. The Endobubble attack will weaken one of your characters, but fortunately it doesn't actually do any damage. This is pretty much all that Domino will do.
The other guy will stick with physical attacks the whole time. Domino is the one you're going to want to defeat first. He's the magic guy with less HP, so he's very vulnerable to physical attacks. When he has been taken care of, then the other guy decides it's time for a change of pace. He boards a large snake called Earth Link, which really becomes the real boss.
Before taking out Earth Link, you should take out the guy on his head. Magic is effective here. Mallow's Star Rain works extremely well as it can deal 250 damage to both of them if you keep it going for the maximum length of time. Mario's Super Flame too is extremely effective.
Earth Link has some nasty attacks that mostly focus on the physical ones. He'll use his bite attack, which is powerful but not nearly as much so as the Carni-Kiss which can kill a character at full HP even when successfully blocked. Other than that, all he does is use Poison. Your attacks don't do much (magic is actually more effective against the snake) but just keep at it.
Item Shop
- Mid Mushroom 10 Coins
- Maple Syrup 15 Coins
- Able Juice 2 Coins
- FroggieDrink 8 Coins
- Max Mushroom 39 Coins
- Pick Me Up 3 Coins
- Freshen Up 25 Coins
Time to enter the factory for a scene, then a battle then another scene afterward. Toad appears and wants to offer a little helping hand. After doing a little shopping, Toad hands you a 'Rock Candy' as a gift.
You'll have to fight your way through another couple of rooms. Just remember to kill the main enemy first so that all the hammers don't respawn over and over constantly. Following this is yet another sub-boss to fight.
Boss: Gunyolk
One more boss to fight on the way to Smithy. Pretty much what you want to do here is focus on staying alive. The boss has a couple of weak status inflicting attacks and one or two single person hits. Every so often, it will fire a large beam similar to the one the Axem Rangers used that will really hurt your party.
Perhaps set aside one KerokeroCola for this fight in case your health gets pretty low and attack with all the most powerful attacks you have, preferably against both of them.
Jump on the large button when you are prepared for the final battle.
Boss: Smithy
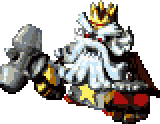
You finally get to take on the evil Smithy. Smithy is an old man with a hammer who could easily be mistaken for a grumpy old dwarf. His attacks are anything but mistakable however, they're going to inflict some serious damage. Make sure at least one person in your party, preferably the healer, is wearing the Lazy Shell and the Rare Scarf to get a defense stat as high as possible.
For his first attack he will usually start with the sledge, a big stomping thing that comes right down on your head, not too pleasant. Smithy is able to use the classic Mega Drain spell. Not surprisingly, he has an attack where he just hits you with his hammer, and lastly he uses Meteor Swarm, which does a good deal of damage to your party.
Smithy's last ability is the ability to create some nasty enemies which will start really wrecking havoc on your party. To stop him from being able to make these enemies, what you need to do is destroy the smelter on the side, which is easier said than done.
In the end, it boils down to your ability to deal 2000 damage to Smithy. If you've got someone equipped with the Lazy Shell and Rare Scarf like I said then the only attack that can really damage you at all is his hammer attack, and that's only if you don't block it, so rely on that character a lot.
Boss: Smithy
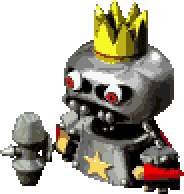
The final boss has several forms and switches between them constantly. Each form comes with its own set of attacks as well. With 8000 HP you're going to be there for a while.
Fortunately, his physical defense leaves something to be desired, the Lazy Shell for one with Mario kicking it will deal up to 300 damage per hit which is nice. Speaking of Lazy Shell, if you have that armor on someone it seems that Smithy has virtually no attacks that can hurt you. Meaning it will take a while, but you are still almost guaranteed a win. And in the end, I guess that's what really matters.
This really is the final boss. No more forms, meaning go buts with all the items in your inventory. If you have Rock Candy, Fire Bombs, KerokeroColas, ANYTHING they should be used in this battle, even if you don't really need to... why not?
You beat the game. Good job! Now sit back and enjoy the ending.
Other Side Quests
Casino
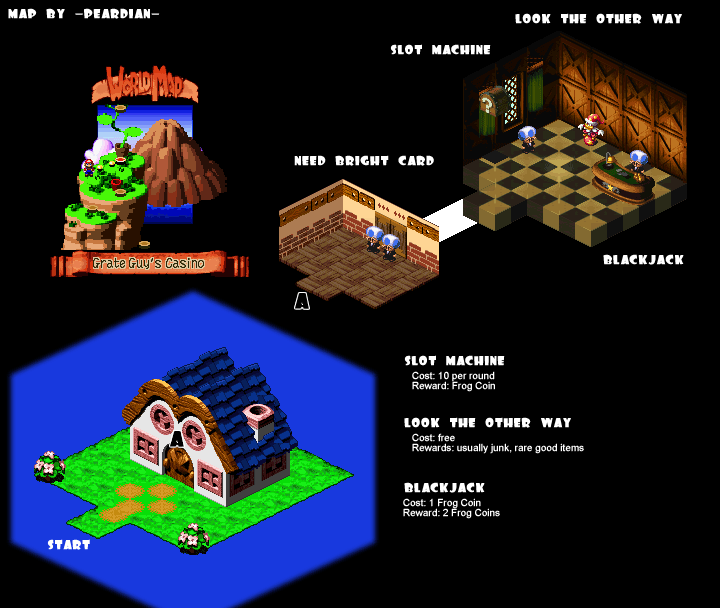 37.2 KB
In addition to The Three Musty Fears and Culex (the secret boss), there are a couple of other things you can do as well.
- The first is head on over and visit the Tadpole Pond. Head all the way to the right and visit the musical tadpole area.
- Secondly, there's a casino to check out. Get the Bright Card from Knife Guy. From here, return to those five tubes in Bean Valley. There's a chomp down the tube at the top. Defeat it and jump up and down a few times where it was previously. This will reveal the casino.
Secrets
All of the game's secrets are consolidated on a dedicated Secrets page :)