Mednafen Tutorial
- About Mednafen
- Should you use Mednafen?
- Mednafen's front-ends
- 64-bit and 32-bit versions
- Installation
- Loading a game
- Q: I get 'Mednafen executable not installed'!
- Q: Some games show a black screen!
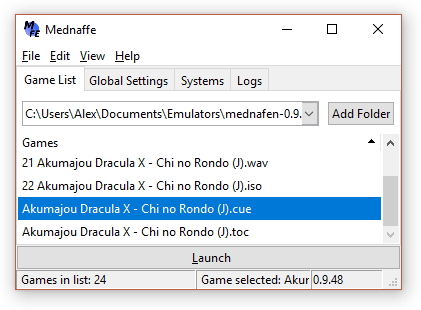
- Q: I get 'ROM image is too large' error!
- Loading a TurboGrafx-CD ISO
- Loading a PlayStation 1 ISO
- Loading a Saturn ISO
- CD swapping for multiple-CD games
- Help screen
- Setting up the keyboard or gamepad
- Changing controller type
- ESC closes the game!
- Fullscreen
- Screen filters
- Save states
- Fast forward
- Capturing screenshots
- Finding ROMs
- Q: Mednafen isn't saving anything!
View this guide on Google Docs to:
- Save as PDF or any common doc format
Share
About Mednafen
This tutorial is to help you with Mednafen for Windows. Mednafen is a multi-system emulator that supports Atari Lynx, Neo Geo Pocket Color, WonderSwan, Game Boy Color, Game Boy Advance, NES, SNES, Virtual Boy, PC Engine/TurboGrafx-16 CD, PC-FX, Game Gear, Genesis/Mega Drive, Sega CD/Mega CD, Sega Master System, PlayStation 1, and Saturn. By itself, Mednafen doesn't have a user interface. In order to enjoy a more traditional (and much easier) emulation experience with Mednafen, you need a front-end user interface. The most popular front-end seems to be “Mednaffe.” This tutorial is focused entirely on it.
What makes Mednafen particularly awesome is its support for ISO files. This is a huge advantage for emulating TurboGrafx-CD/PC Engine CD. MagicEngine and Ootake are great emulators, but playing CD games on them requires a CD-ROM drive. Thankfully, Mednafen is here to fly in and save the day.
Mednafen can be downloaded from its homepage: https://mednafen.github.io/
Should you use Mednafen?
With all the emulator offerings as of 2024, should you use Mednafen? Well, it depends. RetroArch is the superior multi-system emulator when it comes to being user-friendly. It also offers more systems, more features, and a user interface. BizHawk, another multi-system emulator, has been rising in popularity as well.
At the time I'm writing this, Mednafen is respected as the #1 emulator when it comes to accuracy of emulating PlayStation 1, Saturn, and PC Engine/PC Engine CD. It's a high-quality, reputable emulator! But yet, what sucks is that it lacks a user interface. The front-end needs to be set up separately (which I explain in this tutorial). Due to these extra steps and lack of usability, I don't always recommend Mednafen. It's more for advanced emulation users. One could also argue that it's not worth using Mednafen when considering that RetroArch offers the same high-quality cores for PlayStation 1, Saturn, and PCE.
Mednafen's front-ends
 Mednaffe in action
Mednafen is a command line driven program. You'd need to know DOS commands to work your way around it. Given that very few people know DOS, front-end user interfaces have been made for us so that we can use Mednafen with a graphical interface.
The front-end that I have chosen to include in my site's download of Mednafen is Mednaffe. I think it's the easiest to use out of all the other Mednafen front-ends out there.
There are others such as MedGui (which I used to cover here) and MedGui Reborn (the new version of MedGui). I think Mednaffe is more user friendly and ideal for beginners. MedGui is still worth checking out, though. It's awesome if you're a more experienced emulation user looking for better ROM management and extra features.
64-bit and 32-bit versions
When you go to download Mednafen, the first thing you're going to see is two versions: 64-bit and 32-bit. So what is that and which version do you download? I won't drown you with technical jargon. In short: these are types of Windows systems. 64-bit is newer and faster, and 32-bit is older and slower. If you have 64-bit Windows, you need to download the 64-bit version of Mednafen. And vice versa with 32-bit.
They stopped making 32-bit computers around 2017, so chances are you're most likely using a 64-bit computer. If you're not sure if you have 64-bit or 32-bit Windows, here's how you can check:
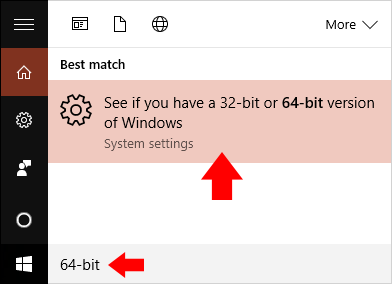
- On the bottom left where you see Search the web and Windows, do a search for “64-bit”.
- You'll see this come up: “See if you have a 32-bit or 64-bit version of Windows”. Click it.
- You'll arrive here . Look for “System type”. If it says “64-bit operating system” then you're using 64-bit Windows. If it says “32-bit operating system” then you're using 32-bit Windows.
Using Windows XP? Here are directions for that .
Installation
Mednafen is a standalone program, so it does not have an install wizard. Installation is simple: just extract Mednafen from its zip file. To make things clearer, check out the video below that shows how to 'install' a portable emulator (it shows Snes9x, but Mednafen is the same process). It's pretty straight-forward - all that you're doing is extracting a zip file while doing a little bit of folder management. If you want to 'uninstall' a portable emulator, simply delete it!
In the video, I'm recommending “Documents” to house your emulators. But, you could also place emulators in “Downloads”, a folder on your desktop, an external HDD, or a thumb drive. These are common locations with full read/write access.
Don't forget that this Mednafen tutorial is based on using the Mednaffe front-end. Once you download it, simply extract it into Mednafen's folder. When all is done, Mednafen's folder should look like this
IMPORTANT! Mednafen must be placed in a common folder on your computer. I recommend Documents, Downloads, or create a folder on your desktop. If you place Mednafen somewhere else on your main C drive, then you may be restricting it to read-only access. Doing so prevents Mednafen from saving anything.
To open Mednafen (or rather, the Mednaffe front-end), double-click on ![]()
Loading a game
Mednafen supports Atari Lynx, Neo Geo Pocket Color, WonderSwan, Game Boy Color, Game Boy Advance, NES, SNES, Virtual Boy, PC Engine/TurboGrafx-16 CD, PC-FX, Game Gear, Genesis, Sega Master System, Saturn, and PlayStation 1. I don't recommend using Mednafen for the popular systems such as SNES and Genesis. There are better emulators for them.
Adding a folder (optional)
Mednaffe gives you the option to load all the folders that contain your ROMs. This gives your ROMs easier access, as opposed to manually loading a single ROM every time via the File menu. Here's how to load your folders:
- Click the
 button, or press Ctrl+A.
 - Navigate to the ROM folder you want to add, then click Open; as shown here .
- You should now see your ROMs listed in Mednaffe. Simply double-click on a game to load it. Continue the steps above to add more folders.
- Once you have several folders added, you can swap among them by clicking on the path at the top - as shown here .
- To remove a folder, have the folder open that you want to remove and click File > Remove folder.
- Next, you should read Setting up the keyboard or gamepad so you can actually play the game.
Loading a game
If you followed the directions above about adding a folder, then all you need to do is double-click on a game to play it. But if you prefer the old fashion method, here's how to load a game manually via the File menu:
-
Click on File > Open, or press Ctrl+O (as shown to the right).
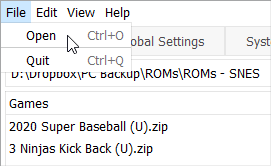
- Navigate to the folder containing the game you want to play, click on it, then click Open; as shown here .
- Another window should pop up with your game loading. Next, you should read Setting up the keyboard or gamepad so you can actually play the game.
Q: I get 'Mednafen executable not installed'!
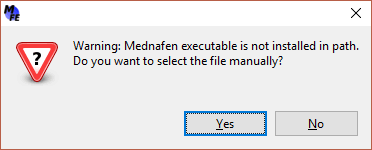
If upon opening Mednaffe you receive the following error message: “Mednafen executable is not installed in path” - that means Mednafen is not in the same folder as Mednaffe. You need to download Mednafen and extract it into the same folder where Mednaffe resides, or vice versa. In the end, your folder should look like this .
Q: Some games show a black screen!
Some of your ROMs may not load with Mednafen, giving you just a black screen. The fix is to try downloading the game from another ROM site. It's weird, but Mednafen is picky about certain ROMs.
Q: I get 'ROM image is too large' error!
Upon loading a game, if you receive this error:
ROM image is too large
This error normally appears when attempting to load a game in BIN/CUE format and the BIN file was selected. To run the game, you need to select the CUE file. Also, make sure the proper BIOS files are there and in the correct location.
Loading a TurboGrafx-CD ISO
You're going to need the BIOS files for PC Engine CD - I have them here.
ROM websites distribute TurboGrafx-CD ISOs in one of four formats. You can learn about these formats in my Kega Fusion tutorial if you're curious. I need to point out that TurboGrafx-CD ISOs in ISO/MP3 format are not supported by Mednafen. If you have a game(s) in ISO/MP3, I would recommend downloading the game from elsewhere to obtain it as a binary BIN/CUE , a standard BIN/CUE , or a BIN/WAV .
Here's how to load a game:
- Make sure “syscard3.pce” is present in the root of Mednaffe's folder.
- From this point you can load the TurboGrafx-CD/PC Engine CD game as you would any other ROM. So my directions in loading a game apply the same way:
- If you added the game's folder, simply double-click on the game's CUE sheet to load it.
- Otherwise, select the CUE sheet via File > Open.
- If you haven't already, you should read Setting up the keyboard or gamepad so you can actually play the game.
You can learn a little more about Mednafen's TurboGrafx-CD/PC Engine CD emulation in Mednafen's official page.
Loading a PlayStation 1 ISO
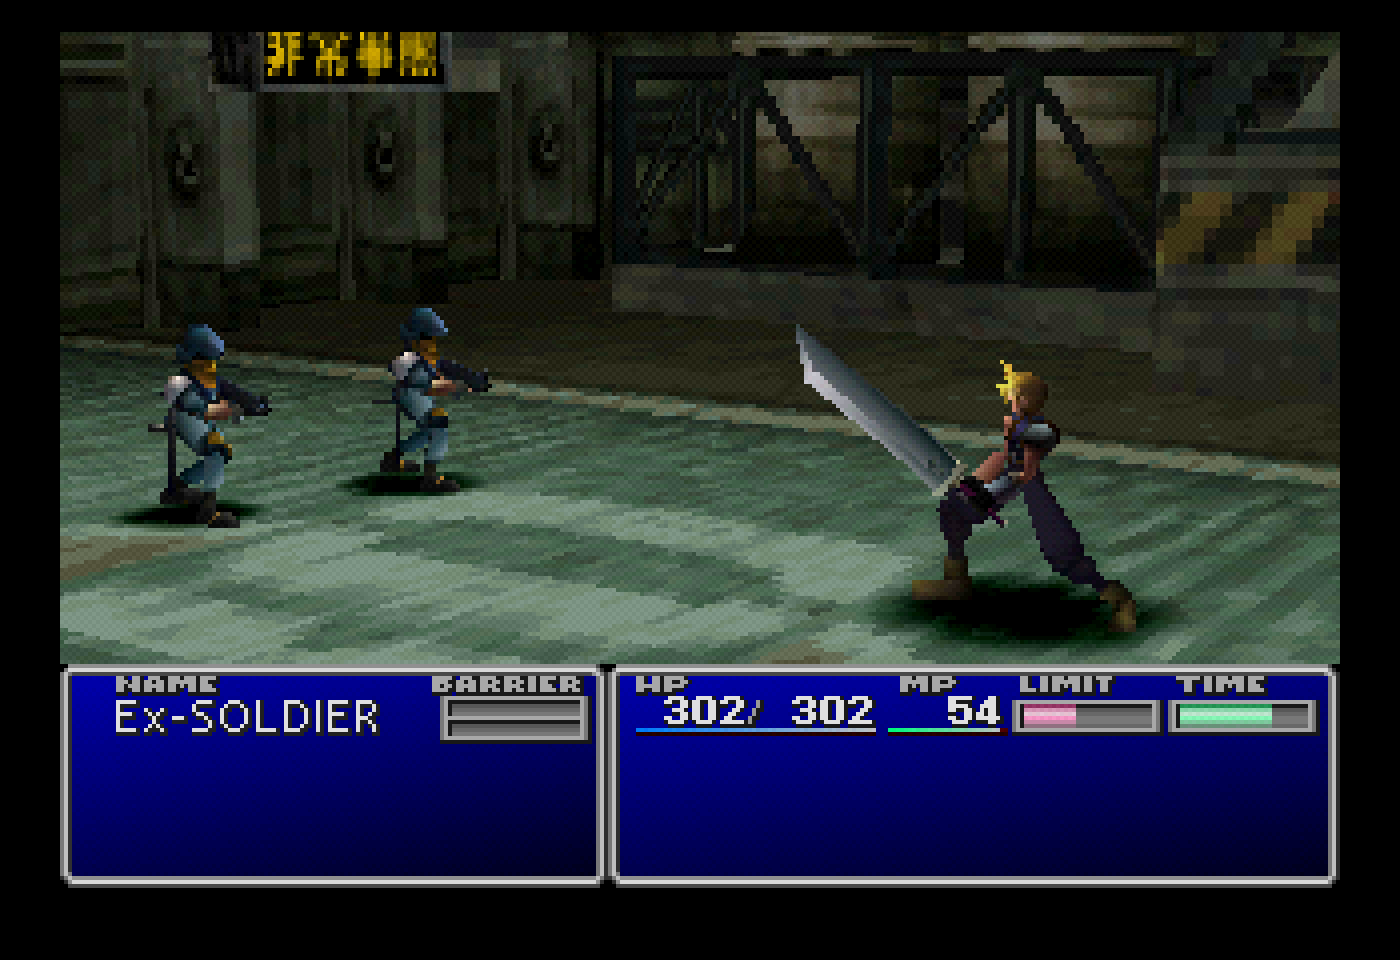 Final Fantasy VII running on Mednafen
Mednafen is respected as the #1 emulator for PlayStation 1. It's focused on accuracy, which makes it very compatible. It's been known to outperform Sony's official PSone emulator in accuracy tests. In my opinion, I think DuckStation is far easier to use and offers more features. Stick with Mednafen if you insist on using the absolute best in emulation accuracy. Anyhow, here's how to load games:
- First, you need the BIOS. You can download it from my emulators page.
- Mednafen specifically requires the following BIOS files. I mean, you don't need all three, you just need the BIOS for the region you want to play.
- scph5500.bin - required for Japan-region games.
- scph5501.bin - required for North America/US-region games.
- scph5502.bin - required for Europe-region games.
- You must name the BIOS exactly as shown here. For example, if your NA BIOS is named “SCPH-5501.BIN”, you must rename it to “scph5501.bin”.
- Place the BIOS file(s) in Mednafen's main directory, as shown here .
- Before we load your game I need to point out an important detail. Mednafen can only play ISOs that are “CUE” sheets (or “BIN/CUE”), CloneCD “CCD/IMG/SUB”, and cdrdao “TOC” files. BIN/CUE is the most common. It would look something like below. When you open the CUE sheet in Notepad, you'll see the name of the BIN file.
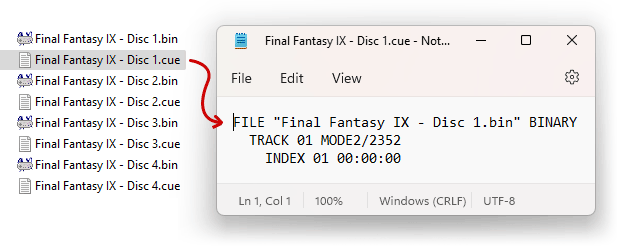
*If your PlayStation 1 game is currently in a ZIP, 7Z, or RAR file, it must be extracted. If you don't have a program that extracts RAR or 7z files, use 7-Zip (it's free). - From this point you can load the PlayStation 1 game as you would like any other ROM. So my directions in loading a game apply the same way:
- If you added the game's folder, simply double-click on the game's CUE sheet to load it.
- Otherwise, select the CUE sheet via File > Open.
- Lastly, make sure to read CD swapping for multiple-CD games. And if you haven't already, you should read Setting up the keyboard or gamepad so you can actually play the game.
You can learn more about Mednafen's PlayStation 1 emulation in Mednafen's official page.
Loading a Saturn ISO
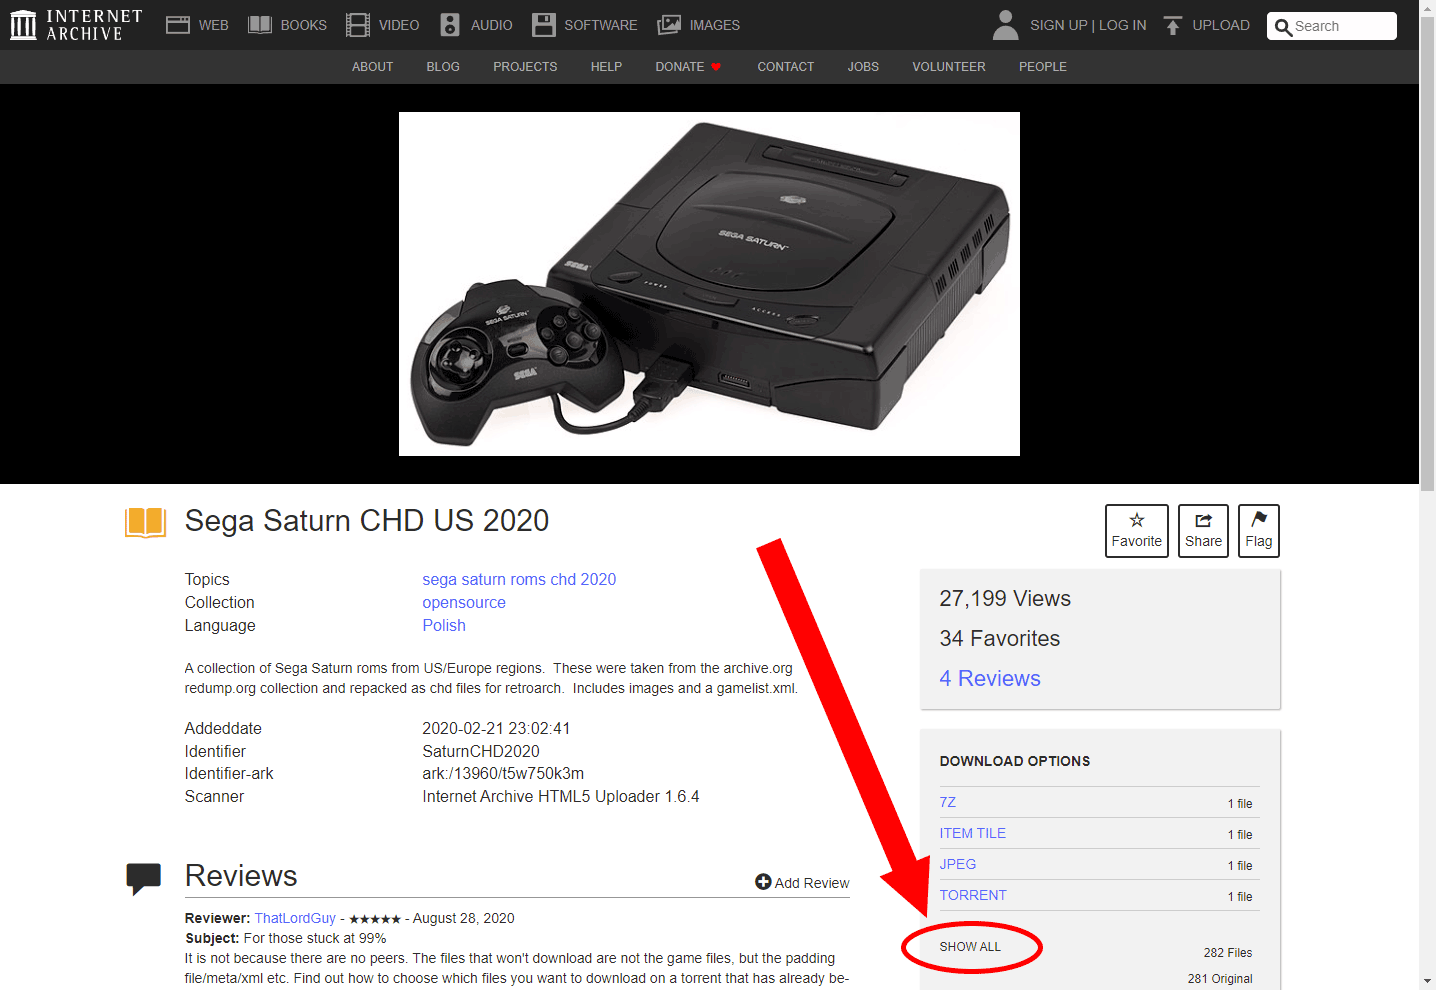
Mednafen is finicky with its compatibility with Saturn ISOs. People often find that the Saturn ISOs available in rom sites don't work with Mednafen. Fortunately, Saturn games in CHD format have a high success rate of working with Mednafen. To find Saturn CHD games, search Google with “archive.org saturn chd”. Click the first search result, then click SHOW ALL, as shown here . Then you need to convert the CHD to BIN/CUE, because Mednafen doesn't natively support CHD.
With that out of the way, let's proceed with the directions on loading Saturn games.
- First, you need the BIOS. You can download it from my emulators page. Download the specially marked Saturn BIOS for Mednafen.
- My Saturn BIOS files will have the proper filenames. But just for reference, note that the BIOS files must be named exactly as the following:
- mpr-17933.bin - required for North America/US-region and Europe-region games.
- sega_101.bin - required for Japan-region games.
- Place the BIOS files in Mednafen's main directory, as shown here .
- Before we load your game I need to point out an important detail. Mednafen can only play ISOs that are “CUE” sheets (or “BIN/CUE”), CloneCD “CCD/IMG/SUB”, and cdrdao “TOC” files. BIN/CUE is the most common. It would look something like below. When you open the CUE sheet in Notepad, you'll see the name of the BIN file and a list of audio tracks.
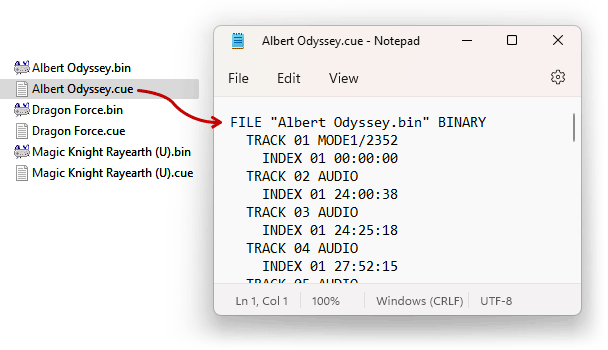
*If your Saturn game is currently in a ZIP, 7Z, or RAR file, it must be extracted. If you don't have a program that extracts RAR or 7z files, use 7-Zip (it's free). - From this point you can load the Saturn game as you would like any other ROM. So my directions in loading a game apply the same way:
- If you added the game's folder, simply double-click on the game's CUE sheet to load it.
- Otherwise, select the CUE sheet via File > Open.
- When Mednafen rejects your Saturn ISO, you'll get one of these two outcomes:
- Rejected ISO error 1: You'll see a weird CD status screen .
- Rejected ISO error 2: You get a ROM image is too large error.
- Lastly, make sure to read CD swapping for multiple-CD games. And if you haven't already, you should read Setting up the keyboard or gamepad so you can actually play the game.
You can learn more about Mednafen's Sega Saturn emulation in Mednafen's official page.
CD swapping for multiple-CD games
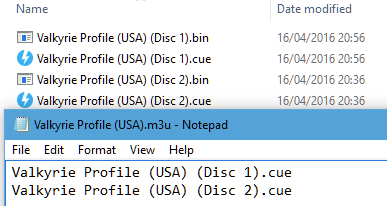
This is a weird, confusing process. To automatically load the next disc of a game, you will need a .m3u file. To make one, simply create a text file and name it after your game. Within the text file, write the names of the .cue sheets for your game discs as such:
- Game (Disc 1).cue
- Game (Disc 2).cue
- Game (Disc 3).cue
Save the .txt file into Mednafen's root folder and then change the file extension to .m3u. Run the .m3u, rather than the .cue of the first disc and the first disc will load. When you get to the end of that disc, the next disc will be automatically loaded. For this method to work, shared memory cards must be used for the games in the playlist.
Creating shared memory cards
Create psx.cfg, and add the line: filesys.fname_sav %s.%X. Here's the full documentation. Emulation bugs, crashes and save states can corrupt your memory card data.
Help screen
While a game is running, press F1 for Help. In window mode, it's a bit cropped off but in fullscreen you can see all of it. The Help screen is important to review since Mednafen's features are entirely keyboard driven once a game is running. The Mednafen documentation is also very helpful. Press F1 again to exit Help (don't press Esc because that closes the game!).
Setting up the keyboard or gamepad
There are two ways you can go about this. You can set up keys via Mednaffe's user interface or while a game is running.
Configuring keys via the user interface
Unlike other Mednafen front-ends before Mednaffe, Mednaffe allows you to easily configure the all keys for every system in advance! This saves you a lot of trouble. Here's how:
- If you want to configure a gamepad, plug it in now. If Mednafen is already open, close it and re-open it after you've plugged in the gamepad.
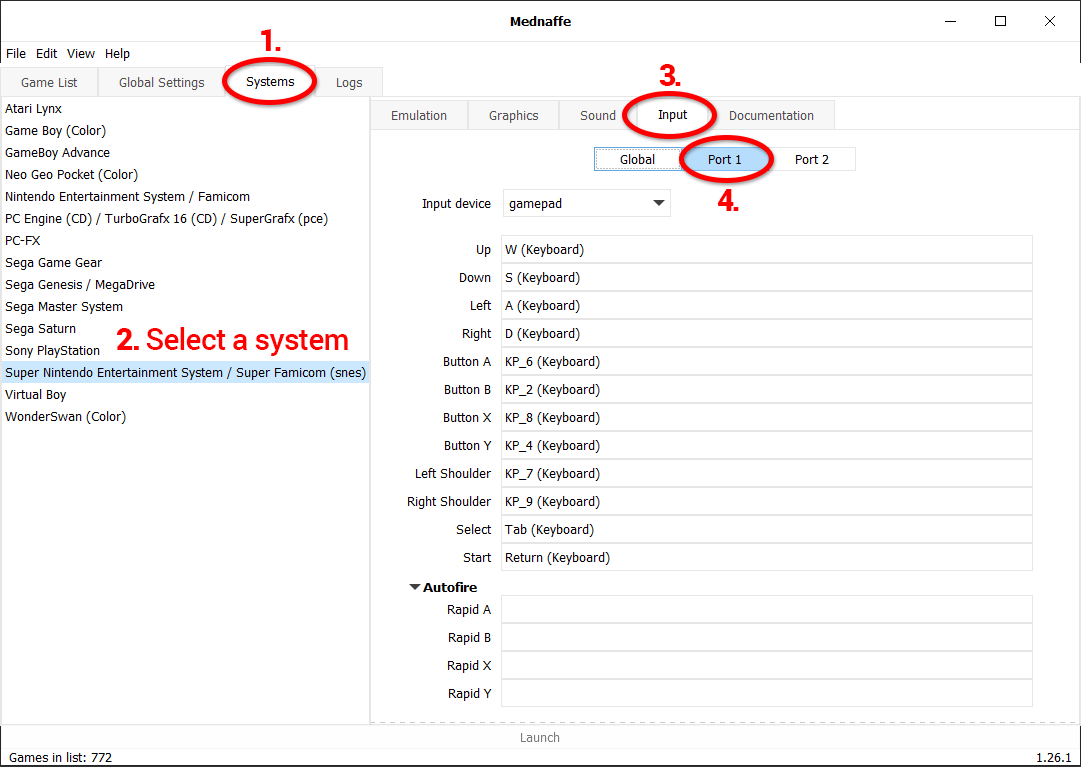
- Click on the Systems tab. You'll see a list of all the systems supported by Mednafen (as shown toward the right).
- Click on the system you want to configure the keys of, then click on the Input tab then Port 1. Here you'll see all the buttons associated with the system and their current button.
- To reconfigure a button to another keyboard key or a gamepad button, click on the keyboard key associated to a button. Then press the new keyboard key or gamepad button you want it set to.
Configuring keys during gameplay
- While a game is running, press Alt+Shift+1 (for player 2 it's Alt+Shift+2).
- Proceed to follow the prompts and press the keyboard key or gamepad button you want to be set for the one displayed. Mednafen presents you a weird sequence like “Gamepad 1: UP (1), Gamepad 1: UP (2), Gamepad 2: RIGHT (1), Gamepad 2: RIGHT (2)”. You need to press each button twice. It's ok if you mess up. Just finish the configuration and start over.
- This process needs to be repeated for every different system you play.
Changing controller type
One area where Mednaffe fails is that its input screen doesn't let you change controller types. For example, its Genesis/Mega Drive emulation defaults to the 3-button controller. But what if you want to use the 6-button controller? Well then, to do that we need to use Mednafen's in-game functions since Mednaffe can't help us do that.
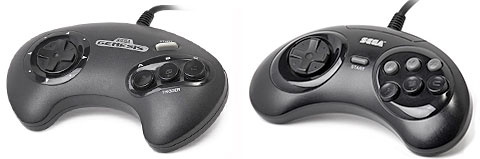
It's quick and easy. While a game is running, press Ctrl+Shift+1 to change the controller type. Then press Alt+Shift+1 to define the keys for this controller.
ESC closes the game!
BE CAREFUL! During gameplay, if you press Esc it will close the game! If you're an emulation enthusiast, you might be used to pressing Esc to bring up the emulator's menu. Not with Mednafen.
Fullscreen
Press Alt+Enter to enter fullscreen. Press Alt+Enter again to go back to window mode. Don't press Esc! That closes the game.
You'll notice fullscreen is not quite fullscreen. You can enlarge the game screen in fullscreen by clicking the Systems tab, click a video game system you want changed, click Graphics, click Fullscreen, then in the Resolution boxes enter “1” - as shown here .
Also keep in mind that you can set it so that games open in fullscreen by default. Just go to Global Settings > Video, and click Enable fullscreen - as shown here .
Screen filters
Screen filters enhance graphics to make them look better than the real thing! They're set on a per system basis, so configuring for one video game system doesn't set it for all of them. Here's how to enable a filter:
- Click on the Systems tab, select a video game system, click the Filters tab, then select a filter in the “Special video scaler” drop-down menu - as shown here .
- Secondly, the screen needs to be enlarged so that the filter has room to work. Click on the Resolution tab for the video game system you're setting a filter for. In this tab look for “Scaling Factor”, as outlined here . In my sample screenshot I have the scaling factor at 4.00, which means I'm enlarging the screen 400%. If you want to you can set a different scaling factor for when Mednafen is in window mode or in fullscreen mode.
- Note: Certain filters work best when you match the scaling factor to their name. For example, “hq4x” and “scale4x” work best when the scaling factor is at 4.00.
The filters
Here is some explanation and samples for these filters below.
- hq2x, hq3x, hq4x: attempts to round pixels together with some blurring. Here's a sample of hq4x:
- scale2x, scale3x, scale4x: attempts to round pixels together without blurring. Here's a sample of scale4x:
- 2xsai, super2xsai, supereagle: smears pixels together with a slight blur. They're all pretty similar with only slight differences. Samples of all three:


Save states
Save states is a feature that saves the exact spot you are in any game. To save your state, just press the F5 key during gameplay. To recall your saved state, press the F7 key.
Mednafen lets you save up to 10 different save states via 10 slots. You access these slots by pressing any number between 0-9. For example, if you want to save a state to slot #3, press 2 on your keyboard then press F5 to save.
Note: The save states feature is not supported with every video game system that Mednafen supports. If you attempt to save a save state and you see a “Save error” message, then save states are not supported for that given system.
Fast forward
Fast forward is the feature that speeds up the game. To access it, hold down the “~” key. Let it go when you want it to stop.
Capturing screenshots
Press F9 to capture a screenshot. Mednafen will dump it to the “snaps” folder as a PNG.
Finding ROMs
In my links page, I have some good links to sites where you can download ROMs. If you want to try to find more sites than what's in my collection of links, just Google around. For example, if you want to download Dracula X just Google “download dracula x pc engine”.
Q: Mednafen isn't saving anything!
If you're using Mednafen for the first time and you're finding that you have all these problems:
- Save states aren't working. You save a state, then when you try to reload it nothing happens.
- In an RPG when you save your game at a save point and close/re-open Mednafen, you find that the save is lost.
- Emulator configurations that you changed such as adding a screen filter aren't saved. When you close/re-open Mednafen, you have to make those configuration changes again.
Then your problem is that you currently have Mednafen in a read-only location on your computer. You must move Mednafen to a more common location such as Documents, Downloads, or a folder on your desktop.